Dodge Journey: Removal
2.4L
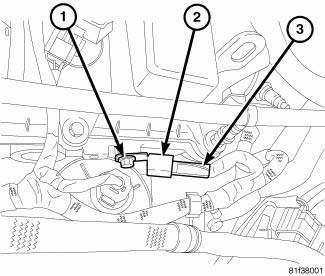
Fig. 3: Capacitor 2.4L
- - Bolt
- - Capacitor
- - Connector
1. Disconnect and isolate negative battery cable at battery.
2. Remove engine cover.
3. Remove electrical connector (3).
4. Remove mounting bolt (1) and ignition capacitor (2).
2.7L 1st
Fig. 4: 1st Ignition Capacitor - 2.7L
1. Disconnect and isolate the negative battery cable.
2. Disconnect the electrical connector.
3. Remove nut and capacitor.
2.7L 2nd
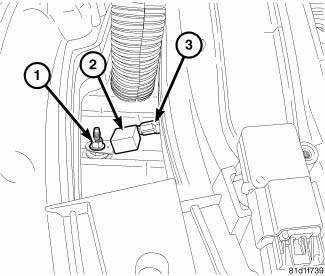
Fig. 5: 2nd Ignition Capacitor - 2.7L
The ignition capacitor is located under the intake manifold on the drivers side of the engine.
1. Disconnect and isolate negative battery cable at battery.
2. Remove electrical connector (3).
3. Remove mounting bolt (1) and ignition capacitor (2).
3.5L
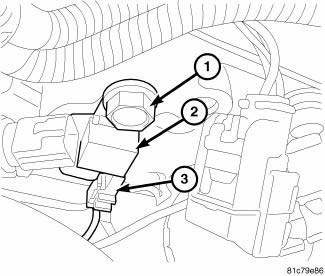
Fig. 6: Ignition Capacitor - 3.5L
The ignition capacitor is located on the drivers side of the engine.
1. Disconnect and isolate negative battery cable at battery.
2. Remove electrical connector (3).
3. Remove mounting bolt (1) and ignition capacitor (2).

 Installation
2.4L
Fig. 7: Capacitor 2.4L
- Bolt
- Capacitor
- Connector
1. Install ignition coil capacitor (2) and bolt (1), tighten bolt to 10 N.m
(88.5 ft. lbs.).
2. Connect electrical connect ...
See also:
VEHICLE MODIFICATIONS/ALTERATIONS
WARNING:
Any modifications or alterations to this vehicle could
seriously affect its roadworthiness and safety and
may lead to an accident resulting in serious injury or
death. ...
Engine diagnosis
ENGINE DIAGNOSIS - INTRODUCTION
Engine diagnosis is helpful in determining the causes of malfunctions not
detected and remedied by routine
maintenance.
These malfunctions may be classified as e ...
Installation
BATTERY HARNESS
Fig. 36: Mounting Clips And TIPM Housing
1. Position the battery harness into the vehicle.
2. One at a time, install the battery harness retaining pushpins, fasteners and
rout ...
