Dodge Journey: Pump, water
Description
2.4L
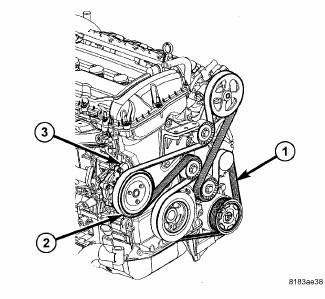
Fig. 80: WATER PUMP - WORLD ENGINE
- - ACCESSORY DRIVE BELT
- - WATER PUMP PULLEY
- - WATER PUMP
The water pump (3) on the world engine is attached to the water pump adapter on the front of the cylinder block.
The water pump is driven by the accessory drive belt. The water pump is connected to the water plenum by the return tube.
DESCRIPTION - 2.7L
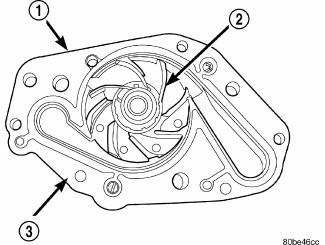
Fig. 81: Water Pump - 2.7L Engine
- - WATER PUMP BODY
- - IMPELLER
- - GASKET
The 2.7L pump has a die cast aluminum housing and a plastic swept vane impeller. It bolts directly to the cylinder block, behind the timing chain cover. The water pump is driven by the back side of the engine's primary timing chain.
Standard Procedure
COOLANT AIR EVACUATION
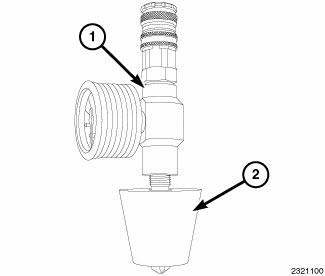
Fig. 82: PRESSURIZED AIR OPERATED VACUUM GENERATOR
Evacuating or purging air from the cooling system involves the use of a pressurized air operated vacuum generator. The vacuum created allows for a quick and complete coolant refilling while removing any airlocks present in the system components.
NOTE: To avoid damage to the cooling system, ensure that no component would be susceptible to damage when a vacuum is drawn on the system.
WARNING: ANTIFREEZE IS AN ETHYLENE GLYCOL BASE COOLANT AND IS HARMFUL IF SWALLOWED OR INHALED. IF SWALLOWED, DRINK TWO GLASSES OF WATER AND INDUCE VOMITING. IF INHALED, MOVE TO FRESH AIR AREA. SEEK MEDICAL ATTENTION IMMEDIATELY. DO NOT STORE IN OPEN OR UNMARKED CONTAINERS. WASH SKIN AND CLOTHING THOROUGHLY AFTER COMING IN CONTACT WITH ETHYLENE GLYCOL. KEEP OUT OF REACH OF CHILDREN. DISPOSE OF GLYCOL BASED COOLANT PROPERLY. CONTACT YOUR DEALER OR GOVERNMENT AGENCY FOR LOCATION OF COLLECTION CENTER IN YOUR AREA. DO NOT OPEN A COOLING SYSTEM WHEN THE ENGINE IS AT OPERATING TEMPERATURE OR HOT UNDER PRESSURE; PERSONAL INJURY CAN RESULT. AVOID RADIATOR COOLING FAN WHEN ENGINE COMPARTMENT RELATED SERVICE IS PERFORMED; PERSONAL INJURY CAN RESULT.
WARNING: WEAR APPROPRIATE EYE AND HAND PROTECTION WHEN PERFORMING THIS PROCEDURE.
NOTE: The service area where this procedure is performed should have a minimum shop air requirement of 80 PSI (5.5 bar) and should be equipped with an air dryer system.
NOTE: For best results, the radiator should be empty. The vehicle's heater control should be set to the heat position (ignition may need to be turned to the on position but do not start the motor).
1. Refer to the Chrysler Pentastar Service Equipment (Chrysler PSE) Coolant Refiller #85-15-0650 or equivalent tool's operating service specification for specific assembly steps.
2. Choose an appropriate adapter cone that will fit the vehicle's radiator filler neck or reservoir tank.
3. Attach the adapter cone (2) to the vacuum gauge (1).
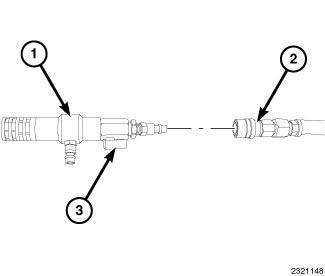
Fig. 83: VACUUM GENERATOR/VENTURI BALL VALVE
4. Make sure the vacuum generator/venturi ball valve (3) is closed and attach an airline hose (2) (minimum shop air requirement of 80 PSI/5.5 bar) to the vacuum generator/venturi (1).
5. Position the adaptor cone/vacuum gauge assembly into the radiator filler neck or reservoir tank. Ensure that the adapter cone is sealed properly.
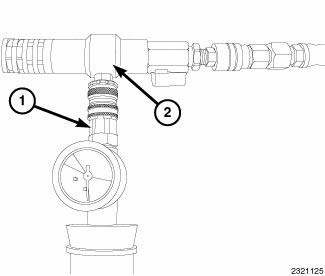
Fig. 84: VACUUM GENERATOR/VENTURI
6. Connect the vacuum generator/venturi (2) to the positioned adaptor cone/vacuum gauge assembly (1).
7. Open the vacuum generator/venturi ball valve.
NOTE: Do not bump or move the assembly as it may result in loss of vacuum.
Some radiator overflow hoses may need to be clamped off to obtain vacuum.
8. Let the system run until the vacuum gauge shows a good vacuum through the cooling system. Refer to the tool's operating service information for appropriate pressure readings.
NOTE: If a strong vacuum is being created in the system, it is normal to see the radiator hoses to collapse.
9. Close the vacuum generator/venturi ball valve.
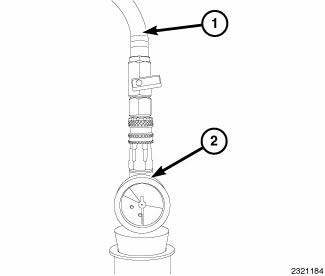
Fig. 85: VACUUM GENERATOR/VENTURI AND AIR LINE
10. Disconnect the vacuum generator/venturi and airline from the adaptor cone/vacuum gauge assembly.
11. Wait approximately 20 seconds, if the pressure readings do not move, the system has no leaks. If the pressure readings move, a leak could be present in the system and the cooling system should be checked for leaks and the procedure should be repeated.
12. Place the tool's suction hose into the coolant's container.
NOTE: Ensure there is a sufficient amount of coolant, mixed to the required strength/protection level available for use. For best results and to assist the refilling procedure, place the coolant container at the same height as the radiator filler neck. Always draw more coolant than required. If the coolant level is too low, it will pull air into the cooling system which could result in airlocks in the system.
13. Connect the tool's suction hose (1) to the adaptor cone/vacuum gauge assembly (2).

Fig. 86: SUCTION HOSE BALL VALVE
14. Open the suction hose's ball valve to begin refilling the cooling system.
15. When the vacuum gauge reads zero, the system is filled.
NOTE: On some remote pressurized tanks, it is recommended to stop filling when the proper level is reached.
16. Close the suction hose's ball valve and remove the suction hose from the adaptor cone/vacuum gauge assembly.
17. Remove the adaptor cone/vacuum gauge assembly from the radiator filler neck or reservoir tank.
18. With heater control unit in the HEAT position, operate engine with container cap in place.
19. After engine has reached normal operating temperature, shut engine off and allow it to cool. When engine is cooling down, coolant will be drawn into the radiator from the pressure container.
20. Add coolant to the recovery bottle/container as necessary. Only add coolant to the container when the engine is cold. Coolant level in a warm engine will be higher due to thermal expansion. Add necessary coolant to raise container level to the COLD MINIMUM mark after each cool down period.
21. Once the appropriate coolant level is achieved, attach the radiator cap or reservoir tank cap.
Removal
2.4L ENGINE

Fig. 87: WATER PUMP - WORLD ENGINE
- - WATER PUMP
- - MOUNTING BOLT
- - WATER INLET TUBE NUTS
- - INLET WATER TUBE
1. Remove the accessory drive belt.
2. Raise vehicle.
3. Remove accessory drive belt splash shield.
4. Drain cooling system.
5. Remove screws attaching water pump pulley (1). Remove pulley (1).
6. Remove water pump mounting bolts (2).
7. Remove water pump (3).
2.7L ENGINE

Fig. 88: WATER PUMP - 2.7L
- - WATER PUMP
- - BOLTS
- - BOLTS
WARNING: Do not remove pressure cap with the system hot and pressurized. Serious burns from coolant can result.
1. Disconnect negative battery cable.
2. Drain cooling system.
NOTE: The water pump is driven by the primary timing chain.
3. Remove the timing chain cover, timing chain, and all chain guides.
4. Remove bolts attaching water pump to block.
5. Remove water pump and gasket.
3.5L ENGINE
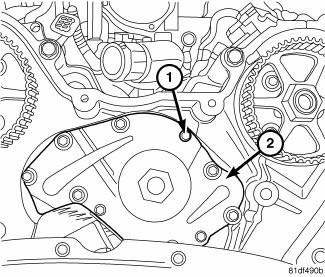
Fig. 89: WATER PUMP - 3.5L
- - MOUNTING BOLTS
- - WATER PUMP
NOTE: It is normal for the water pump to weep a small amount of coolant from the weep hole (black stain on water pump body). Do not replace the water pump if this condition exists. Replace the water pump if a heavy deposit or a steady flow of engine coolant is evident on water pump body from the weep hole (shaft seal failure). Be sure to perform a thorough analysis before replacing water pump.
1. Drain cooling system.
2. Remove engine timing belt.
3. Remove water pump mounting bolts. Note position of longer bolt for proper re-installation.
4. Remove water pump body from engine.
5. Clean water pump mounting surface.
2.0L DIESEL
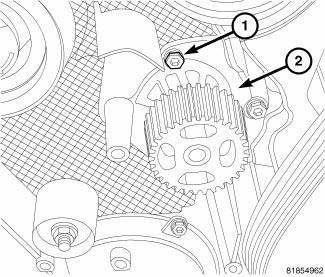
Fig. 90: WATER PUMP - 2.0L DIESEL
- - BOLT
- - WATER PUMP
1. Remove timing chain.
2. Remove water pump mounting bolts (1).
3. Remove water pump (2).
4. Remove O-ring from water pump.
Cleaning
Clean gasket mating surfaces as necessary.
Inspection
INSPECTION - 2.7L
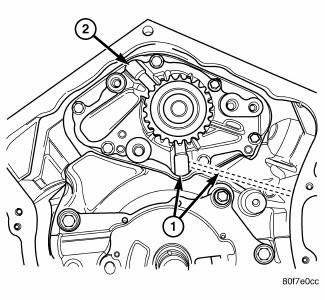
Fig. 91: WATER PUMP WEEP PASSAGES - 2.7L
- - PRIMARY WEEP PASSAGE
- - SECONDARY WEEP PASSAGE
Inspect and replace the water pump if it has any of the following defects:
1. Damage or cracks on the pump body.
2. Coolant leaks: If the shaft seal is leaking, this will be evident by traces of thick deposits of dried glycol running down from the pump primary weep passage. A thin black stain below the pump primary weep hole/passage is considered normal operation.
3. Coolant leaks: If the pump primary weep passage is plugged, coolant may come from the secondary weep passage and collect in the valley of the engine. The coolant will eventually run out the back side of the engine. Leakage from the secondary weep passage may give false indications that core plug(s) may be leaking on the back side of the engine block. If this condition is found, clean the primary weep passage of debris.
4. Impeller rubs inside of cylinder block.
5. Excessively loose or rough turning bearing.
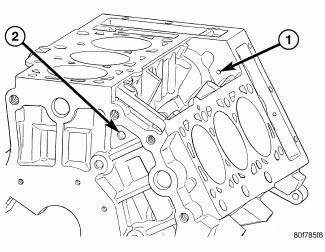
Fig. 92: SECONDARY WATER PUMP WEEP PASSAGE - 2.7L
- - WEEP PASSAGE TO VALLEY OF BLOCK
- - HOLE IN REAR OF BLOCK
NOTE: It is normal for the water pump to weep a small amount of coolant from the primary weep hole (black stain at weep passage). Do not replace the water pump if this condition exists. Replace the water pump if a heavy deposit or a steady flow of engine coolant is evident from the primary weep passage.
This indicates a shaft seal failure and pump must be replaced. Coolant may leak from the secondary weep passage and fill the valley of the engine. If this condition is found, clean the primary weep passage of debris. Be sure to perform a thorough analysis before replacing water pump.
Disassembly
WATER PUMP - GAS ENGINE

Fig. 93: WATER PUMP ASSEMBLY
1. Remove the water pump assembly from the vehicle.
2. Discard the water pump outlet gasket (7).
3. Remove the three bolts (1) attaching the water pump pulley (2) to the water pump (4).
4. Remove the water pump pulley (2).
5. Remove the five bolts (3) attaching the water pump (4) to the water pump adapter (6).
6. Remove and discard the gasket (8).
7. Remove the water pump (4) and inspect carefully for any damage.
Assembly
WATER PUMP - GAS ENGINE
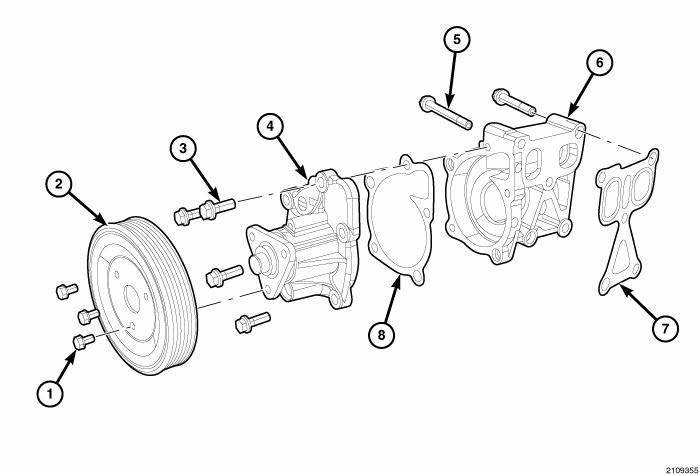
Fig. 94: WATER PUMP ASSEMBLY
1. Thoroughly clean all gasket mating surfaces before assembling.
2. Inspect water pump and components for any damage.
3. Using bolts (3), install the water pump (4) and gasket (8) to the water pump adapter (6). Tighten the bolts (3) to 22 N-m (16 lbs. ft.) 4. Using bolts (1), install the water pump pulley (2) to the water pump (4). Tighten the bolts (1) to 9 N-m (80 lbs. in.) 5. Using bolts (5), install the water pump assembly and gasket to the engine block. Tighten the bolts to 24 N.m (18 lbs. ft.). 6. Start the engine and check for leaks.
Installation
2.4L ENGINE
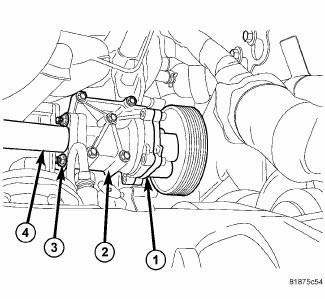
Fig. 95: WATER PUMP - WORLD ENGINE
- - WATER PUMP
- - MOUNTING BOLT
- - WATER INLET TUBE NUTS
- - INLET WATER TUBE
1. Position water pump assembly (1) and gasket onto cylinder block.
2. Position water inlet tube (4) and gasket onto water pump (1).
3. Install mounting bolts (2). Tighten bolts to 25.5 N.m (225 in. lbs.).
4. Install drive belt splash shield.
5. Lower vehicle.
6. Install accessory drive belt.
7. Evacuate air and refill cooling system.
8. Check cooling system for leaks.
2.7L ENGINE
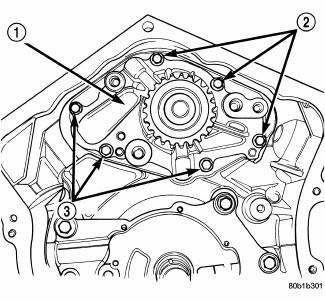
Fig. 96: WATER PUMP - 2.7L
- - WATER PUMP
- - BOLTS
- - BOLTS
1. Clean all sealing surfaces.
2. Install water pump and gasket. Tighten mounting bolts to 12 N.m (105 in. lbs.).
3. Install timing chain guides, timing chain, and timing chain cover.
4. Reconnect negative battery cable.
5. Evacuate air and refill cooling system.
6. Check cooling system for leaks.
3.5L ENGINE
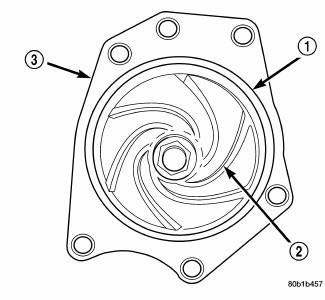
Fig. 97: WATER PUMP - 3.5L ENGINE
- - O-RING
- - IMPELLER
- - WATER PUMP BODY
1. Clean all O-ring surfaces on pump and cover.
2. Install new O-ring on water pump.
3. Position water pump to engine.
4. Install mounting bolts and tighten to 12 N.m (105 in. lbs.).
5. Install timing belt. 6. Evacuate air and refill cooling system.
7. Check cooling system for leaks.
2.0L DIESEL

Fig. 98: WATER PUMP - 2.0L DIESEL
- - BOLT
- - WATER PUMP
1. Clean the O-ring mating surfaces on water pump (2) and front of timing chain cover.
2. Install O-ring onto water pump (2).
3. Apply a small amount of petroleum jelly to lubricate O-ring.
4. Install water pump and mounting bolts. Tighten bolts (1) to mounting bolts to 24 N.m (18 ft. lbs.).
5. Install timing belt.
6. Evacuate air and refill cooling system.
7. Check cooling system for leaks.
 Housing, coolant outlet
Removal
Fig. 78: COOLANT OUTLET CONNECTOR - 2.7L
- BOLT (2)
- BOLT (2)
- COOLANT OUTLET CONNECTOR
WARNING: Do not remove pressure cap with the system hot and under
pressure
...
 Radiator, engine cooling
Description
Fig. 99: COOLING SYSTEM - OVERVIEW
- WINDSHIELD WASHER RESERVOIR
- UPPER SUPPORT
- FAN SHROUD
- FAN MOTOR
- LOWER RADIATOR HOSE
All vehicles are equipped with a cross flo ...
See also:
Removal
LEFT-HAND DRIVE
NOTE: The ABM is only separately serviceable for non-HSA (Hill Start
Assist) equipped
vehicles. Do not remove the ABM for vehicles equipped with HSA.
1. Disconnect the nega ...
VEHICLE MODIFICATIONS/ALTERATIONS
WARNING:
Any modifications or alterations to this vehicle could
seriously affect its roadworthiness and safety and
may lead to an accident resulting in serious injury or
death. ...
Removal
WARNING: Review safety precautions and warnings in this part
before performing
this procedure. Failure to
follow the warnings and cautions could result in possible serious or
fata ...
