Dodge Journey: Insulator, engine mount, right
Removal

Fig. 243: Belly Pan
1. Remove the belly pan (2).
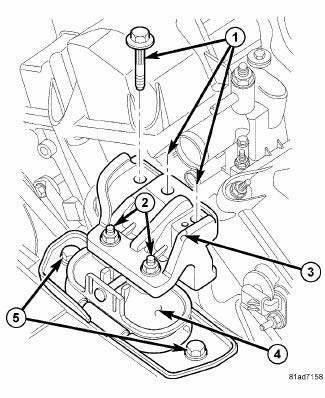
Fig. 244: Right Engine Mount
2. Lower vehicle. Remove the load on the engine motor mounts by carefully supporting the engine assembly from below.
3. Remove coolant recovery container.
4. Disconnect the ground strap.
5. Remove the right engine support bracket vertical fasteners (1) and (2) and remove support bracket (3).
6. Remove the bolts (5) attaching the right isolator (4) to the frame rail.
7. Remove right isolator (4).
Installation

Fig. 245: Right Engine Mount
1. Position right isolator (4) and install the isolator to frame rail bolts (5). Tighten bolts to 55 N.m (40 ft.lbs.).
2. Install the engine support bracket (3) and bolts (1). Tighten bolts to 50 N.m (37 ft. lbs).
3. Install the support bracket to isolator nuts (2) and tighten to 30 N.m (22 ft. lbs).
4. Reconnect the ground strap.

Fig. 246: Belly Pan
5. Raise vehicle on a hoist.
6. Install the belly pan (2).
7. Install coolant recovery container.
 Insulator, engine mount, rear
Removal
Fig. 234: Belly Pan
1. Remove throttle body air inlet hose and air cleaner housing assembly.
2. Raise the vehicle.
3. Remove the belly pan (2).
Fig. 235: Identifying Rear Mount B ...
 Lubrication
...
See also:
Fan, cooling
Description
Fig. 67: COOLING SYSTEM - OVERVIEW
- WINDSHIELD WASHER RESERVOIR
- UPPER SUPPORT
- FAN SHROUD
- FAN MOTOR
- LOWER RADIATOR HOSE
The radiator fan module includes a support ...
Installation
Fig. 51: Front Hub And Bearing Mounting
1. If required, install the hub and bearing (1) by sliding it into the
knuckle.
2. If installing hub and bearing, install the four bolts (2) fastening t ...
ALL WHEEL DRIVE (AWD) — IF EQUIPPED
This feature provides on-demand All-Wheel Drive
(AWD). The system is automatic with no driver inputs or
additional driving skills required. Under normal driving
conditions, the front wheels provide ...
