Dodge Journey: Installation
BATTERY HARNESS
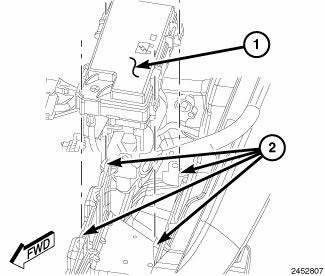
Fig. 36: Mounting Clips And TIPM Housing
1. Position the battery harness into the vehicle.
2. One at a time, install the battery harness retaining pushpins, fasteners and routing clips until the harness is installed exactly where it was in the vehicle.
3. Position the battery harness cable (2) onto the TIPM stud (3). Install the retaining nut (1) and tighten to 10 N.m (90 in. lbs.)
4. Install the TIPM on the bracket posts, push down until you hear a click.
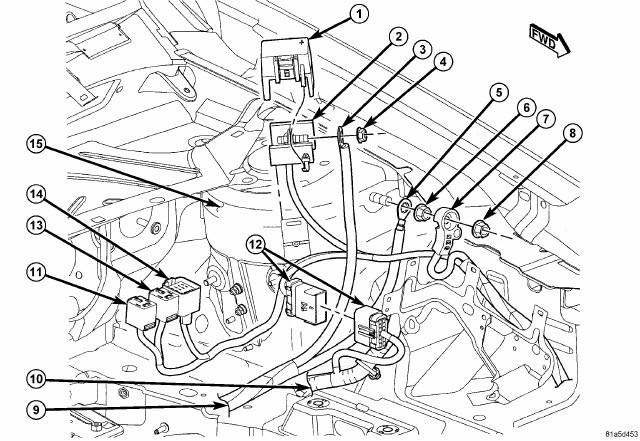
Fig. 37: View Of Battery Harness & Attachments - Diesel Shown, Gasoline
Similar
NOTE: Diesel battery harness shown in illustration, gasoline battery harness similar.
5. On diesel engine equipped vehicles:
- Connect the glow plug module connector (14)
- Connect the cabin heater relay connectors (11 and 13)
- Connect the in-line connector to the instrument panel harness (12)
6. Install the remote positive battery terminal (2) onto the mounting bracket on the left strut tower (15) by pushing straight down until fully engaged.
7. Remove the cover (1) from the remote positive battery terminal (2). Position the starter harness positive cable (3) onto the remote positive battery post. Install the retaining nut (4) and tighten to 16.5 N.m (145 in. lbs.) Install the cover (1) onto the remote positive battery terminal (2).
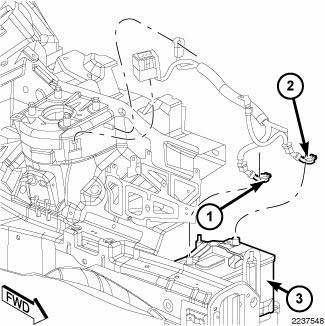
Fig. 38: Battery And Pinch Clamp Bolts
8. Raise vehicle on hoist. 9. Install the battery.
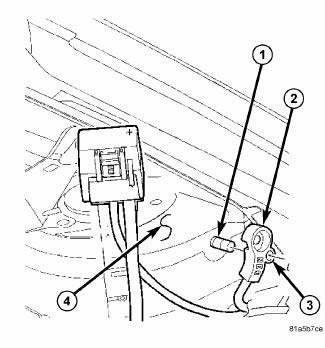
Fig. 39: Identifying Battery Cables & Terminals
10. Lower the vehicle.
11. Install the negative battery cable remote terminal (2) onto the remote battery post (1). Install the nut (3) and tighten to 16.5 N.m (145 in. lbs.)
STARTER HARNESS
WARNING: To protect the hands from battery acid, a suitable pair of heavy duty rubber gloves should be worn when removing or servicing a battery.
Safety glasses also should be worn.
WARNING: Remove metallic jewelry to avoid injury by accidental arcing of battery current.
CAUTION: The negative battery cable remote terminal (2) must be disconnected and isolated from the remote battery post (1) prior to service of the vehicle electrical systems. The negative battery cable remote terminal can be isolated by using the supplied isolation hole (3) in the terminal casing.

Fig. 40: Identifying Starter Harness Negative Cable Retaining Nut & Cable
1. Remove and isolate the battery harness negative cable (4) on something other than the remote negative battery post (1).
2. Position the starter harness into the vehicle.
3. One at a time, install the starter harness retaining pushpins, fasteners and routing clips until the harness is installed exactly where it was in the vehicle.
4. Position the starter harness negative cable (2) onto the remote negative battery post (1). Install the retaining nut (3) and tighten to 16.5 N.m (145 in. lbs.)
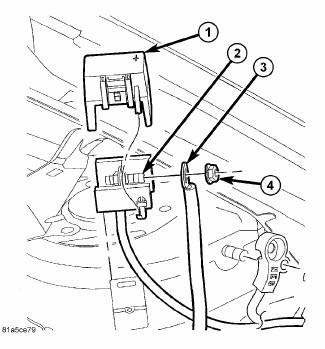
Fig. 41: Identifying Positive Cable Retaining Nut & Cable
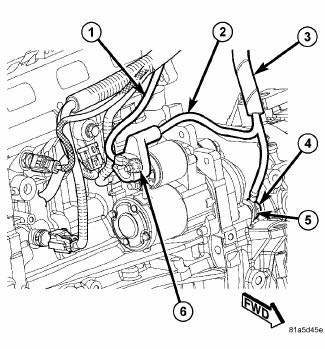
Fig. 42: Identifying Starter & Cables
Remove the cover (1) from the remote positive battery terminal (2). Position the starter harness positive cable (3) onto the remote positive battery post. Install the retaining nut (4) and tighten to 16.5 N.m (145 in. lbs.) Install the cover (1) onto the remote positive battery terminal (2).
5. Raise vehicle on hoist.
6. Position the starter harness positive cable (2) onto the starter positive battery post. Install the retaining nut (6) and tighten to 13 N.m (115 in. lbs.)
7. Position the starter harness negative cable (5) onto the engine block. Install the retaining bolt (4) and tighten to 16.5 N.m (145 in. lbs.)
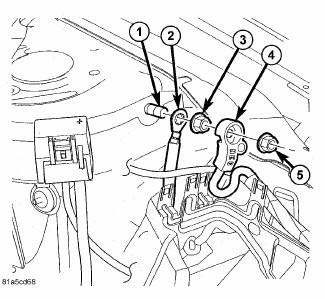
Fig. 43: Identifying Starter Harness Negative Cable Retaining Nut & Cable
8. Lower the vehicle.
9. Position the negative battery harness cable remote terminal (4) onto the remote battery post (1). Install the nut (5) and tighten to 16.5 N.m (145 in. lbs.)
 Removal
BATTERY HARNESS
WARNING: To protect the hands from battery acid, a suitable pair
of heavy duty
rubber gloves should be worn when removing or servicing a battery.
Safety glasses als ...
 Tray, battery
DESCRIPTION
The battery is placed and secured in a stamped steel battery tray. The
battery tray is located in the left front side
of the vehicle, just ahead of the left front wheel and tire assemb ...
See also:
Fascia, front lower, closeout
REMOVAL
Fig. 11: Lower Fascia
1. Remove fasteners (5) to lower closeout.
Fig. 12: Push Pins - Front Lower Fascia
2. Remove push pins (1) to lower closeout.
3. Remove the front lower fascia.
...
AUTOSTICK — IF EQUIPPED
AutoStick is a driver-interactive transmission that offers
six manual ratio changes to provide you with more
control of the vehicle. AutoStick allows you to maximize
engine braking, eliminate undes ...
Installation
NOTE: Before stabilizer bar installation, inspect the cushions and
links for excessive
wear, cracks, damage and distortion. Replace any pieces failing inspection.
NOTE: Before installing the ...
