Dodge Journey: Removal
1. Disconnect and isolate battery negative cable from battery post.
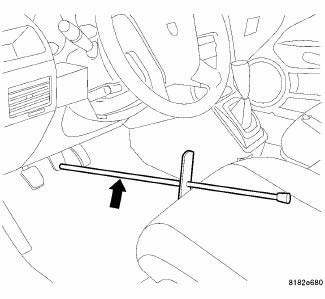
Fig. 70: BRAKE PEDAL HOLDING TOOL
2. Using a brake pedal holding tool as shown, depress brake pedal past its first inch of travel and hold it in this position. Holding pedal in this position will isolate master cylinder from hydraulic brake system and will not allow brake fluid to drain out of brake fluid reservoir while brake lines are open.
3. Raise and support vehicle.
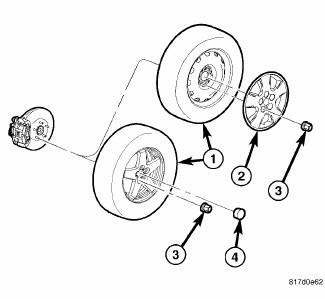
Fig. 71: TIRE AND WHEEL MOUNTING
4. Remove wheel mounting nuts (3), then tire and wheel assembly (1).
5. Manually release the parking brake cable tension.
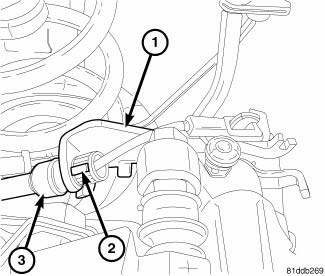
Fig. 72: PARKING BRAKE CABLE AT BRACKET
6. Collapse the cable retainer fingers (2) at the end of the cable housing (3), then pull the cable housing out of the mounting bracket (1).
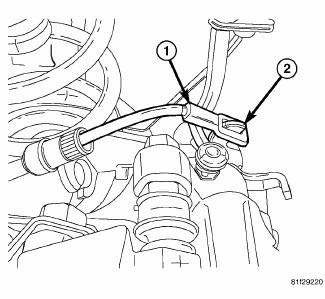
Fig. 73: PARKING BRAKE CABLE AT LEVER
7. Slide the cable strand out of the mounting bracket, then pull the parking brake cable strand (1) upward and unhook it from the caliper lever (2).
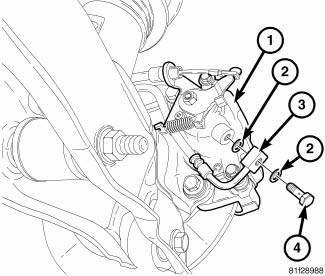
Fig. 74: BRAKE HOSE MOUNTING TO CALIPER
8. Remove the banjo bolt (4) connecting the brake flex hose (3) to the brake caliper (1). There are two washers (2) that will come off with the banjo bolt. Discard the washers. They should not be reused.
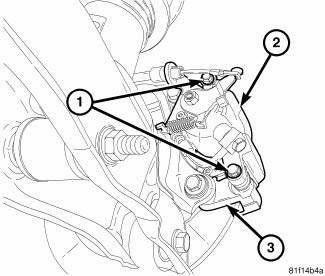
Fig. 75: REAR CALIPER MOUNTING
CAUTION: When removing or installing a caliper guide pin bolt, it is necessary to hold the guide pin stationary while turning the bolt. Hold the guide pin stationary using a wrench placed upon the pin's hex-shaped head.
9. Remove two caliper guide pin bolts (1).
10. Slide the disc brake caliper (2) from the disc brake adapter bracket (3) and brake pads.
CLEANING
WARNING: Chrysler LLC does not manufacture any vehicles or replacement parts that contain asbestos. Aftermarket products may or may not contain asbestos. Refer to aftermarket product packaging for product information.
Whether the product contains asbestos or not, dust and dirt can accumulate on brake parts during normal use. Follow practices prescribed by appropriate regulations for the handling, processing and disposing of dust and debris.
To clean or flush the internal passages of the brake caliper, use fresh brake fluid or Mopar Non-Chlorinated Brake Parts Cleaner. Never use gasoline, kerosene, alcohol, oil, transmission fluid or any fluid containing mineral oil to clean the caliper. These fluids will damage rubber cups and seals.
INSPECTION
Inspect the disc brake caliper for the following:
- Brake fluid leaks in and around piston boot area
- Ruptures, brittleness or damage to the piston dust boot
If caliper fails inspection, disassemble and recondition caliper, replacing the seals and dust boots.
 Installation
CAUTION: When installing a NEW brake caliper it is necessary to
bleed the brakes
using a special procedure which has been integrated to this installation
procedure.
Fig. 76: R ...
See also:
Operation
The standard front and available rear heating-A/C systems used in this
vehicle are blend-air type systems. In a
blend-air system, a blend-air door controls the amount of conditioned air that
is a ...
Removal
2.0L TURBO DIESEL
Fig. 2: Generator Cables
1. Remove engine cover.
2. Disconnect and isolate the negative battery cable.
3. Remove accessory drive belt.
4. Disconnect battery cable fro ...
Installation
Fig. 101: Check For Stretched Bolts
- STRETCHED BOLT
- THREADS ARE NOT STRAIGHT ON LINE
- THREADS ARE STRAIGHT ON LINE
- UNSTRETCHED BOLT
NOTE: The cylinder head bolts (4) are tighte ...

