Dodge Journey: Removal, Installation
REMOVAL
WARNING: Refer to the applicable warnings and cautions for this system before performing the following operation. Failure to follow the warnings and cautions may result in possible serious or fatal injury.
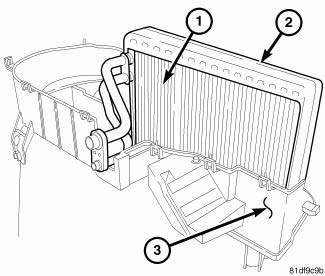
NOTE: The HVAC housing assembly must be removed from vehicle and disassembled for service of the A/C evaporator.

Fig. 239: Evaporator Removal/Installation
NOTE: LHD model shown. RHD model similar.
1. Remove the HVAC housing and place it on a workbench.
2. Disassemble the HVAC housing to gain access to the A/C evaporator.
NOTE: If the foam insulator around the A/C evaporator is deformed or damaged, the insulator must be replaced.
3. Carefully lift the A/C evaporator (1) and the foam insulator (2) out of the lower half of the HVAC housing (3).
INSTALLATION
CAUTION: Be certain to adjust the refrigerant oil level when servicing the A/C refrigerant system. Failure to properly adjust the refrigerant oil level will prevent the A/C system from operating as designed and can cause serious A/C compressor damage.
NOTE: When replacing multiple A/C system components, refer to the REFRIGERANT OIL CAPACITIES to determine how much oil should be added to the refrigerant system.
NOTE: If only the A/C evaporator is being replaced, add 10 milliliters (0.3 fluid ounce) of refrigerant oil to the refrigerant system. Use only refrigerant oil of the type recommended for the A/C compressor in the vehicle.
NOTE: Replacement of the refrigerant line O-ring seals and gaskets is required anytime a refrigerant line is disconnected. Failure to replace the rubber O-ring seals and metal gaskets could result in a refrigerant system leak.
NOTE: LHD model shown. RHD model similar.

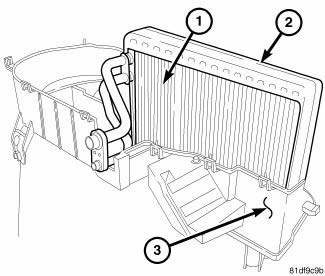
Fig. 240: Evaporator Removal/Installation
NOTE: Make sure that the foam insulator is properly positioned around the A/C evaporator and in the HVAC housing.
1. Carefully install the A/C evaporator (1) and foam insulator (2) into the lower half of the HVAC housing (3).
2. Assemble the HVAC housing.
3. Install the HVAC housing.
4. If the A/C evaporator is being replaced, add 10 milliliters (0.3 fluid ounce) of refrigerant oil to the refrigerant system. When replacing multiple A/C system components, refer to the REFRIGERANT OIL CAPACITIES to determine how much oil should be added to the refrigerant system. Use only refrigerant oil of the type recommended for the A/C compressor in the vehicle.
 Description, Operation
DESCRIPTION
Fig. 238: Evaporator Description
NOTE: LHD model shown. RHD model similar.
The A/C evaporator (1) for the heating-A/C system is mounted in the HVAC
housing, which is located be ...
 Line, A/C discharge
DESCRIPTION
Fig. 241: Discharge Line Description
NOTE: 2.7L shown. Other engines similar.
The A/C discharge line (2) is the refrigerant line that carries refrigerant
from the A/C compresso ...
See also:
Installation
NOTE: Perform 1 through 5 on each side of the vehicle to complete pad
set installation,
then proceed to 6.
NOTE: Make sure that the audible wear indicator (if equipped) is placed
toward ...
DOOR LOCKS
Manual Door Locks
To lock each door, push the door lock plunger on each
door trim panel downward. To unlock the front doors,
pull the inside door handle to the first detent. To unlock
the rear doo ...
Indicators
Indicators are located in various positions within the CCN and are all
connected to the CCN electronic circuit
board. All indicators, except the inverter indicator (if equipped), are
controlled b ...
