Dodge Journey: Crossmember, rear suspension
REMOVAL
1. Raise and support the vehicle.

Fig. 52: Tire And Wheel Mounting
2. On each side of the vehicle, remove the wheel mounting nuts (3), then the front tire and wheel assembly (1).

Fig. 53: Hub Nut And Washer
3. If equipped with all-wheel-drive, remove the cotter pin (2) from the hub nut (3) on the end of the axle half shaft. While a helper applies the brakes to keep the hub (1) from rotating, remove the hub nut (3) and washer (4) from the axle half shaft.
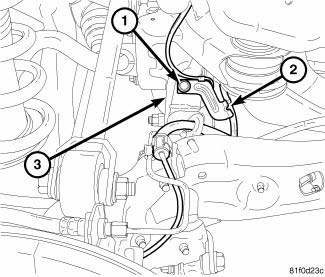
Fig. 54: Wheel Speed Sensor Routing Clamp
4. On each side of the vehicle, remove the screw (1) fastening the wheel speed sensor routing clamp (2) to the rear suspension crossmember (3).
5. Remove the exhaust system from the vehicle.
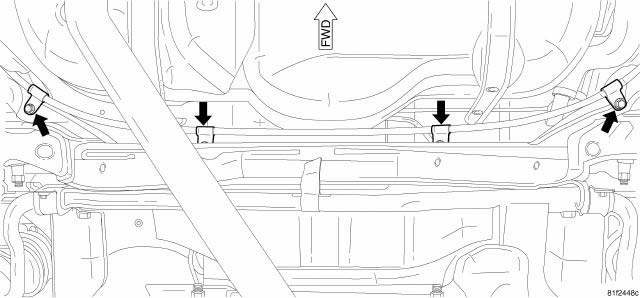
Fig. 55: Right Cable At Crossmember
6. Remove the screws securing the four right rear parking brake cable routing clamps to the rear crossmember.
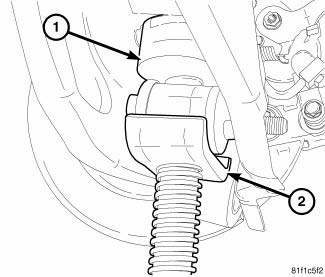
Fig. 56: Supporting Rear Shock
7. On each side of the vehicle, if equipped with load-leveling shocks, support the lower shock (1) with a jack (2) using just enough force to allow easy removal of the lower shock mounting bolt in the following step. Lower the jack following bolt removal.
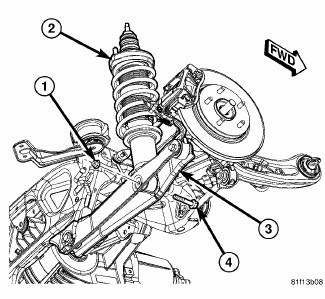
Fig. 57: Rear Lower Shock Mounting
8. On each side of the vehicle, remove the lower shock mounting nut (1) and bolt (4).
9. If equipped with all-wheel-drive, remove the rear driveline module, but instead of using a drive-on hoist, place jacks under the outboard ends of the lower control arms and adjust the rear suspension height at the hub and bearings to simulate curb riding height. Once the rear driveline module is removed, remove the jacks.
10. If equipped with all-wheel-drive, slide the half shaft out of the hub and bearing on each side of the vehicle and remove it.

Fig. 58: Rear Stabilizer Bar Retainer
11. On each side of the vehicle, while holding the stabilizer bar link upper stud stationary, remove the nut (2) securing the link (4) to the stabilizer bar (3).
12. On each side of the vehicle, remove the screws (1) securing the stabilizer bar retainer (5) to the crossmember.
13. Remove the stabilizer bar (3) from the vehicle.
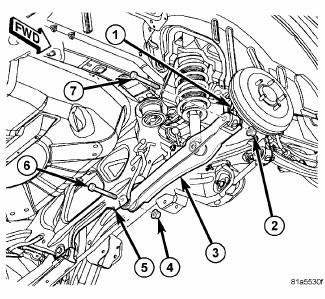
Fig. 59: Rear Lower Control Arm Mounting
14. On each side of the vehicle:
- Loosen (do not remove) the nut (2) and bolt (7) securing the lower control arm (3) to the knuckle (1).
- Remove the nut (4) and bolt (6) securing the lower control arm (3) to the rear crossmember (5).
- Swing the lower control arm down away from the rear crossmember.
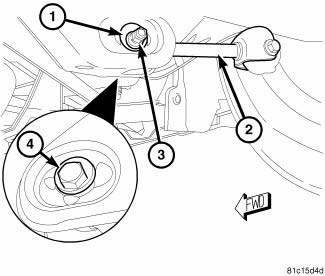
Fig. 60: Rear Toe Adjustment Cam Bolt
15. On each side of the vehicle:
- Mark the position of the cam bolt (4) cams on the crossmember using a paint marker or crayon. Do not use any type marker that will scratch or damage the surface of the crossmember.
- While holding the cam bolt (4) head stationary, loosen and remove the toe link mounting cam bolt nut (3) and washer (1). Remove the cam bolt.
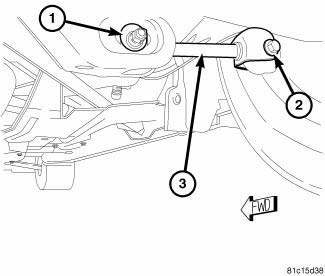
Fig. 61: Toe Link
16. On each side of the vehicle, loosen (do not remove) the mounting bolt (2) and nut securing the toe link (3) to the knuckle.
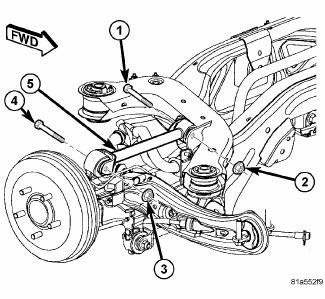
Fig. 62: Upper Control Arm Mounting
17. On each side of the vehicle:
- Loosen (do not remove) the nut (3) and bolt (4) securing the upper control arm (5) to the knuckle.
- Remove the nut (2) and bolt (1) securing the upper control arm (5) to the crossmember.
18. On each side of the vehicle, using wire or a bungee cord, support the knuckle to keep it from sagging.
NOTE: Before lowering the rear suspension crossmember, the location of the crossmember must be marked on the body of the vehicle. Do this so the crossmember can be relocated, upon reinstallation, against the body of vehicle in the same location as before removal. If the crossmember is not reinstalled in exactly the same location as before removal, the rear wheel alignment settings may be lost.
19. Using a crayon or marker that will not break the paint surface, mark the location of the rear suspension crossmember on the body near each mounting bolt. Do not use any type of sharp instrument that will damage the underbody of the vehicle.
20. Support the crossmember with a transmission jack. Secure the crossmember to the jack.
21. Remove the two mounting screws securing each crossmember reinforcement bracket (one each side of vehicle) to the body.
22. Remove the mounting nuts securing the crossmember reinforcement brackets to the crossmember rear mounting bolts. Remove the brackets.
23. Remove the four mounting bolts securing the crossmember to the body.
24. Slowly lower the crossmember using the jack.
INSTALLATION
1. Support the rear suspension crossmember with a transmission jack. Secure the crossmember to the jack.
2. Slowly raise the crossmember into mounted position using the transmission jack matching the crossmember to the marked locations on the body made during removal. As the crossmember is raised, guide the rear suspension components into place.
3. Install the four mounting bolts (rear bolts have stud heads) securing the crossmember to the body. Tighten the crossmember mounting bolts to 95 N.m (70 ft. lbs.).
4. Position the crossmember reinforcement brackets (one each side of vehicle) over the crossmember rear mounting bolt head-studs and install the mounting nuts, but do not tighten at this time.
5. Install the mounting screws securing the crossmember reinforcement brackets to the body. Tighten the screws to 55 N.m (41 ft. lbs.).
6. Tighten the mounting nuts securing the reinforcement brackets to the rear crossmember mounting bolts to 50 N.m (37 ft. lbs.).
7. Remove the transmission jack.

Fig. 63: Upper Control Arm Mounting
8. On each side of the vehicle, position the upper control arm (5) and install the bolt (1) and nut (2) securing the arm to the crossmember. Do not tighten either upper control arm mounting bolts at this time.

Fig. 64: Rear Toe Adjustment Cam Bolt
CAUTION: When installing the cam bolt (4) and washer make sure the cams stay inside the abutments built into the crossmember. Failure to do so can damage the abutments and make toe adjustment difficult.
9. On each side of the vehicle:
- Position the toe link (2) and install the cam bolt (4) from the front through the crossmember and link. Match the cam on the bolt to the marks made during removal or position the top of the cam to the 12 O'clock position if not available.
- Install the cam washer (1) and nut (3) securing the toe link (2) to the crossmember. Do not tighten at this time.

Fig. 65: Rear Lower Control Arm Mounting
10. On each side of the vehicle, position the lower control arm (3) and install the bolt (6) and nut (4) securing the lower control arm to the crossmember (5). Do not tighten nut and bolt at crossmember or knuckle at this time.
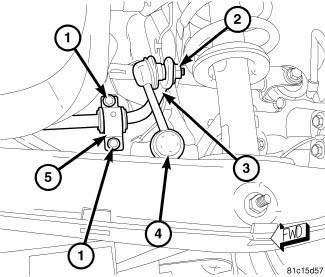
Fig. 66: Rear Stabilizer Bar Retainer
NOTE: When installing the stabilizer bar on a vehicle with all-wheel-drive, position the bar so that the bar loops over the axle half shafts once installed, not under the axle half shafts.
11. Position the stabilizer bar (3) on the rear crossmember.
CAUTION: Before installing the screws in the following step, it is especially important to clean the threads and apply Mopar Lock AND Seal Adhesive or equivalent.
12. Install the two retainers (5 - right side shown in illustration) over the cushions at the mounting holes and install the retainer screws (1). Do not tighten the screws at this time.
CAUTION: Before installing the nut in the following step, it is especially important to clean the threads and apply Mopar Lock AND Seal Adhesive or equivalent.
13. On each side of the vehicle, install the stabilizer link (4) upper stud in the end of the stabilizer bar (3).
Install the nut (2) on the upper stud and while holding the stabilizer link stud stationary, tighten the nut to 48 N.m (35 ft. lbs.).
14. On each side of the vehicle, tighten the stabilizer bar retainer screws (1) to 25 N.m (18 ft. lbs.).
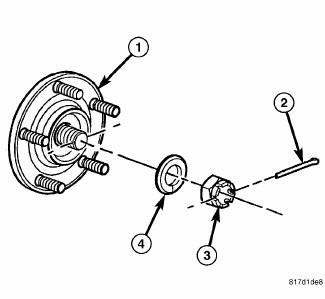
Fig. 67: Hub Nut And Washer
NOTE: Always install a new hub nut. The original hub nut is one-time use only and should be discarded when removed.
15. If equipped with all-wheel-drive, slide the half shaft into the hub and bearing on each side of the vehicle and hand-start the washer and hub nut (3) Support the shafts to keep them from overextending the joints.
16. If equipped with all-wheel-drive, install the rear driveline module. In place of using a drive-on hoist, place jacks under the outboard ends of the lower control arms and adjust the rear suspension height at the hub and bearings to simulate curb riding height. Once the rear driveline module is installed, remove the jacks.

Fig. 68: Supporting Rear Shock
17. On each side of the vehicle, if equipped with load-leveling shocks, place a jack (2) against the lower shock eye and support the lower end of the shock assembly (1). Lift the shock assembly using the jack until the hole in the lower shock eye lines up with that in the lower control arm.

Fig. 69: Rear Lower Shock Mounting
18. On each side of the vehicle, install the mounting bolt (4) and nut (1) fastening the shock assembly (2) to the lower control arm (3). Do not tighten at this time.
Fig. 70: Right Cable At Crossmember
19. Position the four parking brake cable routing clamps along the front of the rear crossmember and install the screws. Tighten the screws to 6 N.m (55 in. lbs.).
20. Install the exhaust system.
Fig. 71: Wheel Speed Sensor Routing Clamp
21. On each side of the vehicle, attach the wheel speed sensor routing clamp (2) to the rear suspension crossmember (3) using the mounting screw (1). Tighten the mounting screw to 20 N.m (15 ft. lbs.).
Fig. 72: Hub Nut And Washer
22. While a helper applies the brakes to keep the hub (1) from rotating, on each side of the vehicle:
- Tighten the hub nut (3) to 245 N.m (181 ft. lbs.).
- Insert the cotter pin (2) through the notches in the nut and the hole in half shaft. If the notches in the nut do not line up with the hole in the half shaft, continue to tighten the nut until they do. Do not loosen the nut.
- Wrap the cotter pin (2) ends tightly around the lock nut.

Fig. 73: Tire And Wheel Mounting
23. On each side of the vehicle, install tire and wheel assembly (1). Install and tighten wheel mounting nuts (3) to 135 N.m (100 ft. lbs.).
24. Lower the vehicle.
25. Position the vehicle on an alignment rack/drive-on lift. Raise the vehicle as necessary to access mounting bolts and nuts.
26. Tighten the lower control arm mounting bolt nut at the crossmember to 105 N.m (77 ft. lbs.).
27. Tighten the lower control arm mounting bolt nut at the knuckle to 105 N.m (77 ft. lbs.).
28. Tighten the shock assembly lower mounting bolt nut to 99 N.m (73 ft. lbs.).
29. Tighten the upper control arm mounting bolt nut at the crossmember to 105 N.m (77 ft. lbs.).
30. Tighten the upper control arm mounting bolt nut at the knuckle to 105 N.m (77 ft. lbs.).
31. Tighten the toe link mounting bolt nut at the knuckle to 105 N.m (77 ft. lbs.).
32. Perform wheel alignment as necessary.

Fig. 74: Rear Toe Adjustment Cam Bolt
33. Once rear toe is set, while holding the cam bolt (4) head stationary, tighten the toe link mounting cam bolt nut (3) to 100 N.m (74 ft. lbs.).
 Crossmember, front suspension
REMOVAL
1. Raise and support the vehicle.
Fig. 33: Tire And Wheel Mounting
2. On each side of the vehicle, remove the wheel mounting nuts (3), then the
front tire and wheel assembly
(1).
Fi ...
 Heated Glass
...
See also:
ILLUMINATED ENTRY
The interior lights will turn on when you press the
UNLOCK button on the Remote Keyless Entry (RKE)
transmitter or open a door or the liftgate.
This feature also turns on the approach lighting (if
...
VOICE COMMAND — IF EQUIPPED
Voice Command can be initiated by pressing the VR
button located on the radio or
steering wheel
controls (if equipped).
Refer to “Voice Command” in the Uconnect™ Phone
User Manual located ...
Switch, backup lamp
DESCRIPTION
Fig. 43: Backup Lamp Switch
Vehicles equipped with a manual transmission (2) have a normally open,
spring-loaded plunger type backup
lamp switch (1). Vehicles with an optional elect ...
