Dodge Journey: Fascia, rear
REMOVAL

Fig. 15: Push Pins
1. Open the hatch.
2. Remove the 6 pushpins (1) securing the fascia (2).

Fig. 16: Rivets
3. Remove the rivets (2) and the Torx screw (3) around the wheel well for the fascia (1).
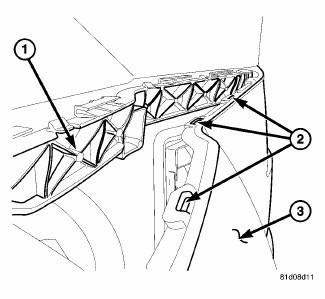
Fig. 17: Tabs, Fascia & Bracket
4. Separate the tabs (2) securing the fascia (3) to the bracket (1).

Fig. 18: Tail Light Push Pin
5. Remove the push pin (2) under the taillight (1) to the fascia (3).
6. Remove fascia (3) from vehicle.
INSTALLATION
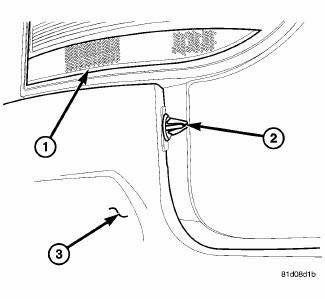
Fig. 19: Tail Light Push Pin
1. Install the fascia (3) to the vehicle and install the pushpin (2) at the tailight (1) to the body.

Fig. 20: Tabs, Fascia & Bracket
2. Clip the fascia (3) into the tabs (2) to the bracket (1).
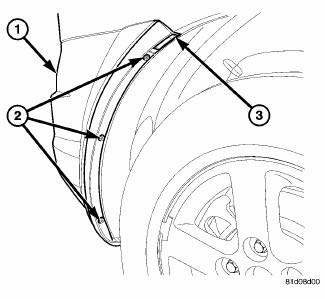
Fig. 21: Rivets
3. Install the Torx screw (3) for the fascia top the wheel opening and then install the pop rivets (2).

Fig. 22: Push Pins
4. Install the 6 push pins (1) to secure the fascia (2) to the body.
5. Close the hatch and check for fit.
 Fascia, front lower, closeout
REMOVAL
Fig. 11: Lower Fascia
1. Remove fasteners (5) to lower closeout.
Fig. 12: Push Pins - Front Lower Fascia
2. Remove push pins (1) to lower closeout.
3. Remove the front lower fascia.
...
 Reinforcement, bumper, front
REMOVAL
Fig. 23: Front Bumper Reinforcement
1. Remove the front fascia. See Removal .
2. Support bumper reinforcement (3) on a suitable lifting device.
3. Mark the position of the bolts (1) ...
See also:
Installation
2.0L TURBO DIESEL
Fig. 19: Generator Bushing
1. If reinstalling the old generator, install a generator mounting bolt and
tap bushing out slightly to ease
mounting of generator.
Fig. 20: Remo ...
With intermediate shaft
NOTE: Never grasp the halfshaft assembly by the inner or outer boots.
This can cause
damage to the boot, which will allow contaminants to enter the C/V joint.
NOTE: The inner tripod joints ...
Description, Operation
DESCRIPTION
Fig. 29: Removing/Installing ECM - 2.0L Diesel
The ECM (3) is located in the left side of engine compartment attached to the
left inner fender below the air
filter housing.
OPERAT ...
