Dodge Journey: Removal, Installation
REMOVAL

Fig. 6: Backup Camera & Liftgate & Lights
1. Disconnect the negative battery cable.
2. Remove the four retainers (1) holding the lightbar (5) to the liftgate (6).
3. Using a trim stick or equivalent, release the lightbar (5) from the clips.
4. Disconnect the electrical connectors from the backup camera (2) and the lights (3).
5. Disconnect the liftgate release cable (4) from the lightbar (5).
6. Remove the retainer from the back of the camera.
7. Unclip the camera cover from the lightbar.
8. Remove the camera mounting retainers.
9. Remove the camera from the lightbar.
INSTALLATION
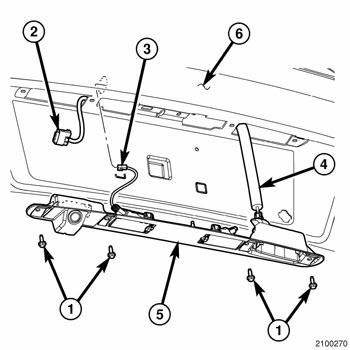
Fig. 7: Backup Camera & Liftgate & Lights
1. Install the camera to the lightbar.
2. Install the camera mounting retainers.
3. Clip the camera cover to the lightbar.
4. Install the retainer to the back of the camera.
5. Connect the liftgate release cable (4) to the lightbar (5).
6. Connect the electrical connectors to the backup camera (2) and the lights (3).
7. Install the lightbar to the tailgate.
8. Install the four retainers (1) holding the lightbar (5) to the liftgate (6).
9. Connect the negative battery cable.
 Diagnosis and Testing
Rear Camera
The hardwired circuits of the Rear View Camera (RVC) and those between the
RVC and the radio receiver may
be diagnosed using conventional diagnostic tools and procedures.
The wiring ...
 Module, satellite video
REMOVAL
1. Disconnect and isolate the negative battery cable.
2. Move the front passenger seat to the most forward position.
Fig. 8: Antenna & Electrical Connectors
3. Disconnect the three ...
See also:
Wiring, trailer tow
DESCRIPTION
Fig. 73: Instruction Sheet Are Placed In Glove Box
Vehicles equipped with an optional Trailer Tow Preparation package have a
trailer tow wiring harness and an
instruction sheet (1) ...
Removal, Installation
REMOVAL
WARNING: Disable the airbag system before attempting any steering
wheel, steering
column, or instrument panel component diagnosis or service. Disconnect
and isolate the negat ...
VEHICLE MODIFICATIONS/ALTERATIONS
WARNING:
Any modifications or alterations to this vehicle could
seriously affect its roadworthiness and safety and
may lead to an accident resulting in serious injury or
death. ...
