Dodge Journey: Fluid
STANDARD PROCEDURE
FLUID LEVEL CHECKING
The fluid required for this transaxle is Mopar ATF+4 (Automatic Transmission Fluid). Use of improper or substitute fluids can cause shift problems and/or transaxle failure.
1. Insure the vehicle is level, remove the fill plug and add fluid until the fluid just starts to trickle out.
FLUID DRAIN AND FILL

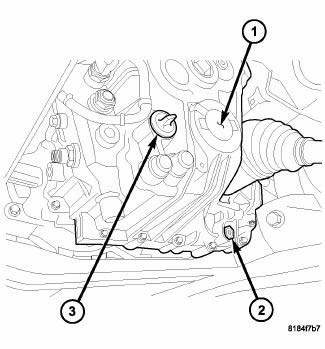
Fig. 174: Drain Plug
NOTE: The fluid required for this transaxle is Mopar ATF+4 (Automatic Transmission Fluid). Use of improper or substitute fluids can cause shift problems and/or transaxle failure.
1. Raise vehicle on hoist.
2. Obtain suitable fluid collection container and place under transaxle.
3. Remove transaxle drain plug (2). Allow fluid to drain into container until empty.
4. Install the drain plug (2) with a new gasket and tighten to 39 N.m (29 ft. lbs.).
5. Remove transaxle rubber fill plug (3).
6. Add the appropriate amount of transaxle fluid to the transaxle.
7. Install the transaxle rubber fill plug (3).
 Differential, transaxle
DESCRIPTION
Fig. 166: Differential Assembly
- RING GEAR
- PINION SHAFT
- DIFFERENTIAL CASE
- PINION GEAR
- SIDE GEAR
The BG6 differential is a conventional open design, and is integr ...
 Input shaft, transmission
DISASSEMBLY
Fig. 175: Snap Ring At Input Shaft
1. Remove the snap ring (2) that retains the input shaft bearing and sixth
gear to the shaft.
Fig. 176: Press Bearing From Input Shaft
2. Using ...
See also:
Cylinder compression pressure test
The results of a cylinder compression pressure test can be utilized to
diagnose several engine malfunctions.
Ensure the battery is completely charged and the engine starter motor is in
good opera ...
Installation
LEFT-HAND-DRIVE
NOTE: The master cylinder must be bled before installing it on the
vehicle.
1. Bench bleed the master cylinder.
2. Wipe the face of the power brake booster clean where the ...
Engine oil leak inspection
Begin with a thorough visual inspection of the engine, particularly at the
area of the suspected leak. If an oil
leak source is not readily identifiable, the following steps should be followed:
1. ...
