Dodge Journey: Removal
2.7L ENGINE
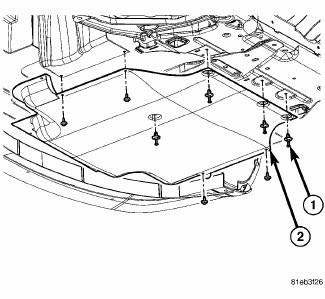
Fig. 22: Belly Pan
- - BELLY PAN
- - EXHAUST EXTENSION PIPE
1. Remove the belly pan (2).
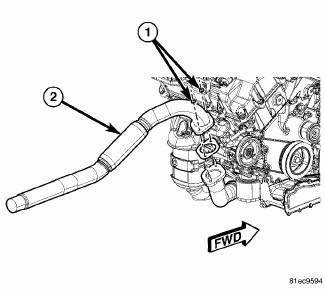
Fig. 23: 2.7L Extension Pipe
2. Remove the fasteners (1), and remove the exhaust extension pipe (2) from the cross under pipe.
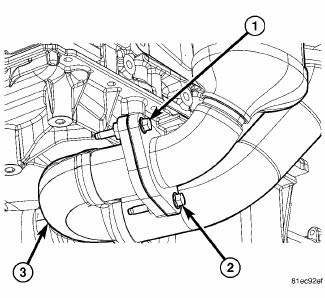
Fig. 24: Cross Under Pipe Fasteners
3. Remove the rear maniverter-to-cross under pipe fasteners (1) and (2).
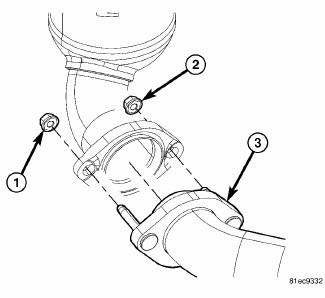
Fig. 25: Maniverter To Cross Under Fasteners
4. Remove the front maniverter-to-cross under fasteners (1) and (2), and remove the cross under pipe (3).
3.5L ENGINE

Fig. 26: Belly Pan
1. Raise vehicle on hoist.
2. Remove the fasteners (1) and remove the belly pan (2).
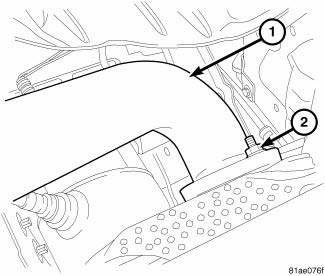
Fig. 27: Exhaust System Pipe
- - EXHAUST PIPE
- - NUTS
3. Disconnect exhaust system pipe (1) from cross under pipe.
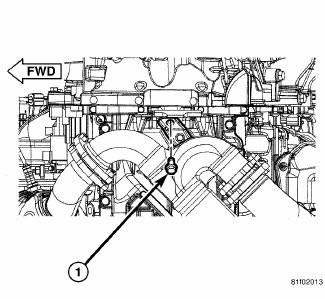
Fig. 28: Cross Under To Bracket
4. Remove cross-under pipe bracket to cross under pipe bolt (1).
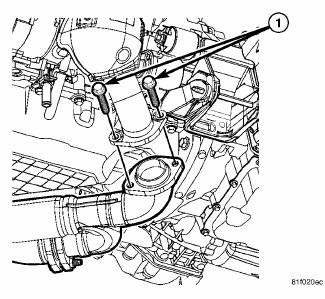
Fig. 29: Left Maniverter To Cross Under
5. Remove cross under to front maniverter bolts and nuts (1).
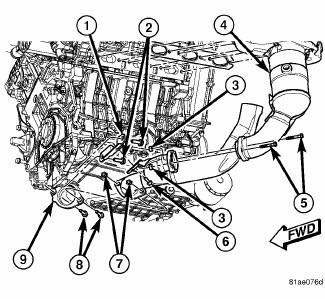
Fig. 30: Cross Under Pipe - 3.5L
- - BRACKET
- - BRACKET MOUNTING BOLTS
- - CROSS UNDER PIPE TO REAR MANIVERTER NUTS
- - REAR MANIVERTER
- - REAR MANIVERTER TO CROSS UNDER BOLTS
- - CROSS UNDER PIP TO BRACKET BOLTS
- - CROSS UNDER PIPE TO FRONT MANIVERTER NUTS
- - CROSS UNDER PIPE TO FRONT MANIVERTER BOLTS
- - FRONT MANIVERTER
6. Remove cross under to rear maniverter bolts (5) and nuts (3).
7. Remove cross under pipe.

Fig. 31: Cross Under Bracket Transmission Bracket
8. If necessary, remove cross under transmission bracket (2).

 Installation
2.7L ENGINE
Fig. 32: Maniverter To Cross Under Fasteners
1. Install the cross under pipe (3). and the front maniverter-to-cross under
fasteners (1) and (2). Tighten to
27 Nm (20 ft. lb.).
Fi ...
See also:
Uconnect™ Multimedia (SATELLITE RADIO) — IF EQUIPPED
(REN/REQ/RER/RES/REU/RBZ RADIOS ONLY)
Satellite radio uses direct satellite-to-receiver broadcasting
technology to provide clear digital sound, coast to
coast. The subscription service provider is Sirius Satellite
Radio. This service o ...
MAINTENANCE PROCEDURES
The pages that follow contain the required maintenance
services determined by the engineers who designed your
vehicle.
Besides those maintenance items specified in the fixed
maintenance schedule, ...
Installation
Fig. 101: Check For Stretched Bolts
- STRETCHED BOLT
- THREADS ARE NOT STRAIGHT ON LINE
- THREADS ARE STRAIGHT ON LINE
- UNSTRETCHED BOLT
NOTE: The cylinder head bolts (4) are tighte ...
