Dodge Journey: Cover(s), cylinder head, right
REMOVAL
1. Disconnect negative battery cable.
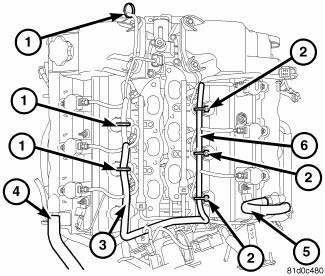
Fig. 126: Engine Harness Retaining Clips
- - Left cylinder head cover engine harness retainers
- - Right cylinder head cover engine harness retainers
- - Left engine harness
- - Makeup air hose
- - PCV Hose
- - Right engine harness
2. Disconnect electrical connectors from ignition coils and capacitor.
3. Disconnect right engine harness retaining clips (2) from cylinder head cover studs. Position the engine harness (6) aside.
4. Disconnect the PCV hose (5) from the upper intake manifold.
5. Remove upper intake manifold.
Fig. 127: Cylinder Head Cover Fasteners
- - DOUBLE ENDED STUDS
- - BOLTS
6. Remove ground strap from cylinder head cover stud.
7. Disconnect electrical harness retaining clips from cylinder head cover studs. Reposition electrical harness.
8. Remove fastener attaching ignition coil capacitor.
9. Remove ignition coils. 10. Loosen all cylinder head cover fasteners.
NOTE: Cylinder head cover attaching bolts are captured to the cover.
CAUTION: Make certain the double ended studs in the center of the cylinder head cover are loose before attempting to remove cover.
11. Remove cylinder head cover.
INSTALLATION
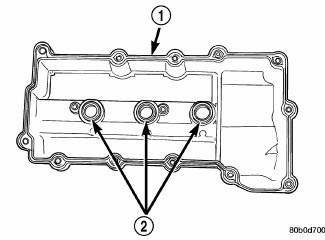
Fig. 128: Cylinder Head Cover Gasket & Spark Plug Seals
- - ONE PIECE GASKET
- - SPARK PLUG WELL SEALS
1. Clean cylinder head cover and both sealing surfaces. Inspect and replace gaskets (1) as necessary.

Fig. 129: Cylinder Head Cover Fasteners
- - DOUBLE ENDED STUDS
- - BOLTS
2. Install cylinder head cover and hand start all fasteners. Verify that all double-ended studs are in the correct locations.
3. Tighten cylinder head cover attaching bolts and double-ended studs (1) to 12 N.m (105 in. lbs.).
4. Install ignition coils.
5. Install ignition coil capacitor and fastener.
6. Connect ground strap to cylinder head cover stud.

Fig. 130: Engine Harness Retaining Clips
- - Left cylinder head cover engine harness retainers
- - Right cylinder head cover engine harness retainers
- - Left engine harness
- - Makeup air hose
- - PCV Hose
- - Right engine harness
7. Reposition the right engine harness (6), and install the right engine harness retainers (2) to the double-ended studs.
8. Install upper intake manifold.
9. Reconnect the PCV to the upper intake manifold.
 Cover(s), cylinder head, left
REMOVAL
1. Disconnect negative battery cable.
2. Disconnect electrical connectors from ignition coils and capacitor.
Reposition electrical harness.
3. Remove ground strap from cylinder head c ...
 Lifter(s), hydraulic
Diagnosis and Testing
DIAGNOSIS AND TESTING - HYDRAULIC LASH ADJUSTER NOISE DIAGNOSIS
Proper noise diagnosis is essential in locating the source of a NVH
complaint. Locating a lash adjuster (tappe ...
See also:
Description, Operation
DESCRIPTION
The battery cables are large gauge, stranded copper wires sheathed within a
heavy plastic or synthetic rubber
insulating jacket. The wire used in the battery cables combines excellent ...
Arm, lower control
Diagnosis and Testing
LOWER CONTROL ARM
Inspect the lower control arm for signs of damage from contact with the
ground or road debris. If the lower
control arm shows any sign of damage, look for ...
LIFTGATE
The liftgate can be unlocked or locked with the Remote
Keyless Entry (RKE) transmitter or by activating the
power door lock switch located on either front door trim
panel.
NOTE: The liftgate canno ...
