Dodge Journey: Description, Operation
DESCRIPTION
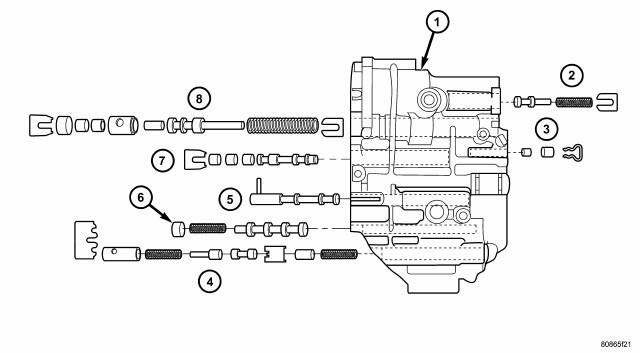
Fig. 430: Identifying Valve Body Assembly
- - VALVE BODY
- - T/C REGULATOR VALVE
- - L/R SWITCH VALVE
- - CONVERTER CLUTCH CONTROL VALVE
- - MANUAL VALVE
- - CONVERTER CLUTCH SWITCH VALVE
- - SOLENOID SWITCH VALVE
- - REGULATOR VALVE
The valve body assembly consists of a cast aluminum valve body, a separator plate, and transfer plate. The valve body contains valves and check balls that control fluid delivery to the torque converter clutch, solenoid/pressure switch assembly, and frictional clutches. The valve body contains the following components :
- Regulator valve (8)
- Solenoid switch valve (7)
- Manual valve (5)
- Converter clutch switch valve (6)
- Converter clutch control valve (4)
- Torque converter regulator valve (2)
- Low/Reverse switch valve (3)
In addition, the valve body also contains the thermal valve, #2, #3 and #4 check balls, the #5 (overdrive) check valve and the 2/4 accumulator assembly.
OPERATION
NOTE: Refer to Schematics and Diagrams for a visual aid in determining valve location, operation and design.
REGULATOR VALVE
The regulator valve controls hydraulic pressure in the transaxle. It receives unregulated pressure from the pump, which works against spring tension to maintain oil at specific pressures. A system of sleeves and ports allows the regulator valve to work at one of three predetermined pressure levels. Regulated oil pressure is also referred to as "line pressure."
SOLENOID SWITCH VALVE
The solenoid switch valve controls line pressure from the LR/CC solenoid. In one position, it allows the low/reverse clutch to be pressurized. In the other, it directs line pressure to the converter control and converter clutch valves.
MANUAL VALVE
The manual valve is operated by the mechanical shift linkage. Its primary responsibility is to send line pressure to the appropriate hydraulic circuits and solenoids. The valve has three operating ranges or positions.
CONVERTER CLUTCH SWITCH VALVE
The main responsibility of the converter clutch switch valve is to control hydraulic pressure applied to the front (off) side of the converter clutch piston. Line pressure from the regulator valve is fed to the torque converter regulator valve, where it passes through the valve, and is slightly regulated. The pressure is then directed to the converter clutch switch valve and to the front side of the converter clutch piston. This pressure pushes the piston back and disengages the converter clutch.
CONVERTER CLUTCH CONTROL VALVE
The converter clutch control valve controls the back (on) side of the torque converter clutch. When the PCM/TCM energizes or modulates the LR/CC solenoid to apply the converter clutch piston, both the converter clutch control valve and the converter control valve move, allowing pressure to be applied to the back side of the clutch.
T/C REGULATOR VALVE
The torque converter regulator valve slightly regulates the flow of fluid to the torque converter.
LOW/REVERSE SWITCH VALVE
The low/reverse clutch is applied from different sources, depending on whether low (1st) gear or reverse is selected. The low/reverse switch valve alternates positions depending on from which direction fluid pressure is applied. By design, when the valve is shifted by fluid pressure from one channel, the opposing channel is blocked. The switch valve alienates the possibility of a sticking ball check, thus providing consistent application of the low/reverse clutch under all operating conditions.
 Valve body
...
 Removal
Fig. 431: Identifying Battery Cables
- BATTERY POSITIVE CABLE
- THERMO-WRAP
- BATTERY NEGATIVE CABLE
NOTE: If valve body is replaced or reconditioned, the PCM Quick Learn
Procedure
...
See also:
Removal
LEFT-HAND DRIVE
NOTE: The ABM is only separately serviceable for non-HSA (Hill Start
Assist) equipped
vehicles. Do not remove the ABM for vehicles equipped with HSA.
1. Disconnect the nega ...
Filter, engine oil
Removal
Fig. 256: Oil Filter & Drain Plug
1. Raise vehicle on hoist.
2. Position a suitable collecting container under oil filter location.
3. Remove oil filter (2) using a suitable oil ...
Diagnosis and testing
ON-BOARD DIAGNOSTIC SYSTEM
The Powertrain Control Module (PCM) monitors critical input and output
circuits of the charging system,
making sure they are operational. A Diagnostic Trouble Code (DTC) ...
