Dodge Journey: Removal
WARNING: Refer to the applicable warnings and cautions for this system before performing the following operation. Failure to follow these instructions may result in serious or fatal injury.
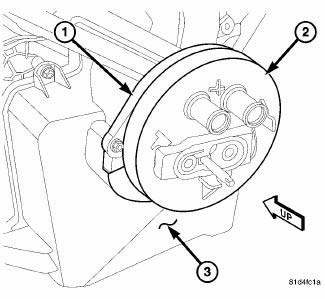
Fig. 285: Rear Housing Flange Seal
1. Disconnect and isolate the negative battery cable.
2. Remove the rear heater-A/C housing and place it on a workbench.
3. Remove the foam seal (2) from the flange (1) located at the bottom of the rear heater-A/C housing (3). If the foam seal is deformed or damaged, it must be replaced.
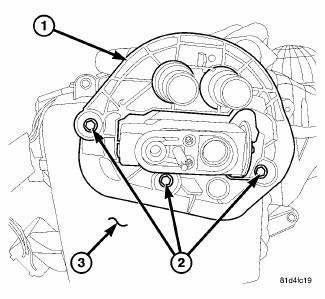
Fig. 286: Rear Housing Flange
4. Remove the three screws (2) that secure the flange (1) to the bottom of the rear heater-A/C housing (3) and remove the flange.
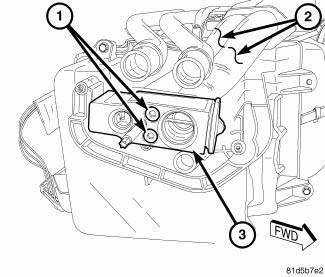
Fig. 287: Rear Expansion Valve Removal/Installation Bench
5. Remove the two screws (1) that secure the rear expansion valve (3) to the tapping plate located on the end of the rear evaporator tubes (2) and remove the valve.
6. Remove and discard the O-ring seals and install plugs in, or tape over the opened evaporator tubes and expansion valve ports.
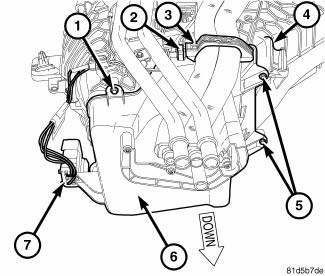
Fig. 288: Lower Rear Housing Removal/Installation
7. Remove the wire harness connector (7) from the lower rear heater-A/C housing (6).
8. Open the evaporator tube retaining bracket (3) located on the outboard side of the lower housing.
9. Remove the metal retaining clip (2) that secures the lower housing to the rear heater-A/C housing (4).
10. Remove the five screws (1 and 5) that secure the lower housing the rear heater-A/C housing and carefully remove the lower housing. Rotate and tilt the lower housing as necessary for removal.
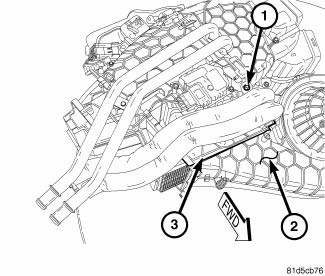
Fig. 289: Rear Evaporator Cover Removal/Installation
11. Remove the screw (1) that secures the rear evaporator cover (3) to the outboard side of the rear heater- A/C housing (2) and remove the cover of the housing.
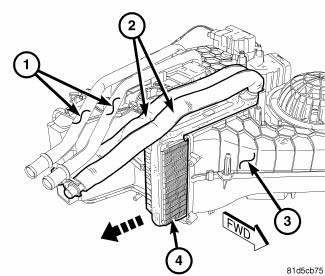
Fig. 290: Rear Evaporator Removal
12. Carefully pull the rear A/C evaporator (4) out the bottom of the rear heater-A/C housing (3). Guide the evaporator tubes (2) past the heater core tubes (1). If the foam seals on the A/C evaporator are deformed or damaged, they must be replaced.
 Description, Operation
DESCRIPTION
Fig. 284: Rear Evaporator Description
The rear A/C evaporator (4) is located within the rear heater-A/C housing,
behind the right interior quarter panel
trim. The rear A/C evaporato ...
 Installation
CAUTION: Be certain to adjust the refrigerant oil level when
servicing the A/C
refrigerant system. Failure to properly adjust the refrigerant
oil level will prevent the A/C system fro ...
See also:
IF YOUR ENGINE OVERHEATS
In any of the following situations, you can reduce the
potential for overheating by taking the appropriate action.
• On the highways — Slow down.
• In city traffic — While stopped, put the ...
Removal, Installation
REMOVAL
Fig. 298: Identifying Transmission Connectors
- SOLENOID PACK CONNECTOR
- INPUT SPEED SENSOR CONNECTOR
- OUTPUT SPEED SENSOR CONNECTOR
- TRANSMISSION RANGE SENSOR CONNECTOR
...
Installation
CAUTION: Be certain to adjust the refrigerant oil level when
servicing the A/C
refrigerant system. Failure to properly adjust the refrigerant
oil level will prevent the A/C system fro ...
