Dodge Journey: Description, Operation
DESCRIPTION
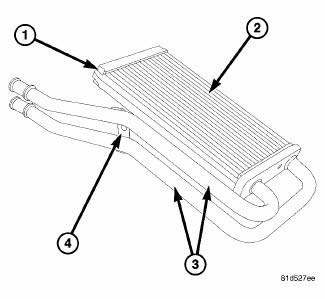
Fig. 272: Rear Heater Core Description
The rear heater core (1) is located in the rear heater-A/C housing behind the right interior quarter trim panel.
The rear heater core is a heat exchanger made of rows of tubes and fins (2). The heater core tubes (3) are permanently soldered to the heater core tank and are retained to the outboard side of the rear heater-A/C housing by use of an integral bracket (4) and screw.
The rear heater-A/C housing must be removed from the vehicle to service the rear heater core.
OPERATION
Engine coolant is circulated through heater hoses and tubes to the rear heater core at all times. As the coolant flows through the heater core, heat removed from the engine is transferred to the heater core fins and the air directed through the heater core picks up the heat from the fins. The rear blend-air door allows control of the rear heater output air temperature by controlling the amount of air flowing through or around the rear heater core. The rear blower motor speed controls the volume of air flowing through the rear heater-A/C housing.
The rear heater core cannot be repaired and must be replaced if inoperative, leaking or damaged.

 Removal
WARNING: Refer to the applicable warnings and cautions for this
system before
performing the following operation. Failure to follow these instructions
may result in serious or fatal ...
See also:
Diagnosis and Testing
ELECTRIC BACKLIGHT (EBL) SYSTEM
NOTE: Illumination of the defogger switch indicator lamp does not
necessarily mean
that electrical current is reaching the rear window glass and/or the outside ...
Schematics and diagrams
40/41TE - WITH VARIABLE LINE PRESSURE
Fig. 181: Identifying Line Pressure - Park & Neutral
Fig. 182: Identifying Line Pressure - Reverse
Fig. 183: Identifying Line Pressure - First Gear ( ...
SENTRY KEY
The Sentry Key Immobilizer system prevents unauthorized
vehicle operation by disabling the engine. The
system does not need to be armed or activated. Operation
is automatic, regardless of whether t ...
