Dodge Journey: Installation
CAUTION: Be certain to adjust the refrigerant oil level when servicing the A/C refrigerant system. Failure to properly adjust the refrigerant oil level will prevent the A/C system from operating as designed and can cause serious A/C compressor damage.
CAUTION: The A/C receiver/drier must be replaced if an internal failure of the A/C compressor has occurred. Failure to replace the A/C Receiver Drier can cause serious damage to the replacement A/C compressor.
NOTE: If only the A/C receiver/drier is being replaced, add 30 milliliters (1 fluid ounce) of refrigerant oil to the refrigerant system. Use only refrigerant oil of the type recommended for the A/C compressor in the vehicle.
NOTE: When replacing multiple A/C system components, refer to the REFRIGERANT OIL CAPACITIES to determine how much oil should be added to the refrigerant system. NOTE: Replacement of the refrigerant line O-ring seals and gaskets is required anytime a refrigerant line is disconnected. Failure to replace the rubber O-ring seals and metal gaskets could result in a refrigerant system leak.
NOTE: LHD model shown in illustrations. RHD model similar.
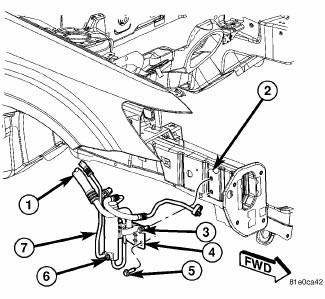
Fig. 235: Receiver/Drier Removal/Installation
NOTE: Illustration shown with front fascia and headlamp removed for clarity.
1. Position the A/C receiver/drier (4) to the right front frame rail (2) and loosely install the lower retaining bolt (5).
2. Install the bolt (3) that secures the upper portion of the A/C suction line (1) to the right front frame rail.
Tighten both bolts securely.
3. Remove the tape or plugs from the opened refrigerant line fittings and the receiver/drier port.
4. Lubricate new O-ring seals with clean refrigerant oil and install them and new gaskets onto the refrigerant line fittings. Use only the specified O-ring seals as they are made of a special material for the R-134a system. Use only refrigerant oil of the type recommended for the A/C compressor in the vehicle.
5. Connect the rear section of the A/C liquid line (7) to the A/C receiver/drier.
6. Install the nut (6) that secures the rear section of the A/C liquid line to the A/C receiver/drier. Tighten the nut to 20 N.m (15 ft. lbs.).

Fig. 236: Lower to Upper Suction Line
7. Connect the lower portion of the A/C suction line (3) to the upper suction line (1)
8. Install the nut (2) that secures the lower portion of the A/C suction line to the upper suction line. Tighten the nut to 20 N.m (15 ft. lbs.).
9. Reposition the right front wheel house splash shield to the body.
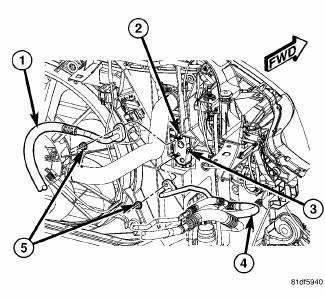
Fig. 237: Refrigerant Lines to Condenser Tapping Block
10. Lower the vehicle.
11. Remove the tape or plug from the opened refrigerant line fitting and condenser ports.
12. Lubricate a new rubber O-ring seal with clean refrigerant oil and install it and a new gaskets onto the refrigerant line fitting. Use only the specified O-rings as they are made of a special material for the R- 134a system. Use only refrigerant oil of the type recommended for the A/C compressor in the vehicle.
13. Connect the A/C liquid line (4) to the tapping block (2) and install the retaining nut (5). Tighten the nut to 20 N.m (15 ft. lbs.).
14. Reconnect the negative battery cable.
CAUTION: Do NOT run the engine with a vacuum pump in operation or with a vacuum present within the A/C system when equipped with the Denso 6SEU16 variable displacement compressor. Failure to follow this caution will result in serious A/C compressor damage.
15. Evacuate the refrigerant system.
16. If the A/C condenser is being replaced, add 10 milliliters (0.3 fluid ounce) of refrigerant oil to the refrigerant system. When replacing multiple A/C system components, refer to the REFRIGERANT OIL CAPACITIES to determine how much oil should be added to the refrigerant system. Use only refrigerant oil of the type recommended for the A/C compressor in the vehicle.
17. Charge the A/C system.
 Removal
WARNING: Review safety precautions and warnings in this part
before performing
this procedure. Failure to
follow the warnings and cautions could result in possible serious or
fata ...

See also:
Body, air cleaner
REMOVAL
1. Disconnect negative battery cable.
Fig. 87: Inlet Air Temperature Sensor Electrical Connector
2. Disconnect inlet air temperature sensor electrical connector (3).
3. Disconnect fres ...
Insulator, engine mount, front
Removal
1. Raise vehicle.
Fig. 222: Belly Pan
- belly pan fasteners
- belly pan
2. Remove the belly pan (2).
Fig. 223: Front Engine Mount Through Bolt
3. Remove front mount to bracket ...
Chain and sprockets, timing
Removal
TIMING CHAIN AND CAM SPROCKETS
Fig. 334: TIMING MARK ALIGNMENT
- CAMSHAFT TIMING MARKS
- CRANKSHAFT TIMING MARKS
1. Disconnect negative battery cable.
2. Drain cooling system.
...
