Dodge Journey: Inspection
CLUTCH INSPECTION - FIXED DISPLACEMENT A/C COMPRESSOR
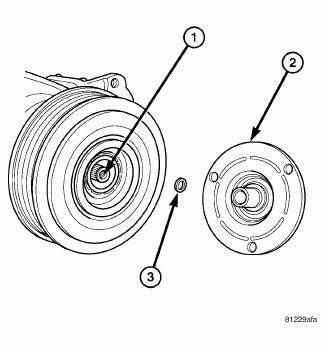
Fig. 212: Identifying Compressor Shaft, Clutch Plate & Shim
Examine the friction surfaces of the pulley and the clutch plate (2) for wear. The pulley and clutch plate should be replaced if there is excessive wear or scoring.
If the friction surfaces are oily, inspect the shaft and nose area of the A/C compressor (1) for refrigerant oil. If refrigerant oil is found, the compressor shaft seal is leaking and the A/C compressor must be replaced.
Check the pulley bearing for roughness or excessive leakage of grease. Replace the pulley and clutch plate if required.
HUB AND PULLEY INSPECTION - VARIABLE DISPLACEMENT A/C COMPRESSOR
NOTE: The compressor drive hub and the pulley and bearing assembly can not be serviced separately from the A/C compressor. In the event of drive hub or pulley and bearing assembly damage or failure, the A/C compressor, drive hub and pulley and bearing must be replaced as an assembly.
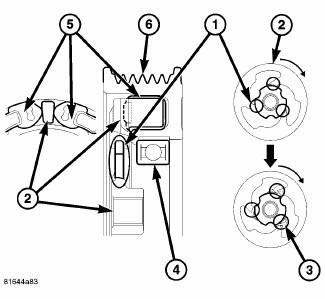
Fig. 213: Compressor Hub & Pulley Inspection
NOTE: Typical clutchless compressor drive hub and pulley and bearing assembly shown.
The bridges (1) located on the non-servicable compressor hub (2) are designed to break away in the event of compressor seizure. Examine the bridges for separation or cracks (3). Damage to the bridges are an indication of excessive compressor torque, which is most likely caused by compressor failure.
Check the non-servicable pulley bearing (4) for roughness or excessive noise. Check the pulley dampeners (5) for excessive play which can be caused by deterioration or damage. Inspect the belt surfaces of the nonservicable pulley (4) for wear. If the pulley surfaces are oily, inspect the shaft and nose area of the A/C compressor for refrigerant oil. If refrigerant oil is found, the compressor shaft seal is leaking and the A/C compressor must be replaced.
Replace the A/C compressor if wear or damage is found to the drive hub or pulley and bearing assembly.
 Removal
CLUTCH - FIXED DISPLACEMENT A/C COMPRESSOR
WARNING: Refer to the applicable warnings and cautions for this
system before
performing the following operation. Failure to follow the warnin ...
 Installation
CLUTCH - FIXED DISPLACEMENT A/C COMPRESSOR
NOTE: Typical A/C compressor and clutch assembly shown in
illustrations.
Fig. 214: Clutch Coil & Snap Ring
1. Align the dowel pin on the bac ...
See also:
Housing, coolant outlet
Removal
Fig. 78: COOLANT OUTLET CONNECTOR - 2.7L
- BOLT (2)
- BOLT (2)
- COOLANT OUTLET CONNECTOR
WARNING: Do not remove pressure cap with the system hot and under
pressure
...
Description, Operation, Specifications
DESCRIPTION
NOTE: All engines use a fixed ignition timing system. Basic ignition
timing is not
adjustable. All spark advance is determined by the Powertrain Control Module
(PCM).
The ign ...
MEDIA CENTER 230 (REQ) — AM/FM STEREO RADIO AND 6–DISC CD/DVD CHANGER
(MP3/WMA AUX JACK)
NOTE: The radio sales code is located on the lower right
side of the radio faceplate.
REQ Radio
Operating Instructions - Radio Mode
NOTE: The ignition switch must be in the ON or ACC
position t ...
