Dodge Journey: Duct, floor distribution, rear
REMOVAL
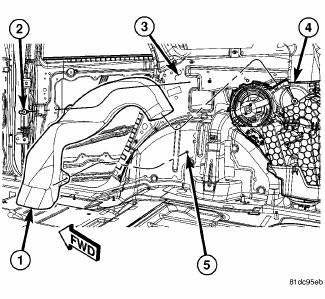
Fig. 159: Rear Floor Distribution Duct
1. Remove right quarter trim panel.
2. Remove the push-pin retainer (2) that secures the rear floor distribution duct (1) to the right inner quarter panel (3).
3. Disengage the rear floor distribution duct from the stud (5) located on the right inner quarter panel.
4. Disengage the rear floor distribution duct from the rear heater-A/C housing (4) and remove the duct.
INSTALLATION

Fig. 160: Rear Floor Distribution Duct
1. Install the rear floor distribution duct (1) onto rear heater-A/C housing (4). Make sure the duct is fully engaged to the housing.
2. Engage the rear floor distribution duct to the stud (5) located on the right inner quarter panel (3).
3. Install the push-pin retainer (2) that secures the rear floor distribution duct to the right inner quarter panel.
4. Install the right quarter panel trim.
 Duct, ceiling distribution
REMOVAL
WARNING: Disable the airbag system before attempting any steering
wheel, steering
column or instrument panel component diagnosis or service. Disconnect
and isolate the negati ...

See also:
Lifter(s), hydraulic
Diagnosis and Testing
DIAGNOSIS AND TESTING - HYDRAULIC LASH ADJUSTER NOISE DIAGNOSIS
Proper noise diagnosis is essential in locating the source of a NVH
complaint. Locating a lash adjuster (tappe ...
Description, Operation, Specifications
DESCRIPTION
NOTE: All engines use a fixed ignition timing system. Basic ignition
timing is not
adjustable. All spark advance is determined by the Powertrain Control Module
(PCM).
The ign ...
Removal
NOTE: The antenna cables are integrated into the body wiring
harnesses. New antenna
cables is overlaid on the body wiring harness.
SATELLITE AUDIO ONLY
1. Disconnect and isolate the batter ...
