Dodge Journey: Manifold, exhaust, crossover
Removal

Fig. 287: Belly Pan
- - belly pan fasteners
- - belly pan
1. Remove the belly pan (2).

Fig. 288: Exhaust Extension Pipe
2. Remove the fasteners (1), and remove the exhaust extension pipe (2) from the cross under pipe.
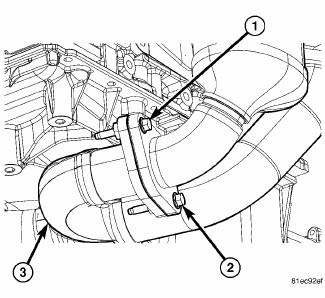
Fig. 289: Exhaust Cross-Under Pipe
3. Remove the rear maniverter-to-cross under pipe fasteners (1) and (2).

Fig. 290: Front Maniverter-To-Cross Under Fasteners
4. Remove the front maniverter-to-cross under fasteners (1) and (2), and remove the cross under pipe (3).
Installation

Fig. 291: Front Maniverter-To-Cross Under Fasteners
1. Install the cross under pipe (3). and the front maniverter-to-cross under fasteners (1) and (2). Tighten to 27 Nm (20 ft. lb.).

Fig. 292: Exhaust Cross-Under Pipe
2. Install the rear maniverter-to-cross under pipe fasteners (1) and (2). Tighten to 29 Nm (21 ft. lb.).
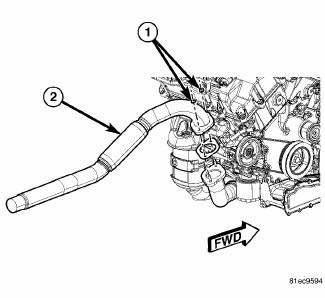
Fig. 293: Exhaust Extension Pipe
3. Install the exhaust extension pipe (2) to the cross under pipe, and install the fasteners (1). Tighten to 27 Nm (20 ft. lb.)

Fig. 294: Belly Pan
- - belly pan fasteners
- - belly pan
4. Install the belly pan (2).
 Manifolds
...
 Manifold, exhaust, front
Removal
1. Disconnect negative battery cable.
2. Remove the engine cover.
Fig. 295: Oxygen Sensors
3. Disconnect and remove oxygen sensors (2) and (4).
Fig. 296: Upper Maniverter Heat Shiel ...
See also:
Sensor, coolant temperature
Description
There are two Engine Coolant Temperature (ECT) Sensors. One of the sensors
threads into the block. The other
sensor is located at the top of the coolant adapter housing. The ECT Sensor ...
Removal, Installation
REMOVAL
Fig. 6: Backup Camera & Liftgate & Lights
1. Disconnect the negative battery cable.
2. Remove the four retainers (1) holding the lightbar (5) to the liftgate (6).
3. Using a ...
INSTRUMENT CLUSTER DESCRIPTIONS
1. Coolant Temperature Gauge
The temperature gauge indicates engine coolant temperature.
Any reading within the normal range indicates
that the cooling system is operating satisfactorily. The
gaug ...
