Dodge Journey: Removal
FOOT OPERATED PARKING BRAKE LEVER
1. Release the parking brake.
2. Raise and support the vehicle.
3. Manually release the parking brake cable tension.
4. Push the front cable strand into the housing until it bottoms.
5. Lower the vehicle.
6. Remove the left front door opening sill scuff plate.
7. Remove the lower cowl trim.
8. Remove the steering column opening cover.
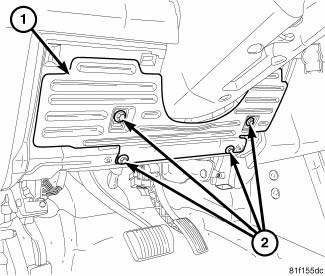
Fig. 225: STEERING COLUMN COVER REINFORCEMENT
9. Remove the steering column cover reinforcement mounting screws (2). Remove the steering column cover reinforcement (1).
10. Pull the parking brake lever pedal up and hold it in this position.

Fig. 226: CABLE BUTTON LOCATED IN LEVER
11. Rotate the cable strand around at the lever mechanism until the strand lines up with the slot, then remove the cable end button (2) from the lever mechanism (1).
NOTE: Prior to removing cable from lever, note cable routing through lever for ease in reassembly.
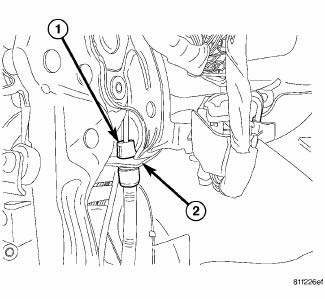
Fig. 227: CABLE HOUSING RETAINED IN LEVER
12. Collapse the front cable retainer fingers on the end of the cable housing (1) at the lever (2).
13. Remove the cable from the parking brake lever (3).
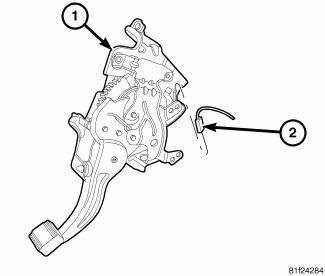
Fig. 228: WIRING AT PARKING BRAKE LEVER
14. Disconnect the wiring connector (2) at parking brake indicator lamp switch.
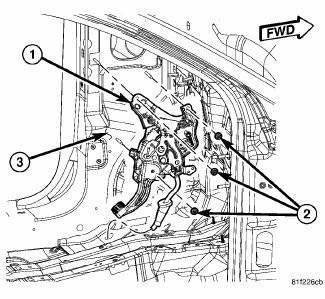
Fig. 229: FOOT LEVER MOUNTING
15. Remove the three mounting nuts (2), then remove the parking brake lever (1) from the cowl (3).
HAND OPERATED PARKING BRAKE LEVER
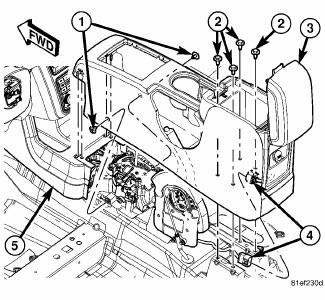
Fig. 230: CENTER CONSOLE
1. Remove the floor center console.
2. Manually release the parking brake cable tension.
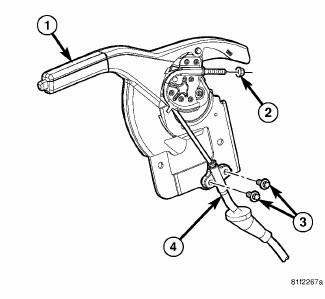
Fig. 231: CABLE MOUNTING TO HAND LEVER
3. Remove the mounting screws (3) fastening the front cable (4) to the side of the parking brake lever (1).
4. Remove the adjusting nut (2) from the end of the front parking brake cable.
5. Remove the cable strand from the lever.
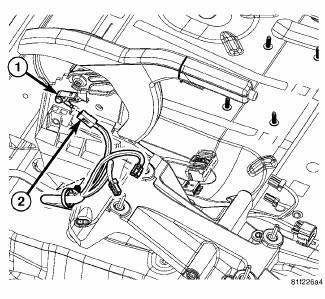
Fig. 232: HAND LEVER PARKING BRAKE SWITCH
6. Disconnect the wiring connector (2) at parking brake indicator lamp switch (1).
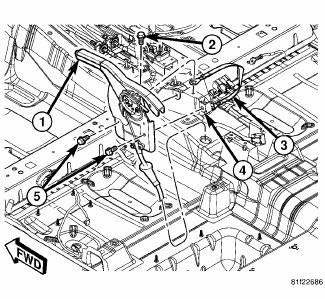
Fig. 233: HAND LEVER MOUNTING
7. Remove the two horizontal (5) and one vertical (2) mounting bolts, then remove the parking brake lever (1) from the shifter bracket (4).

 Installation
FOOT OPERATED PARKING BRAKE LEVER
Fig. 234: FOOT LEVER MOUNTING
1. Position the parking brake lever (1) over the mounting studs, against the
left lower cowl (3).
2. Install the three mounting ...
See also:
Operation
Fig. 427: Identifying Torque Converter Fluid Pressure
Operation
- APPLY PRESSURE
- THE PISTON MOVES SLIGHTLY
FORWARD
- RELEASE PRESSURE
- THE PISTON MOVES SLIGHTLY
REARWARD
The co ...
SEATS
Seats are a primary part of the Occupant Restraint System
of the vehicle. They need to be used properly for safe
operation of the vehicle.
WARNING:
• DO NOT allow people to ride in any area of y ...
Housing, coolant outlet
Removal
Fig. 78: COOLANT OUTLET CONNECTOR - 2.7L
- BOLT (2)
- BOLT (2)
- COOLANT OUTLET CONNECTOR
WARNING: Do not remove pressure cap with the system hot and under
pressure
...
