Dodge Journey: Electrical
SWITCH, BRAKE FLUID LEVEL
Description
The brake fluid level switch (2) is mounted through the center of the fluid reservoir. The switch can be serviced separately from the master cylinder fluid reservoir.

Fig. 12: BRAKE FLUID LEVEL SWITCH CONNECTOR
The brake fluid level switch (2) is mounted through the center of the fluid reservoir. The switch can be serviced separately from the master cylinder fluid reservoir.
Removal

Fig. 13: BRAKE FLUID LEVEL SWITCH CONNECTOR
1. Remove the wiring harness connector (1) from the brake fluid level switch (2) in the master cylinder brake fluid reservoir.

Fig. 14: LEVEL SWITCH RETAINING TABS
2. Push together the retaining tabs (1) that hold the brake fluid level switch in place in the brake fluid reservoir (2).
3. Pull the brake fluid level switch out the right side of the reservoir.
Installation
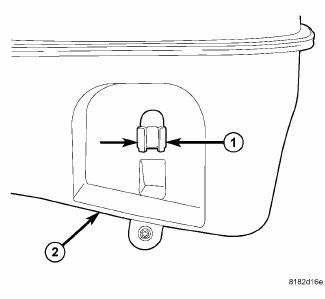
Fig. 15: LEVEL SWITCH RETAINING TABS
1. Align the brake fluid level switch with its mounting hole on the right side of the master cylinder brake fluid reservoir. Push the switch into the fluid reservoir until the switch retaining tabs (1) are expanded on the opposite side of the reservoir (2), locking it in place.
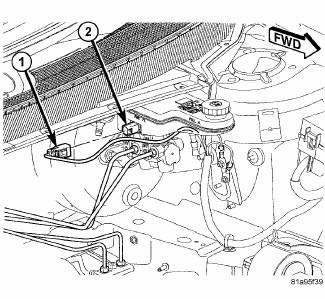
Fig. 16: BRAKE FLUID LEVEL SWITCH CONNECTOR
2. Connect the wiring harness connector (1) to the switch (2).
 Standard procedure
BASE BRAKE BLEEDING
NOTE: This bleeding procedure is only for the vehicle's base brakes
hydraulic system.
For bleeding the antilock brakes hydraulic system.
CAUTION: Before removing t ...

See also:
Sensor, evaporator temperature
DESCRIPTION
Fig. 34: Evaporator Temperature Sensor-Description
The evaporator temperature sensor measures the temperature of the conditioned
air downstream of the A/C
evaporator. The evaporator ...
Inspection
CLUTCH INSPECTION - FIXED DISPLACEMENT A/C COMPRESSOR
Fig. 212: Identifying Compressor Shaft, Clutch Plate & Shim
Examine the friction surfaces of the pulley and the clutch plate (2) for
wea ...
Control, A/C and heater, rear
DESCRIPTION
The A/C-heater controls allows the driver and front seat passenger and the
intermediate seat passengers the
ability to regulate air temperature as well as fan speed for the rear
heat ...
