Dodge Journey: Horn
REMOVAL

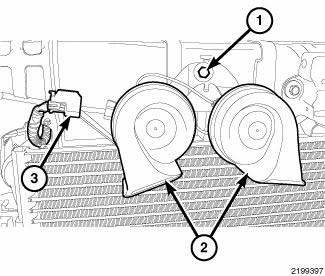
Fig. 1: Removing / Installing Horns
1. Disconnect and isolate the negative battery cable.
2. Remove the push pin type retainers along the top of the grille assembly and position the grille aside.
3. Disconnect the wire harness connectors (3) from the horns (2).
4. Remove mounting bolt (1) securing the horn bracket and remove horns.
INSTALLATION

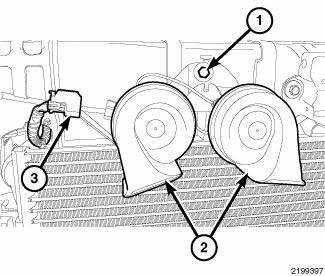
Fig. 2: Removing / Installing Horns
1. Install the horn assemblies (2).
2. Install the horn mounting bolt (1).
3. Connect the wire harness connector (3).
4. Position the grille and install the retainers.
5. Connect the negative battery cable.
 Description, Operation, Diagnosis and Testing
DESCRIPTION
The dual-note horn system features two electromagnetic horn units. The horn
system includes the following
major components:
Horn - The two horns are located at the front center of ...
 Switch, horn
REMOVAL
WARNING: On vehicles equipped with an airbag, refer to Restraint
SERVICE
INFORMATION article for warnings and cautions before servicing the horn
switch.
Fig. 3: Remov ...
See also:
Removal
Fig. 56: BRAKE PEDAL HOLDING TOOL
1. Using a brake pedal holding tool as shown, depress the brake pedal past
its first one inch (25 mm) of
travel and hold it in this position. This will isolate ...
INSTRUMENT CLUSTER
INSTRUMENT CLUSTER ...
Relay, trailer tow
DESCRIPTION
Fig. 40: Identifying Relay & Terminals
Vehicles equipped with an optional trailer tow preparation package have four
trailer tow relays, one each for the
trailer tow stop/turn ri ...
