
Dodge Journey: LIFTGATE
The liftgate can be unlocked or locked with the Remote Keyless Entry (RKE) transmitter or by activating the power door lock switch located on either front door trim panel.
NOTE: The liftgate cannot be unlocked or locked with the manual door lock plungers on the door trim panels or the door lock cylinder on the driver’s door.
To open the unlocked liftgate, squeeze the handle and pull the liftgate toward you. Gas props will raise and support the liftgate in the open position.
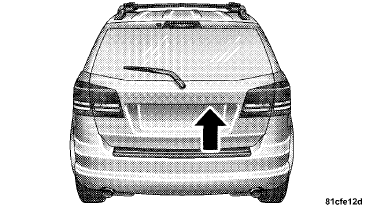
Liftgate Release
NOTE: Because the gas pressure drops with temperature, it may be necessary to assist the props when opening the liftgate in cold weather.
WARNING:
• Driving with the liftgate open can allow poisonous
exhaust gases into your vehicle. These fumes
could injure you and your passengers. Keep the
liftgate closed when you are operating the vehicle.
• If you are required to drive with the liftgate open, make sure that all windows are closed, and the blower switch on the climate control is set at high speed. DO NOT use the recirculation mode.
 WINDOWS
Power Windows
The window controls on the driver’s door trim panel
control all of the door windows.
Power Window Switches
There are single window controls on each passenger door
trim panel, wh ...
 OCCUPANT RESTRAINTS
Some of the most important safety features in your
vehicle are the restraint systems:
• Three-point lap and shoulder belts for all seating
positions.
• Advanced Front Airbags for driver and fr ...
See also:
Antenna, satellite, audio, video
ANTENNA, SATELLITE, AUDIO
DESCRIPTION
Fig. 3: Satellite Audio
If the vehicle is equipped with satellite audio, a combined antenna for AM/FM
and satellite is used. For
removal. See Removal and ...
Removal
NOTE: The antenna cables are integrated into the body wiring
harnesses. New antenna
cables is overlaid on the body wiring harness.
SATELLITE AUDIO ONLY
1. Disconnect and isolate the batter ...
Disassembly
NOTE: The rear heater-A/C housing must be removed from the vehicle for
service of
the mode door actuator and blend door actuator and it must be disassembled
for service of the A/C evaporator ...
