Dodge Journey: Removal
1. Raise and support the vehicle.
2. If equipped, remove the engine belly pan.
3. Remove the rear engine mount.
4. Remove the front engine mount through-bolt.
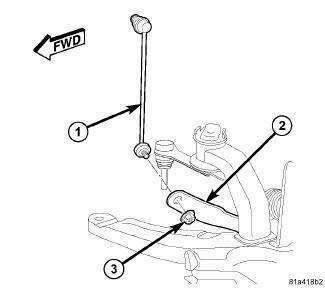
Fig. 66: Stabilizer Link Mounting To Bar
5. At each end of the stabilizer bar, while holding the stabilizer bar link (1) lower stud stationary, remove the nut (3) securing the link to the stabilizer bar (2).
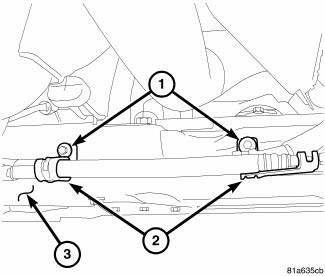
Fig. 67: Hoses At Rear Of Crossmember
6. Remove the screws (1) securing the power steering hose routing clamps (2) to the rear of the crossmember.
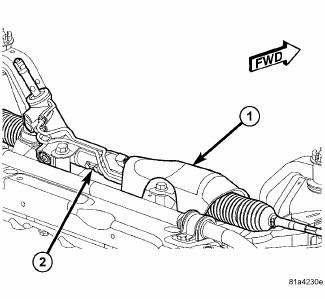
Fig. 68: Heat Shield
7. Remove the screws and push-pins securing the heat shield (1) over the right side of the steering gear (2).
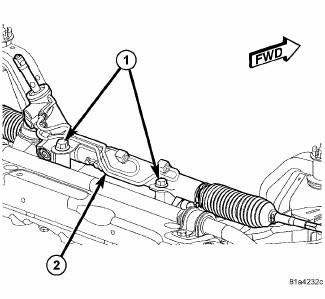
Fig. 69: Identifying Steering Gear Mounting
8. Remove the two bolts (1) securing the steering gear (2) to the crossmember.
9. Support the steering gear using a bungee cord or other to keep the steering gear from lowering when the crossmember is lowered.
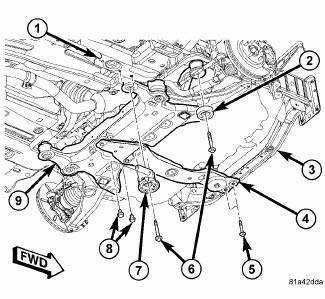
Fig. 70: Front Crossmember Mounting
NOTE: Before removing the front suspension crossmember from the vehicle, the location of the crossmember must be marked on the body of the vehicle.
Do this so the crossmember can be relocated, upon reinstallation, against the body of vehicle in the same location as before removal. If the front suspension crossmember is not reinstalled in exactly the same location as before removal, the preset front wheel alignment settings (caster and camber) may be lost.
10. Mark the location of the front crossmember (9) on the body near each mounting bolt.
11. Support the crossmember (9) with a transmission jack.
12. Remove the four mounting bolts (6) securing the front crossmember (9) to the body.
13. Remove the mounting screws (8) securing the front crossmember reinforcement brackets (7) (one each side of vehicle) to the body (1). Remove the brackets.
14. Slowly lower the crossmember using the jack until there is enough space present to remove the stabilizer bar between the rear of the crossmember and the body. Due to the fact that the fore-and-aft crossmember is still attached, do not lower crossmember any more than necessary to remove the stabilizer bar.
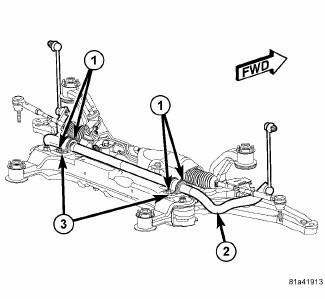
Fig. 71: Stabilizer Bar Mounting
15. Remove the screws (1) securing the stabilizer bushing retainers (3) to the crossmember.
16. Remove the two stabilizer bushing retainers (3).
17. Utilizing the slit cut into the cushions (bushings), remove the two cushions from the stabilizer bar.
18. Remove the stabilizer bar (2) from the vehicle.
 Installation
NOTE: Before stabilizer bar installation, inspect the cushions and
links for excessive
wear, cracks, damage and distortion. Replace any pieces failing inspection.
NOTE: Before installing the ...
See also:
Warning, Caution
WARNING
WARNING: The A/C system contains refrigerant under high pressure.
Repairs should
only be performed by qualified service personnel. Serious or fatal
injury
may result from ...
Reservoir, brake master cylinder
Removal
CAUTION: If at any time the master cylinder is loosened or
removed, you must
perform the master cylinder installation procedure to ensure that the
seal
(o-ring) is still ...
Diagnosis and Testing
BRAKE ROTOR
Any servicing of the rotor requires extreme care to maintain the rotor within
service tolerances to ensure proper
brake action.
Excessive runout or wobble in a rotor can increase pe ...

