Dodge Journey: Removal
WARNING: Refer to the applicable warnings and cautions for this system before performing the following operation. Failure to follow these instructions may result in serious or fatal injury.
NOTE: To prevent any contaminates from entering the rear heating-A/C system, make sure that the area around the underbody line connections is clean of any dirt or foreign residue prior to disconnecting the lines.
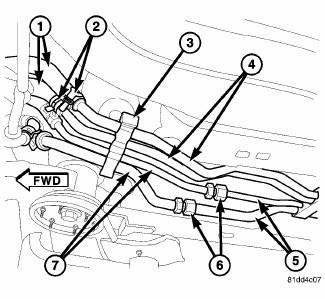
Fig. 298: Underbody Lines Front Connections
1. Disconnect and isolate the negative battery cable.
2. Recover the refrigerant from the refrigerant system.
3. Drain the engine cooling system.
4. Raise and support the vehicle.
5. Remove the rear section of the exhaust system.
6. Remove the exhaust heat shields as necessary to gain access to the underbody lines.
NOTE: Replacement of the front heater hoses will be required if the hose ends are cut for removal.
7. Release the spring type hose clamps (2) and disconnect the front heater hoses (1) from the underbody heater lines (4).
8. Loosen the fitting nuts (6) that secure the underbody refrigerant lines (5) to the front A/C liquid and suction lines (7).
9. Disconnect the front A/C liquid and suction lines from the underbody refrigerant lines and remove and discard the O-ring seals.
10. Disengage the front A/C liquid and suction lines from the front underbody refrigerant line bracket (3).
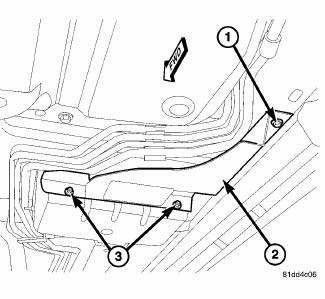
Fig. 299: Underbody Line Shield
11. Remove the two nuts (3) and one screw (1) that secure the underbody line shield (2) to the vehicle underbody and remove the shield.
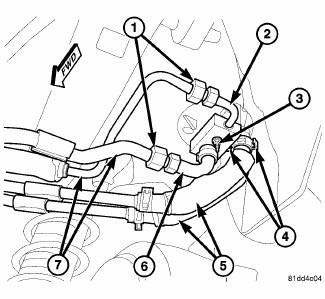
Fig. 300: Underbody Lines to Rear Housing
CAUTION: DO NOT apply excessive force on underbody heater lines or rear heater tubes when disconnecting the connections. Excessive force may damage or deform the tubes and or lines, causing an engine coolant leak.
NOTE: Replacement of the rubber heater hose ends will be required if the rubber hoses are cut for removal.
12. Release the spring type hose clamps (4) and disconnect the underbody heater lines (5) from the rear heater core tubes located behind the right rear wheel housing.
13. Lower the underbody heater lines and drain any residual coolant from the lines into a suitable container.
14. Loosen the fitting nuts (1) that secure the underbody refrigerant lines (7) to the underbody refrigerant extension lines and sealing plate (2 and 6).
15. Disconnect the underbody refrigerant lines from underbody refrigerant extension lines and remove and discard the O-ring seals.
16. Remove the nut (3) that secures the underbody refrigerant extension lines and sealing plate to the rear A/C expansion valve.
17. Disconnect the extension lines and sealing plate from the rear A/C expansion valve and remove and discard the O-ring seals.
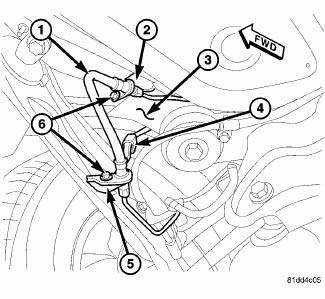
Fig. 301: Right Rear Brake Line Brackets & Wire Harness
18. Disconnect the rear ABS wire harness lead and bracket (4) from the right side of the body (3) to gain clearance to partially lower the right side of the rear cradle.
NOTE: It is not necessary to disconnect the brake line to remove it from the brackets.
19. Remove the two bolts (6) that secure the right rear brake line (1) to the two brackets (2 and 5) and remove the brake line from the brackets to gain clearance to partially lower the right side of the rear cradle.
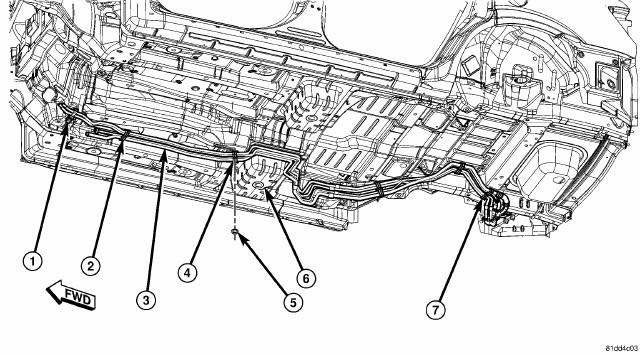
Fig. 302: Underbody Line Brackets
NOTE: Illustration shown with rear body cradle removed for clarity.
20. Remove the lower right rear shock retaining bolt.
WARNING: Be sure to properly support the rear cradle before removing the right side retaining bolts. Failure to follow this warning may result in serious or fatal injury.
21. Support the right side of the rear cradle with a suitable jack stand and remove the bolts that secure the right side of the cradle to the body.
CAUTION: Use care not to damage the ABS wire lead or the brake line when lowering the rear cradle for clearance.
22. Carefully lower the jack stand until the right side of the rear cradle (supported by the stand) is approximately 76-101 mm (3-4 in.) below the body. This will allow access to remove the underbody line assembly.
23. Remove the nut (5) that secures the underbody line bracket (4) to the stud located near the center of the underbody (6).
24. Disengage the remainder of the underbody line brackets (1, 2, and 7) from the studs located underneath the vehicle.
25. Rotate and tilt the underbody lines (3) as necessary and remove the lines from the vehicle.
26. Install plugs in, or tape over all the opened refrigerant line fittings and the rear expansion valve ports.
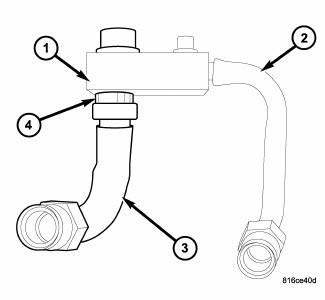
Fig. 303: Underbody Suction Extension Line
27. If required, place the extension lines and sealing plate (1) on a workbench, remove the nylon retaining clip (4) that secures the suction extension line (3) to the sealing plate and remove the suction line from the sealing plate.
 Description
Fig. 297: Underbody Lines
Models equipped with the rear heating-A/C system use metal lines attached to
the vehicle underbody to carry
refrigerant and engine coolant to and from the rear A/C evap ...
 Installation
CAUTION: Be certain to adjust the refrigerant oil level when
servicing the A/C
refrigerant system. Failure to properly adjust the refrigerant
oil level will prevent the A/C system fro ...
See also:
Actuator, recirculation door
DESCRIPTION
Fig. 15: Blend Door Actuators
The recirculation door actuator (1) is a reversible, 12 volt direct current
(DC) servo motor, which is connected
directly to the pivot shaft lever of t ...
Intermediate shaft, diesel
REMOVAL
2.0L DIESEL
1. Remove the right half shaft.
Fig. 50: 2.0L Diesel Right Half Shaft Components
2. Remove the two intermediate shaft bolts (1).
3. Remove the intermediate shaft (2).
...
Diagnosis and testing
ON-BOARD DIAGNOSTIC SYSTEM
The Powertrain Control Module (PCM) monitors critical input and output
circuits of the charging system,
making sure they are operational. A Diagnostic Trouble Code (DTC) ...
