Dodge Journey: Installation
HOUSING-AIR DISTRIBUTION
NOTE: LHD model shown in illustrations. RHD model similar.

Fig. 131: Air Distribution Housing-Removal/Installation
1. Position the air distribution housing (2) onto the rear of the HVAC housing (4).
2. Install the two metal retaining clips (3) that secure the bottom of the air distribution housing to the HVAC housing.
3. Install the seven screws (1) that secure the air distribution housing to the HVAC housing. Tighten the screws to 1.2 N.m (10 in. lbs.).
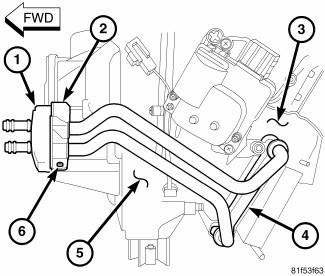
Fig. 132: Heater Core Removal/Installation
4. Carefully install the heater core (4) into the side of the air distribution housing (3).
5. On RHD models, install the air distribution housing onto the HVAC housing (5).
6. Install the flange (2) that secures the heater core tubes to the front of the HVAC housing.
7. Install the screw (6) that secures the flange to the HVAC housing. Tighten the screw to 1.2 N.m (10 in.lbs.).
NOTE: If the foam seal for the flange is deformed or damaged, it must be replaced.
8. Install the foam seal (1) onto the flange.
9. Install all of the floor distribution ducts onto the air distribution housing.
NOTE: If the heater core is being replaced, flush the cooling system.
10. Install the HVAC housing assembly.
HOUSING-AIR INLET
NOTE: LHD model shown. RHD model similar.
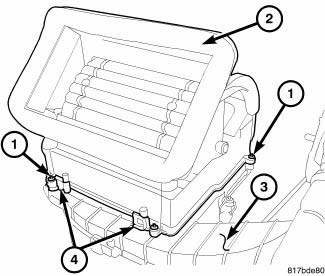
Fig. 133: Air Inlet Housing-Removal/Installation
1. Install the air inlet housing (2) onto the top of the HVAC housing (3) and engage the two plastic retaining tabs (4). Make sure the retaining tabs are fully engaged.
2. Install the four screws (1) that secure the air inlet housing to the HVAC housing. Tighten the screws to 1.2 N.m (10 in. lbs.).
3. If equipped, install the particulate air filter.
4. Install the HVAC housing assembly.
SCREEN-AIR INLET
NOTE: LHD model shown. RHD model similar.
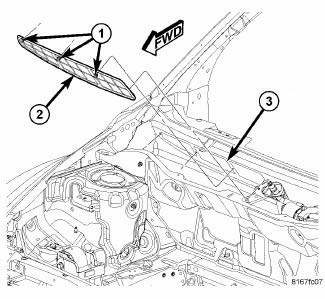
Fig. 134: Screen-HVAC Housing Air Inlet
1. Position the HVAC housing air inlet screen (2) to the cowl panel (3) and fully engage the three push-in retainers (1) that secure the screen to the panel.
2. Install the cowl grille screen.
HOUSING-HVAC
NOTE: LHD model shown in illustrations. RHD model similar.
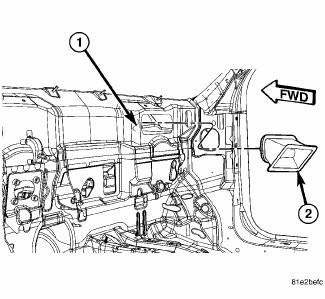
Fig. 135: Air Inlet Duct
1. If removed, install the HVAC housing air inlet duct (2) onto the passenger compartment side of the dash panel (1). Make sure the foam seal is not missing or damaged and that the retaining tabs are fully engage to the dash panel.
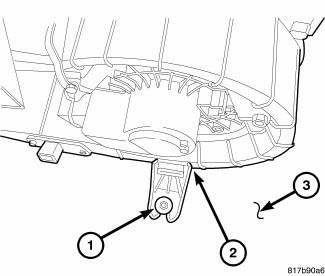
Fig. 136: HVAC Housing to Dash Panel Nut
2. Position the HVAC housing assembly (2) to the dash panel (3). Be certain that the passenger side of the HVAC housing is correctly located over the dash panel mounting stud.
3. Install the nut (1) that secures the HVAC housing to the passenger compartment side of dash panel.
Tighten the nut to 4.5 N.m (40 in. lbs.).
4. Install the condensation drain tube.
5. Install the rear floor ducts.
6. Install the instrument panel.
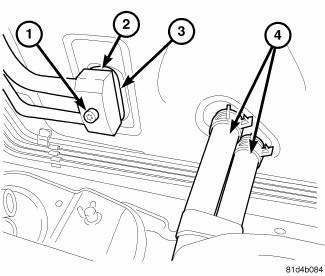
Fig. 137: Unified Liquid & Suction Line to Evaporator
7. Remove the previously installed plugs or caps and connect the heater hoses (4) to the heater core tubes.
8. Remove the tape or plugs from the refrigerant line fittings and the expansion valve ports.
9. Lubricate the rubber O-ring seals with clean refrigerant oil and install them onto the liquid and suction line fittings. Use only the specified O-ring seals as they are made of special materials compatible to the R-134a system. Use only refrigerant oil of the type recommended for the A/C compressor in the vehicle.
10. Connect the A/C liquid and suction line assembly (2) to the A/C expansion valve (3).
11. Install the nut (1) that secures the A/C liquid and suction line assembly to the A/C expansion valve.
Tighten the nut to 20 N.m (15 ft. lbs.).
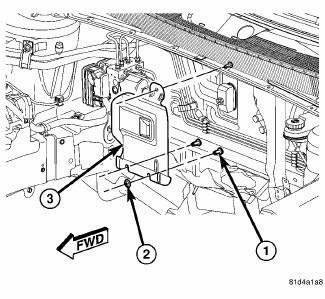
Fig. 138: Heat Shield - Unified Line
12. If equipped, position the heat shield (3) onto the studs (1) located on the dash panel in the engine compartment and install the retaining nuts (2). Tighten the nuts to 1 N.m (10 in. lbs.).
13. Reconnect the negative battery cable.
14. If the heater core is being replaced, flush the cooling system.
15. Refill the engine cooling system.
CAUTION: Do NOT run the engine with a vacuum pump in operation or with a vacuum present within the A/C system when equipped with the Denso 6SEU16 variable displacement compressor. Failure to follow this caution will result in serious A/C compressor damage.
16. Evacuate and charge the refrigerant system.
17. Initiate the Actuator Calibration function using a scan tool.
 Assembly
HOUSING-AIR DISTRIBUTION
NOTE: LHD model with A/C shown in illustrations. RHD and heater-only
models similar.
Fig. 115: Mode Door Levers-Removal/Installation
1. If removed, install the fo ...

See also:
Description
Fig. 1: BG6 Manual Transaxle
- OUTPUT SHAFT #2
- INPUT SHAFT
- OUTPUT SHAFT #1
- DIFFERENTIAL
The Aisin BG 6 6-speed transaxle is a constant-mesh transaxle that is
synchronized in all ...
RADIO OPERATION AND CELLULAR PHONES
Under certain conditions, the cellular phone being on in
your vehicle can cause erratic or noisy performance from
your radio. This condition may be lessened or eliminated
by relocating the cellular ...
Pump, transmission oil
DESCRIPTION
Fig. 359: Identifying Transmission Oil Pump Assembly
- PUMP HOUSING
- OUTER PUMP GEAR
- INNER PUMP GEAR
- REACTION SHAFT SUPPORT
- SEAL RINGS (4)
- REACTION SHAFT
- CRES ...
