Dodge Journey: Description, Operation
DESCRIPTION
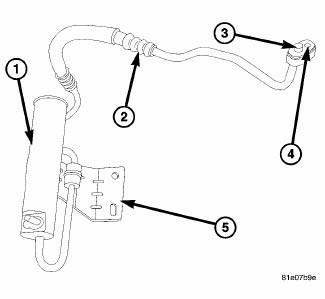
Fig. 231: Receiver/Drier Description
The A/C receiver/drier (1) stores unused refrigerant, filters the refrigerant, helps remove moisture from the refrigerant and retains any refrigerant vapor that may leave the A/C condenser until it becomes a liquid.
The A/C receiver/drier is installed on the high-side of the A/C system, below the engine compartment behind the right side of the front fascia and is connected to the right side of the A/C condenser by an integral refrigerant line (2). An integral mounting bracket (5) secures the A/C receiver/drier to the right front frame rail and the connections are sealed by use of rubber O-ring seals (3) and metal gaskets (4).
OPERATION
The A/C receiver/drier performs a filtering action to prevent foreign material in the refrigerant from contaminating the A/C expansion valve. Refrigerant enters the A/C receiver/drier as a high-pressure, low temperature liquid. Desiccant inside the A/C receiver/drier absorbs any moisture which may have entered and become trapped within the refrigerant system. In addition, during periods of high demand operation of the A/C system, the A/C receiver/drier acts as a reservoir to store surplus refrigerant.
NOTE: Replacement of the refrigerant line O-ring seals and gaskets is required anytime a refrigerant line is disconnected. Failure to replace the rubber O-ring seals and metal gaskets could result in a refrigerant system leak.
The A/C receiver/drier has no serviceable parts except for the O-ring seals and gaskets. The O-ring seals used on the connections are made from a special type of rubber not affected by R-134a refrigerant. The O-ring seals and gaskets must be replaced whenever the A/C receiver/drier is disconnected.
The A/C receiver/drier cannot be repaired and must be replaced if leaking or damaged, or if an internal failure of the A/C compressor has occurred.

 Removal
WARNING: Review safety precautions and warnings in this part
before performing
this procedure. Failure to
follow the warnings and cautions could result in possible serious or
fata ...
See also:
Flow check
To determine whether coolant is flowing through the cooling system, use one
of the following procedures:
PREFERRED METHOD
WARNING: Do not remove the cooling system pressure cap or any hose ...
Description
Vehicle wheel alignment is the positioning of all interrelated front and rear
suspension angles. These angles
affect the handling and steering of the vehicle when it is in motion. Proper
wheel al ...
FREEING A STUCK VEHICLE
If your vehicle becomes stuck in mud, sand, or snow, it
can often be moved by a rocking motion. Turn your
steering wheel right and left to clear the area around the
front wheels. Then shift back an ...
