Dodge Journey: Removal, Installation
Removal
WARNING: Refer to the applicable warnings and cautions for this system before performing the following operation. Failure to follow the warnings and cautions may result in possible serious or fatal injury.
NOTE: The HVAC housing assembly must be removed from vehicle for service of the heater core.
NOTE: LHD model with A/C shown. RHD and heater-only models similar.
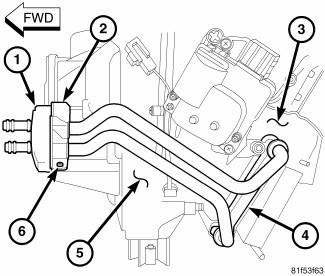
Fig. 227: Heater Core Removal/Installation
1. Remove the HVAC housing assembly and place it on a workbench.
2. Remove the left side front floor duct.
NOTE: If the foam seal for the flange is deformed or damaged, it must be replaced.
3. Remove the foam seal (1) from the flange (2) located on the front of the HVAC housing (5).
4. Remove the screw (6) that secures the flange to the front of the HVAC housing and remove the flange.
5. On RHD models, remove the air distribution housing from the HVAC housing. 6. Carefully pull the heater core (4) out of the driver side of the air distribution housing (3).
Installation
NOTE: LHD model with A/C shown. RHD and heater-only models similar.

Fig. 228: Heater Core Removal/Installation
1. Carefully install the heater core (4) into the side of the air distribution housing (3).
2. On RHD models, install the air distribution housing onto the HVAC housing (5).
3. Install the flange (2) that secures the heater core tubes to the front of the HVAC housing.
4. Install the screw (6) that secures the flange to the HVAC housing. Tighten the screw to 1.2 N.m (10 in.lbs.).
NOTE: If the foam seal for the flange is deformed or damaged, it must be replaced.
5. Install the foam seal (1) onto the flange.
6. Install the left side front floor duct.
NOTE: If the heater core is being replaced, flush the cooling system.
7. Install the HVAC housing assembly.
 Description, Operation
DESCRIPTION
NOTE: LHD model shown. RHD model similar.
Fig. 226: Heater Core-Description
The heater core (1) for the heating-A/C system is mounted within the HVAC air
distribution housing, ...
 Core, service port valve
DESCRIPTION
Refrigerant system service ports are used to recover, recycle, evacuate,
charge and test the A/C refrigerant
system. Unique sizes are used on the two service ports for the R-134a
ref ...
See also:
Description
Fig. 1: BG6 Manual Transaxle
- OUTPUT SHAFT #2
- INPUT SHAFT
- OUTPUT SHAFT #1
- DIFFERENTIAL
The Aisin BG 6 6-speed transaxle is a constant-mesh transaxle that is
synchronized in all ...
Installation
LEFT-HAND-DRIVE
Fig. 140: PEDAL AND BOOSTER MOUNTING - LHD
1. Carefully install the brake pedal and bracket assembly (1) in the vehicle
lining up the bracket with the
power brake booster mounti ...
IF YOUR ENGINE OVERHEATS
In any of the following situations, you can reduce the
potential for overheating by taking the appropriate action.
• On the highways — Slow down.
• In city traffic — While stopped, put the ...
