Dodge Journey: Fascia, rear
REMOVAL

Fig. 15: Push Pins
1. Open the hatch.
2. Remove the 6 pushpins (1) securing the fascia (2).

Fig. 16: Rivets
3. Remove the rivets (2) and the Torx screw (3) around the wheel well for the fascia (1).
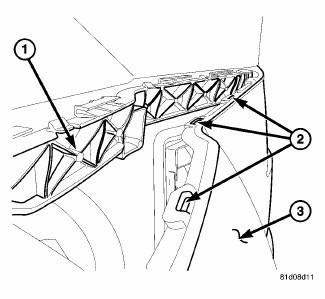
Fig. 17: Tabs, Fascia & Bracket
4. Separate the tabs (2) securing the fascia (3) to the bracket (1).

Fig. 18: Tail Light Push Pin
5. Remove the push pin (2) under the taillight (1) to the fascia (3).
6. Remove fascia (3) from vehicle.
INSTALLATION
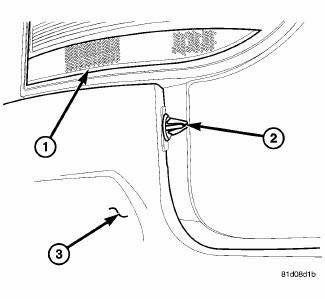
Fig. 19: Tail Light Push Pin
1. Install the fascia (3) to the vehicle and install the pushpin (2) at the tailight (1) to the body.

Fig. 20: Tabs, Fascia & Bracket
2. Clip the fascia (3) into the tabs (2) to the bracket (1).
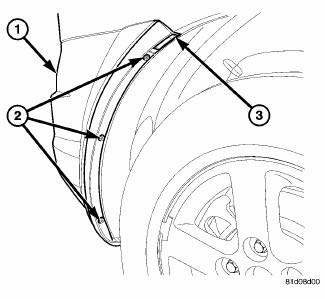
Fig. 21: Rivets
3. Install the Torx screw (3) for the fascia top the wheel opening and then install the pop rivets (2).

Fig. 22: Push Pins
4. Install the 6 push pins (1) to secure the fascia (2) to the body.
5. Close the hatch and check for fit.
 Fascia, front lower, closeout
REMOVAL
Fig. 11: Lower Fascia
1. Remove fasteners (5) to lower closeout.
Fig. 12: Push Pins - Front Lower Fascia
2. Remove push pins (1) to lower closeout.
3. Remove the front lower fascia.
...
 Reinforcement, bumper, front
REMOVAL
Fig. 23: Front Bumper Reinforcement
1. Remove the front fascia. See Removal .
2. Support bumper reinforcement (3) on a suitable lifting device.
3. Mark the position of the bolts (1) ...
See also:
Description, Operation
DESCRIPTION
Fig. 87: PRIMARY AND SECONDARY BRAKE TUBES
All master cylinders (2) are a two-outlet design and the brake tubes from
these primary and secondary outlet
ports lead directly to the In ...
Actuator, recirculation door
DESCRIPTION
Fig. 15: Blend Door Actuators
The recirculation door actuator (1) is a reversible, 12 volt direct current
(DC) servo motor, which is connected
directly to the pivot shaft lever of t ...
MOPAR PARTS
MOPAR fluids, lubricants, parts, and accessories are
available from an authorized dealer. They are recommended
for your vehicle in order to help keep the vehicle
operating at its best. ...
