Dodge Journey: Reinforcement, bumper, front
REMOVAL

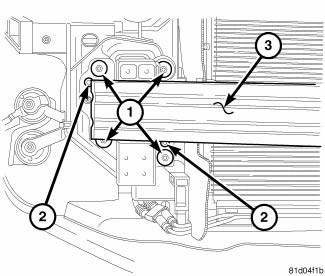
Fig. 23: Front Bumper Reinforcement
1. Remove the front fascia. See Removal .
2. Support bumper reinforcement (3) on a suitable lifting device.
3. Mark the position of the bolts (1) on frame rail to aid in installation.
4. Remove the smaller bolts (2) attaching bumper reinforcement (3) to frame rail.
5. Remove the larger bolts (1) attaching bumper reinforcement (3) to frame rail.
6. Remove bumper reinforcement (3) from vehicle.
INSTALLATION

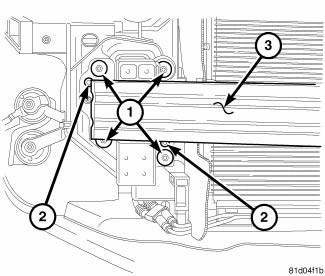
Fig. 24: Front Bumper Reinforcement
1. Position the bumper reinforcement (3) on vehicle.
NOTE: Use marks made previously to properly position bumper reinforcement
2. Install the larger bolts (1) attaching bumper reinforcement (3) to frame rail. Tighten bolts (1) to 28 N.m (250 in. lbs.).
3. Install the smaller bolts (2) attaching bumper reinforcement (3) to frame rail.
4. Install front fascia.
 Fascia, rear
REMOVAL
Fig. 15: Push Pins
1. Open the hatch.
2. Remove the 6 pushpins (1) securing the fascia (2).
Fig. 16: Rivets
3. Remove the rivets (2) and the Torx screw (3) around the wheel well for ...
 Reinforcement, bumper, rear
REMOVAL
Fig. 25: Rear Bumper Reinforcement
1. Remove rear fascia. See Removal .
2. Support bumper reinforcement (1) on a suitable lifting device.
3. Mark position of bolts (2) on frame rail ...
See also:
Diagnosis and testing
COMMON PROBLEM CAUSES
The majority of transaxle malfunctions are a result of:
Insufficient lubrication
Incorrect lubricant
Misassembled or damaged internal components
Improper operation
...
Installation
CAUTION: Be certain to adjust the refrigerant oil level when
servicing the A/C
refrigerant system. Failure to properly adjust the refrigerant
oil level will prevent the A/C system fro ...
Diagnosis and Testing
BASE BRAKE SYSTEM
NOTE: There are three diagnosis charts following that cover the RED
BRAKE
WARNING INDICATOR LAMP, BRAKE NOISE and OTHER BRAKE CONDITIONS.
RED BRAKE WARNING INDICATOR LAMP ...
