Dodge Journey: Installation
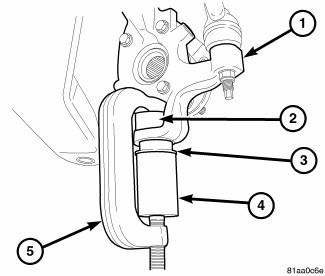
Fig. 25: Ball Joint Installation
1. Install Installer (2), Special Tool 9964-1, and Installer (4), Special Tool 9964-2 on Remover/Installer (5), Special Tool 8441-1. Place a new ball joint (stem down) into Installer 9964-2.
2. Position the assembly onto the knuckle as shown in illustration, then hand tighten the screw-drive.
3. Using hand-tools, tighten the screw-drive forcing the ball joint (3) into the knuckle (1). Continue to install the ball joint until the flange on the ball joint comes to a stop against the bottom of the knuckle.
4. Loosen the screw-drive and remove the tools.
5. Install a NEW snap-ring into the groove in the ball joint using a drift punch.
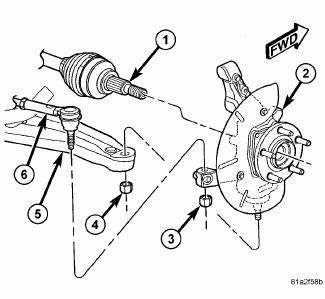
Fig. 26: Front Knuckle Mounting
6. Slide the hub and bearing in the knuckle (2) onto the splines of the half shaft outer C/V joint (1).
7. Insert the lower ball joint stud into the mounting hole in the lower control arm.
8. Install a NEW ball joint stud nut (4). Tighten the nut to 95 N.m (70 ft. lbs.).
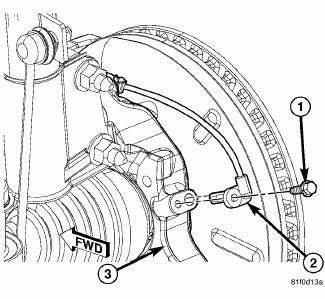
Fig. 27: Front Wheel Speed Sensor
9. Install the wheel speed sensor head (2) into the knuckle (3). Install the mounting screw (1) and tighten it to 12 N.m (106 in. lbs.).
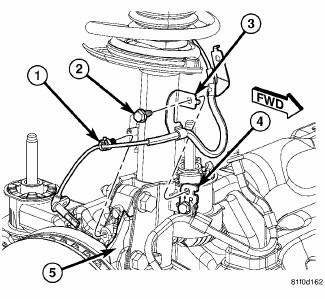
Fig. 28: Wheel Speed Sensor Routing & Brake Flex Hose Bracket
10. Install the routing clip (1) securing the wheel speed sensor cable to the knuckle (5).
11. Install the brake rotor, disc brake caliper and adapter.
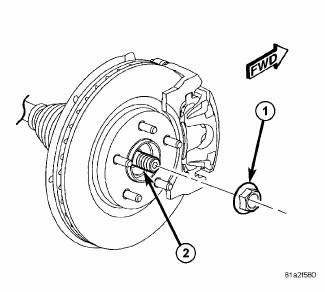
Fig. 29: View Of Hub Nut & Axle Shaft
NOTE: Always install a new hub nut. The original hub nut is one-time use only and should be discarded when removed.
12. Clean all foreign matter from the threads of the half shaft outer C/V joint.
13. Install the hub nut (1) on the end of the half shaft (2) and snug it.
14. While a helper applies the brakes to keep the hub from rotating, tighten the hub nut (3) to 132 N.m (97 ft.lbs.).
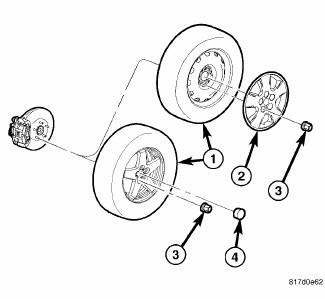
Fig. 30: TIRE AND WHEEL MOUNTING
15. Install the tire and wheel assembly (1). Install and tighten wheel mounting nuts (3) to 135 N.m (100 ft. lbs.).
16. Lower the vehicle.
17. Perform wheel alignment as necessary.
 Removal
NOTE: Before proceeding, review all Warnings and Cautions.
1. Raise and support the vehicle.
Fig. 16: TIRE AND WHEEL MOUNTING
2. Remove the wheel mounting nuts (3), then the tire and wheel a ...
 Hub and bearing
DESCRIPTION
Fig. 31: Front Hub And Bearing Mounting
The front wheel bearing and wheel hub of this vehicle are a one piece sealed
unit or hub and bearing unit type
assembly.
The hub and beari ...
See also:
Pad, heater
DESCRIPTION
Vehicles equipped with the optional heated seat system have two carbon fiber
heated seat elements located in
each front seat. One heating element is used for each seat cushion and anot ...
Line, A/C discharge
DESCRIPTION
Fig. 241: Discharge Line Description
NOTE: 2.7L shown. Other engines similar.
The A/C discharge line (2) is the refrigerant line that carries refrigerant
from the A/C compresso ...
Cooler, EGR
Description
Fig. 62: EGR COOLER
- EGR COOLER TO EGR VALVE TUBE
- MOUNTING SCREWS
- EGR COOLER MOUNTING SCREW
- MOUNTING SCREW
- EGR COOLER BODY
- EGR COOLER MOUNTING NUT
- EGR COOLE ...
