Dodge Journey: Tube, exhaust gas recirculation (EGR)
Removal
2.7L - LOWER TUBE

Fig. 50: Lower Exhaust Gas Recirculation Tube - 2.7L
WARNING: The normal operating temperature of the exhaust gas recirculate (EGR) valve and tube is very high. Therefore, never work around or attempt to service any engine component until it is completely cooled.
1. Remove lower EGR tube nut (3) from exhaust manifold.
2. Remove lower EGR tube bolts (1) from EGR valve (5).
3. Remove gasket (4) from EGR valve (5). Clean gasket surfaces on EGR valve.
4. Remove lower EGR tube (2) from vehicle.
2.7L - UPPER TUBE

Fig. 51: Upper Tube
WARNING: The normal operating temperature of the exhaust gas recirculate (EGR) valve and tube is very high. Therefore, never work around or attempt to service any engine component until it is completely cooled.
1. Disconnect negative battery cable.
2. Remove upper bolts (1) from intake manifold. Inspect gasket, replace if necessary.
3. Remove bolts (5) attaching upper tube (2) to EGR valve (3).
4. Remove the gasket (4) between upper tube (2) and EGR valve (3).
CAUTION: Clean mounting surface of EGR valve. Do not use sharp metal scraping tools. Damage may occur to the sealing surfaces of the EGR valve causing a leak.
5. Clean mounting surface of EGR valve.
3.5L

Fig. 52: UPPER MOUNTING
WARNING: The normal operating temperature of the exhaust gas recirculate (EGR) valve and tube is very high. Therefore, never work around or attempt to service any engine component until it is completely cooled.
1. Remove two upper tube mounting bolts.
2. When removing EGR tube assembly be careful not to drop the silicone rubber seals into the intake manifold. Clean gasket surfaces on the EGR valve. Note that any loose dirt can lodge between the pintle and the seat and cause valve leakage that will give a rough idle and depressed manifold vacuum.
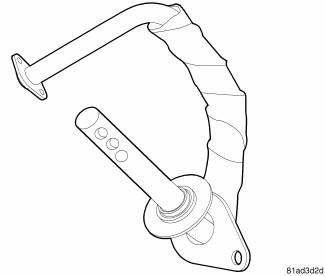
Fig. 53: UPPER TUBE
3. Remove two lower tube mounting bolts.
4. Remove tube assembly from vehicle.
Installation
2.7L - LOWER TUBE
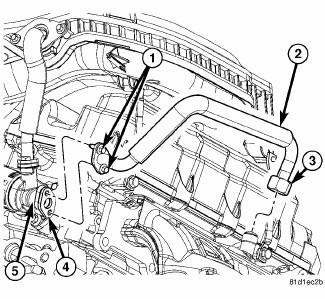
Fig. 54: Lower Exhaust Gas Recirculation Tube - 2.7L
1. Install gasket (4) to EGR valve (5).
2. Install lower EGR tube (2) to vehicle.
3. Install lower EGR tube bolts (1) to EGR valve (5). Tighten bolts to 12 N.m (106 in. lbs.).
4. Install lower EGR tube nut (3) to exhaust manifold. Tighten nut to 70 N.m (51.5 ft. lbs.).
2.7L - UPPER TUBE

Fig. 55: Identifying Inner Exhaust Gas Recirculation Tube Seal
CAUTION: Do Not use metal scrapers when cleaning the mounting surface of the EGR valve. Damage from scratching the surface may cause an improper seal.
CAUTION: Do not allow debris to enter the EGR valve when cleaning the mounting surface. Debris can lodge between the pintle and the seat causing valve leakage that results in rough idle and depressed manifold vacuum.
1. Clean and inspect gasket sealing surfaces.
NOTE: Install new rubber silicone seals on intake manifold end of EGR tube any time it is removed from the intake manifold.
2. Install new silicone rubber seal (1) on the intake manifold end of the EGR tube. Position seal 17 mm (0.67 in.) from the tube flange.

Fig. 56: Identifying Exhaust Gas Recirculation Flange, Tube & Intake Manifold
- - EGR tube flange
- - intake manifold
3. Lubricate the EGR mounting tube hole in the intake manifold with Mopar Rubber Bushing Installation Lube. Do not lubricate the EGR tube or seal.
4. Install the EGR tube (3) into the intake manifold (2) being careful not to damage the silicone rubber seals, and verify that the seals are correctly positioned in the intake manifold.
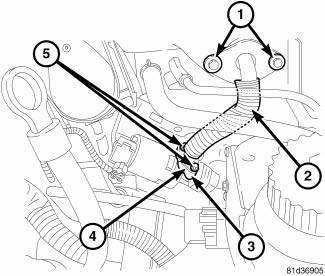
Fig. 57: Upper Tube
5. Install new gasket (4) between the EGR valve (3) and tube (2) and install bolts (5). Tighten bolts to 12 N.m (106 in. lbs.).

Fig. 58: Identifying Exhaust Gas Recirculation Flange, Tube & Intake Manifold
- - EGR tube flange
- - intake manifold
NOTE: The EGR tube flange (1) does not need to be flush with the intake manifold (2) to be sealed. The EGR tube flange can be up to 2 mm (0.08 in.) from intake manifold and still be sealed. This design allows the EGR tube position to vary with the tolerance stack up and remain properly sealed.

Fig. 59: Upper Tube
6. Tighten the EGR tube to intake manifold bolts (1) to 6 N.m (53 in. lbs.).
7. Connect negative battery cable and tighten nut to 5 N.m (45 in. lbs.).
3.5L
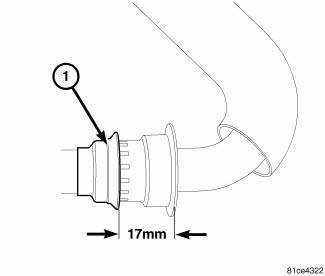
Fig. 60: Identifying Inner Exhaust Gas Recirculation Tube Seal
CAUTION: Do Not use metal scrapers when cleaning the mounting surface of the EGR valve. Damage from scratching the surface may cause an improper seal.
CAUTION: Do not allow debris to enter the EGR valve when cleaning the mounting surface. Debris can lodge between the pintle and the seat causing valve leakage that results in rough idle and depressed manifold vacuum.
1. Clean and inspect gasket sealing surfaces.
NOTE: Install new rubber silicone seals on intake manifold end of EGR tube any time it is removed from the intake manifold.
2. Install new silicone rubber seal (1) on the intake manifold end of the EGR tube. Position seal 17 mm (0.67 in.) from the tube flange.
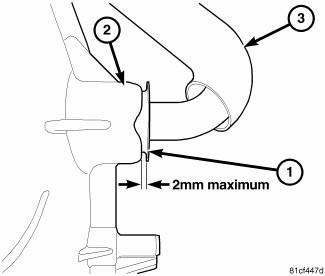
Fig. 61: Identifying Exhaust Gas Recirculation Flange, Tube & Intake Manifold
- - EGR tube flange
- - intake manifold
3. Lubricate the EGR mounting tube hole in the intake manifold with Mopar Rubber Bushing Installation Lube. Do not lubricate the EGR tube or seal.
4. Install the EGR tube (3) into the intake manifold (2) being careful not to damage the silicone rubber seals, and verify that the seals are correctly positioned in the intake manifold.

Fig. 62: Exhaust Gas Recirculation Valve Mounting Bolts 3.5
5. Install new gasket between the EGR valve and tube and install bolts (1). Tighten bolts to 15 N.m (11 ft.lbs.).

Fig. 63: Identifying Exhaust Gas Recirculation Flange, Tube & Intake Manifold
- - EGR tube flange
- - intake manifold
NOTE: The EGR tube flange (1) does not need to be flush with the intake manifold (2) to be sealed. The EGR tube flange can be up to 2 mm (0.08 in.) from intake manifold and still be sealed. This design allows the EGR tube position to vary with the tolerance stack up and remain properly sealed.
Fig. 64: UPPER MOUNTING
CAUTION: DO NOT use air tools to install bolts to intake manifold. Install bolts using hand tools only. Torque all fasteners to specification. The use of air tools can cause the threads of the intake manifold to become stripped.
6. Install the EGR tube flange mounting bolts to intake manifold. Tighten bolts to 12 N.m (106 in. lbs.).

 Valve, exhaust gas recirculation (EGR)
Description
The EGR valve consists of three major components. First there is the pintle,
valve seat, and housing which
contains and regulates the gas flow. Second there is the armature, return
s ...
See also:
Pump, water
Description
2.4L
Fig. 80: WATER PUMP - WORLD ENGINE
- ACCESSORY DRIVE BELT
- WATER PUMP PULLEY
- WATER PUMP
The water pump (3) on the world engine is attached to the water pump adapter ...
Description, Operation
DESCRIPTION
The charging system consists of:
Generator
Decoupler Pulley (2.4L and Diesel Only)
Electronic Voltage Regulator (EVR) circuitry within the Powertrain
Control Module (PCM)
Ign ...
Valve, exhaust gas recirculation (EGR)
Description
The EGR valve consists of three major components. First there is the pintle,
valve seat, and housing which
contains and regulates the gas flow. Second there is the armature, return
s ...
