Dodge Journey: Canister, vapor
Operation
All gasoline fueled vehicles use a maintenance free, evaporative (EVAP) canister. Fuel tank vapors vent into the canister. The canister temporarily holds the fuel vapors until intake manifold vacuum draws them into the combustion chamber. The Powertrain Control Module (PCM) purges the canister through the proportional purge solenoid. The PCM purges the canister at predetermined intervals and engine conditions. The proportional purge solenoid controls the purge rate of fuel vapors from the vapor canister and fuel tank to the engine intake manifold.
Removal
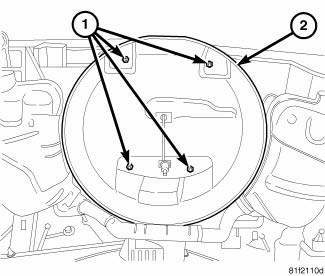
Fig. 20: Spare Tire Well
- - Nuts
- - Spare Tire Well
1. Disconnect and isolate negative battery cable.
2. Remove the spare tire.
3. Raise and support vehicle.
4. Remove the 4 nuts (1) and the spare tire well (2).
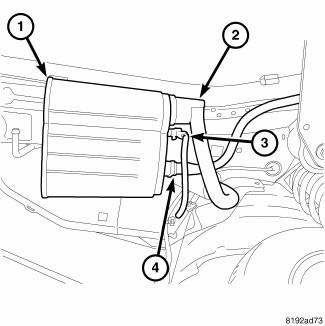
Fig. 21: Canister Mounting Evaporative System Integrity Monitor
5. Remove 2 nuts from EVAP canister mounting brackets and reposition EVAP canister assembly.
6. Disconnect purge line (4) from EVAP canister (1).
7. Remove fresh air hose (2) and electrical connector (3) from the ESIM.
8. Remove EVAP canister assembly from vehicle.
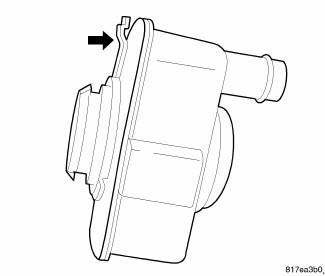
Fig. 22: Natural Vacuum Leak Detection Locking Tab
9. A lock tab (see arrow) is used on the back of the switch. Push lock tab towards switch while rotating switch counterclockwise 1/4 turn for removal.

Fig. 23: Evaporative System Integrity Monitor Switch Removed
10. Remove ESIM (1) from the EVAP canister (3).
11. Remove mounting brackets from EVAP canister.
Installation
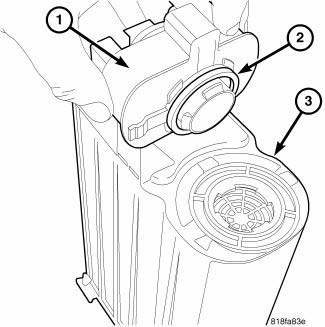
Fig. 24: Evaporative System Integrity Monitor Switch Removed
The picture displays a typical EVAP Canister and a typical ESIM switch. After installing any ESIM switch, the electrical connector on the switch must be in the 3 O'clock position. This step must be done for proper ESIM switch operation.
1. The fresh air hose that attaches to the ESIM must have a clear opening to the atmosphere. Check the fresh air hose, including the fresh air filter, for obstructions or restrictions at the ESIM. If a restriction is present, the system will not allow free flow passage of clean air, and an early shut off of the fuel fill nozzle may occur during fuel fill.
2. Be sure O-ring (2) and EVAP canister opening are clean.
3. Install ESIM (1) to the EVAP canister (3).
4. Instal mounting brackets to EVAP canister assembly.

Fig. 25: Canister Mounting Evaporative System Integrity Monitor
5. Install EVAP canister assembly to vehicle.
6. Install purge line (4) to EVAP canister (1).
7. Install fresh air hose (2) and electrical connector (3) to the ESIM.

Fig. 26: Spare Tire Well
- - Nuts
- - Spare Tire Well
8. Install the spare tire well (2) with 4 nuts (1).
9. Lower vehicle.
10. Install the spare tire.
11. Connect negative battery cable, tighten nut to 5 N.m (45 in. lbs.).
CAP, FUEL FILLER
Description
The plastic fuel fill cap is a threaded/quarter turn onto the end of the fuel filler tube. Its purpose is to retain vapors and fuel in the fuel tank.
Operation
The loss of any fuel vapor out of fuel filler tube is prevented by the use of pressure-vacuum fuel fill cap. Relief valves inside the cap will release fuel tank pressure at predetermined pressures. Fuel tank vacuum will also be released at predetermined values. This cap must be replaced by a similar unit if replacement is necessary. This is in order for the system to remain effective.
CAUTION: Remove fill cap before servicing any fuel system component to relieve tank pressure. If the cap is left loose, a Diagnostic Trouble Code (DTC) may be set.

 Solenoid, evaporative emissions purge
Operation
During the cold start warm-up period and the hot start time delay, the PCM
does not energize the solenoid.
When de-energized, no vapors are purged.
The proportional purge solenoid o ...
See also:
Seal, crankshaft oil, front
Removal
Fig. 212: Crankshaft Front Oil Seal - Removal
- SPECIAL TOOL 6771
1. Remove crankshaft vibration damper.
2. Install Special Tool 8194, Insert into crankshaft nose. Remove seal us ...
Description, Operation
DESCRIPTION
Fig. 272: Rear Heater Core Description
The rear heater core (1) is located in the rear heater-A/C housing behind the
right interior quarter trim panel.
The rear heater core is a h ...
Line, A/C discharge
DESCRIPTION
Fig. 241: Discharge Line Description
NOTE: 2.7L shown. Other engines similar.
The A/C discharge line (2) is the refrigerant line that carries refrigerant
from the A/C compresso ...
