Dodge Journey: Module, satellite video
REMOVAL
1. Disconnect and isolate the negative battery cable.
2. Move the front passenger seat to the most forward position.

Fig. 8: Antenna & Electrical Connectors
3. Disconnect the three antenna connectors (1) and the electrical connector (2).
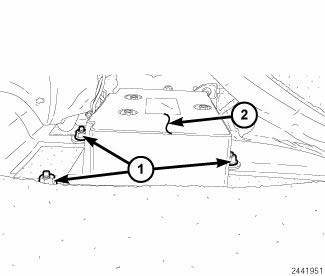
Fig. 9: Retainers & Video Module Housing
4. Remove the three retainers (1) securing the video module housing (2) to the floor, remove video housing and module from vehicle.

Fig. 10: Video Module Retainers & Video Module Housing
5. Remove the video module retainers (1) to the video module housing (2).
INSTALLATION
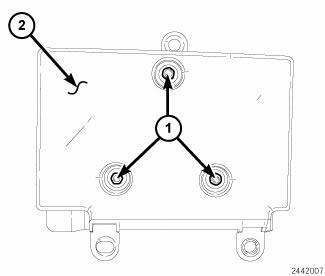
Fig. 11: Video Module Retainers & Video Module Housing
1. Install the video module to the housing.

Fig. 12: Retainers & Video Module Housing
2. Install the video module into the vehicle and Install the three retainers (1) securing the video module housing (2) to the floor.
Tighten to 6 N.m (53 in. lbs.).
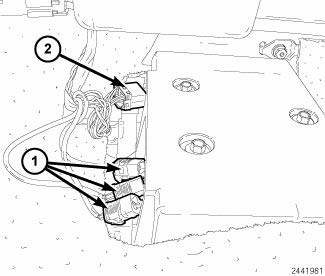
Fig. 13: Antenna & Electrical Connectors
3. Connect the three antenna connectors (1) and the electrical connector (2).
4. Move the front passenger seat back to the original position.
5. Connect the battery negative cable.
 Removal, Installation
REMOVAL
Fig. 6: Backup Camera & Liftgate & Lights
1. Disconnect the negative battery cable.
2. Remove the four retainers (1) holding the lightbar (5) to the liftgate (6).
3. Using a ...
 Monitor, media system
REMOVAL
Fig. 14: Removing / Installing Mounting Fasteners
1. Disconnect and isolate the battery negative cable.
2. Open the video screen to access the mounting fasteners.
3. Remove the mount ...
See also:
Body, air cleaner
REMOVAL
1. Disconnect negative battery cable.
Fig. 87: Inlet Air Temperature Sensor Electrical Connector
2. Disconnect inlet air temperature sensor electrical connector (3).
3. Disconnect fres ...
Installation
2.4L FRONT
Fig. 38: Removing/Installing Camshaft Position Sensor
CAUTION: Install camshaft position (CMP) sensor utilizing twisting
motion. Make sure
CMP sensor is fully seated. Do n ...
Removal
Fig. 10: Identifying Battery Cables
NOTE: If transaxle assembly is being replaced or overhauled (clutch
and/or seal
replacement), it is necessary to perform the "Quick-Learn" Proc ...
