Dodge Journey: REMOTE SOUND SYSTEM CONTROLS — IF EQUIPPED
The remote sound system controls are located on the rear surface of the steering wheel. The left and right-hand controls are rocker-type switches with a pushbutton in the center of each switch. Reach behind the steering wheel to access the switches.
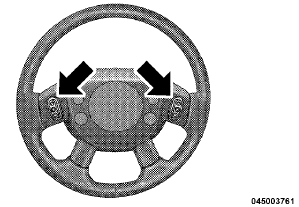
Remote Sound Controls (Back View Of Steering Wheel)
Right-Hand Switch Functions
• Press the top of the switch to increase the volume.
• Press the bottom of the switch to decrease the volume.
• Press the button in the center of the switch to change modes (i.e., AM, FM, etc.).
Left-Hand Switch Functions for Radio Operation
• Press the top of the switch to SEEK the next listenable station up from the current setting.
• Press the bottom of the switch to SEEK the next listenable station down from the current setting.
• Press the button in the center of the switch to tune to the next preset that you have programmed.
Left-Hand Switch Functions for Media (i.e., CD) Operation
• Press the top of the switch once to listen to the next track.
• Press the bottom of the switch once either to listen to the beginning of the current track or to listen to the beginning of the previous track if it is within one second after the current track begins to play.
• Press the switch up or down twice to listen to the second track, three times to listen to the third track, and so forth.
• Press the button located in the center of the switch to change to the next preset that you have programmed.
 UNIVERSAL CONSUMER INTERFACE (UCI) 0.5 — IF EQUIPPED
NOTE: This section is for sales code RES/REL and
REQ/RET radios only with uconnect . For sales code
RBZ/REN/REZ touch screen radio and REU/REX/RE1
radio, refer to the separate User’s Manual.
Thi ...
 CD/DVD DISC MAINTENANCE
To keep a CD/DVD in good condition, take the following
precautions:
1. Handle the disc by its edge; avoid touching the
surface.
2. If the disc is stained, clean the surface with a soft cloth,
wip ...
See also:
Intermediate shaft, gas
REMOVAL
2.4L
1. Remove the right half shaft.
Fig. 44: Intermediate Shaft - 2.4L
2. Remove the three intermediate shaft bolts (1).
3. Remove the intermediate shaft (2).
2.7L
1. Remove the r ...
Installation
Two unique brake lamp switches are used in this vehicle, depending upon
whether the vehicle was built during
early or late production. These switches are not interchangeable. Both switches
are il ...
Manifold, exhaust, rear
Removal
Fig. 305: Belly Pan
- belly pan fasteners
- belly pan
1. Remove the belly pan (2).
Fig. 306: Oxygen Sensors
2. Remove the oxygen sensors (2) and (4).
Fig. 307: Exhaust Gas R ...
