Dodge Journey: Removal, Installation
REMOVAL

Fig. 6: Backup Camera & Liftgate & Lights
1. Disconnect the negative battery cable.
2. Remove the four retainers (1) holding the lightbar (5) to the liftgate (6).
3. Using a trim stick or equivalent, release the lightbar (5) from the clips.
4. Disconnect the electrical connectors from the backup camera (2) and the lights (3).
5. Disconnect the liftgate release cable (4) from the lightbar (5).
6. Remove the retainer from the back of the camera.
7. Unclip the camera cover from the lightbar.
8. Remove the camera mounting retainers.
9. Remove the camera from the lightbar.
INSTALLATION
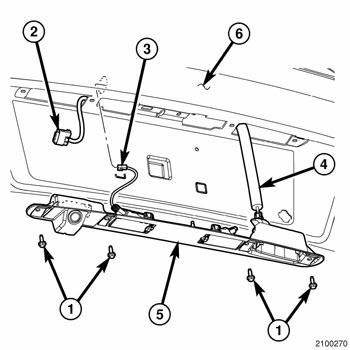
Fig. 7: Backup Camera & Liftgate & Lights
1. Install the camera to the lightbar.
2. Install the camera mounting retainers.
3. Clip the camera cover to the lightbar.
4. Install the retainer to the back of the camera.
5. Connect the liftgate release cable (4) to the lightbar (5).
6. Connect the electrical connectors to the backup camera (2) and the lights (3).
7. Install the lightbar to the tailgate.
8. Install the four retainers (1) holding the lightbar (5) to the liftgate (6).
9. Connect the negative battery cable.
 Diagnosis and Testing
Rear Camera
The hardwired circuits of the Rear View Camera (RVC) and those between the
RVC and the radio receiver may
be diagnosed using conventional diagnostic tools and procedures.
The wiring ...
 Module, satellite video
REMOVAL
1. Disconnect and isolate the negative battery cable.
2. Move the front passenger seat to the most forward position.
Fig. 8: Antenna & Electrical Connectors
3. Disconnect the three ...
See also:
Standard procedure
ENGINE GASKET SURFACE PREPARATION
Fig. 4: PROPER TOOL USAGE FOR SURFACE PREPARATION
To ensure engine gasket sealing, proper surface preparation must be
performed, especially with the use of
alu ...
POWER SUNROOF — IF EQUIPPED
The power sunroof switch is located between the sun
visors on the overhead console.
Power sunroof Switch
WARNING:
• Never leave children in a vehicle with the key in
the ignition switch. Occu ...
Description
Fig. 1: Exterior Lighting System
The exterior lighting system for this vehicle includes the following exterior
lamp units:
Center High Mounted Stop Lamp (3) - A standard equipment Center High ...
