Dodge Journey: Disassembly, Assembly
DISASSEMBLY
NOTE: If the reservoir is being replaced, the new reservoir will come with a brake fluid level switch installed. The old fluid switch does not need to be transferred from the old reservoir to the new reservoir.
1. Clean the master cylinder housing and brake fluid reservoir. Use only Mopar Brake Parts Cleaner or equivalent.
2. Remove the brake fluid reservoir cap. Using a syringe or equivalent type tool, empty as much brake fluid as possible from the reservoir.
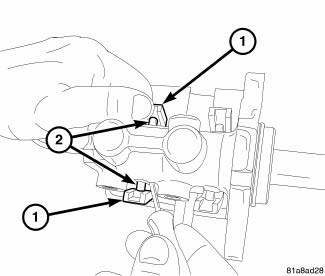
Fig. 100: REMOVING RESERVOIR FROM MASTER CYLINDER PINS
3. Remove the four reservoir retaining tabs from the mounting posts on the master cylinder housing.
4. Pull the reservoir straight up and remove it from the grommet seals in master cylinder housing.

Fig. 101: SEAL ON REAR OF MASTER CYLINDER
5. Remove the vacuum O-ring seal (2) from the master cylinder mounting flange (1).
ASSEMBLY
NOTE: If the reservoir is being replaced, the new reservoir will come with a brake fluid level switch installed. The old fluid switch does not need to be transferred from the old reservoir to the new reservoir.

Fig. 102: SEAL ON REAR OF MASTER CYLINDER
1. Install a NEW vacuum O-ring seal (2) on the master cylinder mounting flange (1) making sure the O-ring fits evenly against the mounting flange.
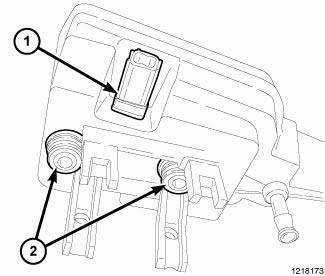
Fig. 103: Grommet Seals
2. Lubricate the reservoir mounting area with fresh clean brake fluid. With the grommet seals (2) on the fluid reservoir spigots, place the reservoir in position over the master cylinder. Install the fluid reservoir by firmly pressing down on the fluid reservoir. Once installed, make sure the fluid reservoir is touching the top of both grommet seals.
3. Push the reservoir retaining tabs over the mounting posts on the master cylinder housing. Make sure the retaining tabs are securely engaged.
4. Fill and thoroughly bleed the master cylinder before installing it.
5. Install the master cylinder.
 Removal
LEFT-HAND-DRIVE
CAUTION: The vacuum in the power brake booster must be depleted
before removing
the master cylinder to avoid damaging the master cylinder and to prevent
inhalation of ...
 Installation
LEFT-HAND-DRIVE
NOTE: The master cylinder must be bled before installing it on the
vehicle.
1. Bench bleed the master cylinder.
2. Wipe the face of the power brake booster clean where the ...
See also:
REPLACEMENT BULBS
All the inside bulbs are brass or glass wedge base.
Aluminum base bulbs are not approved and should not
be used for replacement.
LIGHT BULBS – Interior Bulb Number
Courtesy/Reading Lamps (Incand ...
Module, satellite video
REMOVAL
1. Disconnect and isolate the negative battery cable.
2. Move the front passenger seat to the most forward position.
Fig. 8: Antenna & Electrical Connectors
3. Disconnect the three ...
Fluid
Diagnosis and Testing
BRAKE FLUID CONTAMINATION
Indications of fluid contamination are swollen or deteriorated rubber parts.
Swelling indicates the presence of
petroleum in the brake fluid.
To ...
