Dodge Journey: Switch, backup lamp
REMOVAL
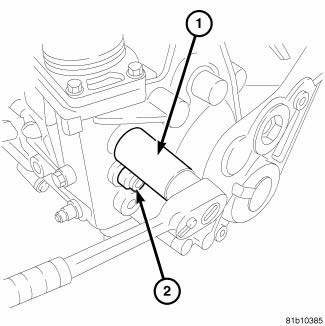
Fig. 249: Back-Up Lamp Switch
1. Disconnect battery negative cable.
2. Raise vehicle on hoist.
3. Disconnect backup lamp switch connector.
4. Remove backup lamp switch (1).
INSTALLATION

Fig. 250: Back-Up Lamp Switch
1. Install the backup lamp switch (1) with a new washer and tighten to 40 N.m (29 ft. lbs.).
2. Connect backup lamp switch connector.
3. Lower vehicle.
4. Connect battery negative cable.
 Assembly
Fig. 239: Output Shaft #2 & Needle Bearing
1. Install the reverse needle bearing (1) onto the output shaft # 2 (2).
Fig. 240: Synchronizer
NOTE: Pay attention to the direction when inser ...
 Synchronizer
DISASSEMBLY
Place synchronizer in a clean shop towel and wrap. Press on inner hub.
Carefully open up shop towel and
remove springs, balls, keys, hub, and sleeve.
CLEANING
Do not attempt to clean ...
See also:
ILLUMINATED ENTRY
The interior lights will turn on when you press the
UNLOCK button on the Remote Keyless Entry (RKE)
transmitter or open a door or the liftgate.
This feature also turns on the approach lighting (if
...
Control, A/C and heater, rear
DESCRIPTION
The A/C-heater controls allows the driver and front seat passenger and the
intermediate seat passengers the
ability to regulate air temperature as well as fan speed for the rear
heat ...
Diagnosis and Testing
LAMPS/LIGHTING - EXTERIOR
WARNING: To avoid serious or fatal injury on vehicles equipped
with airbags, disable
the Supplemental Restraint System (SRS) before attempting any steering
...
