Dodge Journey: Resistor, blower motor, rear
DESCRIPTION
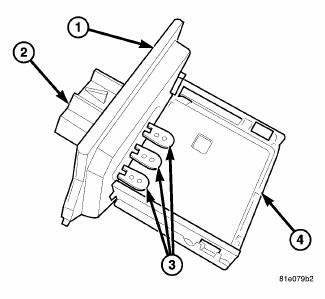
Fig. 62: Rear Blower Resistor
A blower motor resistor is used on this model when equipped with the manual temperature control (MTC) rear heating-A/C system. Models equipped with the automatic temperature control (ATC) rear heating-A/C system use a blower motor power module, instead of the blower motor resistor. The rear blower motor resistor is mounted to the inboard side of the rear heating-A/C housing, located on the right side of the vehicle. The rear blower motor resistor consists of a molded plastic mounting plate (1) with an integral wire connector receptacle (2). Concealed behind the mounting plate are resistors (3) located between a two-piece stamped steel heat sink (4).
The rear blower motor resistor can be accessed for service without removing the rear heater-A/C housing.
OPERATION
The blower motor resistor for the rear heating-A/C system is connected to the vehicle electrical system through a dedicated wire lead and connector of the rear heater-A/C wire harness. The rear blower motor resistor has an electrical circuit board with three resistors, each of which will reduce the current flow through the rear blower motor to change the blower motor speed.
The blower motor switch for the MTC rear heater-A/C system directs the ground path for the rear blower motor through the correct resistor to obtain the selected speed. With the rear blower motor control in the lowest speed position, the ground path for the rear blower motor is applied through all of the resistors. Each higher speed selected with the rear blower motor control applies the blower motor ground path through fewer of the resistors, increasing the rear blower motor speed. When the blower motor switch is in the highest speed position, the blower motor resistors are bypassed and the blower motor receives a direct path to ground through the rear blower motor switch.
The rear blower motor resistor cannot be adjusted or repaired and it must be replaced if inoperative or damaged.
Diagnosis and Testing
REAR BLOWER MOTOR RESISTOR
NOTE: Wiring Information includes wiring diagrams, proper wire and connector repair procedures, further details on wire harness routing and retention, as well as pin-out and location views for the various wire harness connectors, splices and grounds.
1. Disconnect and isolate the negative battery cable.
2. Disconnect the wire harness connector from the blower motor resistor.
3. Using an ohmmeter, check for continuity between all of the blower motor resistor terminals. In each case there should be continuity. If OK, repair the wire harness circuits between the blower motor switch and the blower motor resistor or the blower motor as required. If not OK, replace the inoperative blower motor resistor.
REMOVAL

Fig. 63: Rear Blower Resistor Removal/Installation
1. Disconnect and isolate the negative battery cable.
2. Remove right rear quarter trim panel.
3. Disconnect the wire harness connector (4) from the rear blower motor resistor (3).
4. Remove the two screws (1) that secure the rear blower motor resistor to the rear heater-A/C housing (2) and remove the resistor.
INSTALLATION
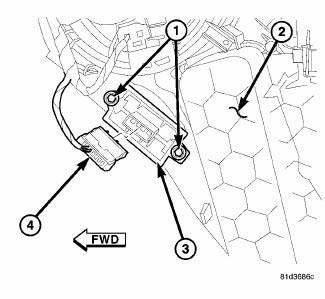
Fig. 64: Rear Blower Resistor Removal/Installation
1. Position the rear blower motor resistor (3) onto the rear heater-A/C housing (2).
2. Install the two screws (1) that secure the rear blower motor resistor to the rear heater-A/C housing.
Tighten the screws to 1.2 N.m (10 in. lbs.).
3. Connect the wire harness connector (4) to the rear blower motor resistor.
4. Install the right rear quarter trim panel.
5. Reconnect the negative battery cable.
 Module, power, rear blower motor
DESCRIPTION
Fig. 59: Rear Blower Power Module Description
A blower motor power module is used on this model when equipped with the
automatic temperature control
(ATC) rear heating-A/C system. M ...

See also:
Diagnosis and testing
COMMON PROBLEM CAUSES
The majority of transaxle malfunctions are a result of:
Insufficient lubrication
Incorrect lubricant
Misassembled or damaged internal components
Improper operation
...
Accumulator
DESCRIPTION
Fig. 238: Identifying Underdrive & Overdrive Accumulators
- RETURN SPRING
- UNDERDRIVE CLUTCH ACCUMULATOR
- SEAL RING (2)
- OVERDRIVE CLUTCH ACCUMULATOR
The 41TE underd ...
Removal
LEFT-HAND DRIVE
NOTE: The ABM is only separately serviceable for non-HSA (Hill Start
Assist) equipped
vehicles. Do not remove the ABM for vehicles equipped with HSA.
1. Disconnect the nega ...
