Dodge Journey: Removal
2.4L
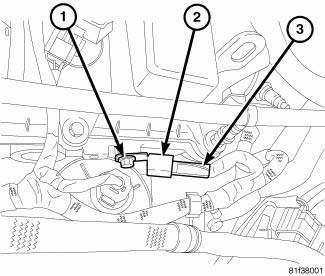
Fig. 3: Capacitor 2.4L
- - Bolt
- - Capacitor
- - Connector
1. Disconnect and isolate negative battery cable at battery.
2. Remove engine cover.
3. Remove electrical connector (3).
4. Remove mounting bolt (1) and ignition capacitor (2).
2.7L 1st
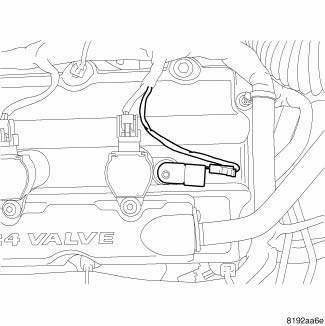
Fig. 4: 1st Ignition Capacitor - 2.7L
1. Disconnect and isolate the negative battery cable.
2. Disconnect the electrical connector.
3. Remove nut and capacitor.
2.7L 2nd
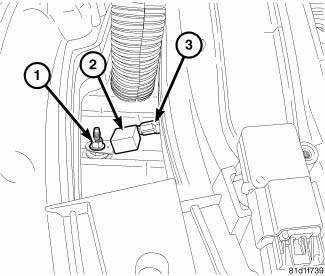
Fig. 5: 2nd Ignition Capacitor - 2.7L
The ignition capacitor is located under the intake manifold on the drivers side of the engine.
1. Disconnect and isolate negative battery cable at battery.
2. Remove electrical connector (3).
3. Remove mounting bolt (1) and ignition capacitor (2).
3.5L
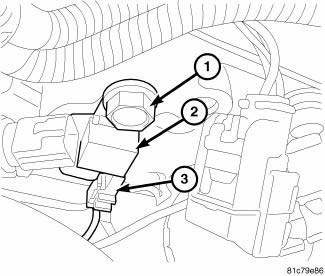
Fig. 6: Ignition Capacitor - 3.5L
The ignition capacitor is located on the drivers side of the engine.
1. Disconnect and isolate negative battery cable at battery.
2. Remove electrical connector (3).
3. Remove mounting bolt (1) and ignition capacitor (2).

 Installation
2.4L
Fig. 7: Capacitor 2.4L
- Bolt
- Capacitor
- Connector
1. Install ignition coil capacitor (2) and bolt (1), tighten bolt to 10 N.m
(88.5 ft. lbs.).
2. Connect electrical connect ...
See also:
Insulator, engine mount, rear
Removal
Fig. 234: Belly Pan
1. Remove throttle body air inlet hose and air cleaner housing assembly.
2. Raise the vehicle.
3. Remove the belly pan (2).
Fig. 235: Identifying Rear Mount B ...
Removal, Installation
REMOVAL
WARNING: To avoid serious or fatal injury on vehicles equipped
with airbags, disable
the Supplemental Restraint System (SRS) before attempting any steering
wheel, steering co ...
Valve, exhaust gas recirculation (EGR), 2.0L Diesel
Description
The EGR valve is mounted to the intake manifold.
Operation
The engines use Exhaust Gas Recirculation (EGR) systems. The EGR system
reduces oxides of nitrogen (NOx)
in engine exhaust ...
