Dodge Journey: Installation
BULBS
HEADLAMP HIGH BEAM
CAUTION: Always use the correct bulb size and type for replacement. An incorrect bulb size or type may overheat and cause damage to the lamp, the socket or the lamp wiring.
CAUTION: Do not contaminate the bulb glass by touching it with your fingers or by allowing it to contact other oily surfaces. Shortened bulb life will result.
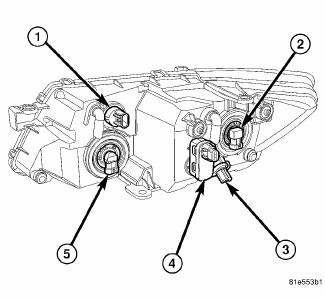
Fig. 71: Headlamp Bulb
1. Align the headlamp bulb and base (5) with the keyed opening on the back of the front lamp unit reflector.
2. Insert the bulb into the reflector until the base is firmly seated.
3. Rotate the bulb base clockwise about 30 degrees to lock it into place.
4. Reconnect the wire harness connector to the connector receptacle integral to the headlamp bulb base.
5. Reconnect the battery negative cable.
HEADLAMP LOW BEAM
CAUTION: Always use the correct bulb size and type for replacement. An incorrect bulb size or type may overheat and cause damage to the lamp, the socket or the lamp wiring.
CAUTION: Do not contaminate the bulb glass by touching it with your fingers or by allowing it to contact other oily surfaces. Shortened bulb life will result.
1. Align the headlamp bulb and base (2) with the keyed opening on the back of the front lamp unit reflector.
2. Insert the bulb into the reflector until the base is firmly seated.
3. Rotate the bulb base clockwise about 30 degrees to lock it into place.
4. Reconnect the wire harness connector to the connector receptacle integral to the headlamp bulb base.
5. Reconnect the battery negative cable.
POSITION LAMP
CAUTION: Always use the correct bulb size and type for replacement. An incorrect bulb size or type may overheat and cause damage to the lamp, the socket or the lamp wiring.
NOTE: The following procedure applies only to vehicles manufactured for certain export markets. Vehicles manufactured for domestic markets do not have a position lamp bulb, socket or wiring provided in the front lamp unit.
1. Align the base of the bulb with the position lamp bulb socket (3).
2. Push the bulb straight into the socket until the base is firmly seated.
3. Align the socket and bulb with the keyed opening on the back of the front lamp unit housing.
4. Insert the socket and bulb straight into the housing until the socket is firmly seated.
5. Rotate the socket clockwise about 30 degrees to lock it into place.
6. Reconnect the wire harness connector to the connector receptacle integral to the position lamp bulb socket.
7. Reconnect the battery negative cable.
TURN SIGNAL/SIDE MARKER LAMP
CAUTION: Always use the correct bulb size and type for replacement. An incorrect bulb size or type may overheat and cause damage to the lamp, the socket or the lamp wiring.
1. Align the base of the bulb with the park/turn signal lamp bulb socket (1).
2. Push the bulb straight into the socket until the base is firmly seated.
3. Align the socket and bulb with the keyed opening on the back of the front lamp unit housing.
4. Insert the socket and bulb straight into the housing until the socket is firmly seated.
5. Rotate the socket clockwise about 30 degrees to lock it into place.
6. Reconnect the wire harness connector to the connector receptacle integral to the park/turn signal lamp bulb socket.
7. Reconnect the battery negative cable.
LAMP
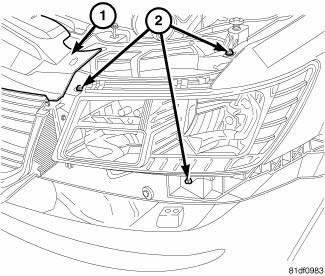
Fig. 72: Fascia & Grille
NOTE: If the front lamp is being replaced with a new unit, the bulbs and sockets must be transferred from the unit being replaced.
1. Position the front lamp unit to the front of the vehicle.
2. Reconnect the headlamp and dash wire harness connectors to the back of the lamp housing.
3. Position the front lamp unit into the Front End Module (FEM).
4. Flex the fascia and grille (1) outward far enough to install and tighten the three screws (2) that secure the front lamp unit to the FEM. Tighten the screws securely.
5. Reinstall the four plastic push-pin fasteners that secure the upper grille to the FEM.
6. Reinstall the front fascia on the same side of the vehicle as the front lamp unit being installed.
7. Reconnect the battery negative cable.
8. Confirm proper headlamp alignment.
 Standard procedure, Removal
STANDARD PROCEDURE
FRONT LAMP UNIT MOISTURE CLEARING
Some occasional moisture accumulation inside a vented front lamp unit is
normal and appears as a fogging on
the inside of the lamp lens, simil ...
 Wiring, trailer tow
DESCRIPTION
Fig. 73: Instruction Sheet Are Placed In Glove Box
Vehicles equipped with an optional Trailer Tow Preparation package have a
trailer tow wiring harness and an
instruction sheet (1) ...
See also:
Sensor, transmission range
DESCRIPTION
Fig. 386: Locating Transmission Range Sensor (TRS)
- TRANSMISSION RANGE SENSOR
The Transmission Range Sensor (TRS) (1) is mounted to the top of the valve
body inside the transa ...
Diagnosis and Testing, Removal, Installation
DIAGNOSIS AND TESTING
INSTRUMENT CLUSTER
As a quick diagnosis, the cluster will perform a functional check of the
odometer display, transmission range
display and warning indicators after the ign ...
Removal
LEFT-HAND-DRIVE
1. Disconnect and isolate the battery negative cable from its post on the
battery.
2. If equipped, remove the silencer pad below the steering column opening cover.
Fig. 132: S ...
