Dodge Journey: Description
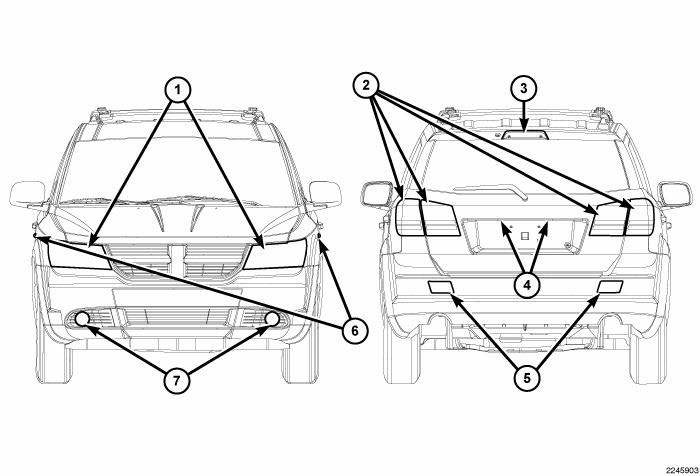
Fig. 1: Exterior Lighting System
The exterior lighting system for this vehicle includes the following exterior lamp units:
- Center High Mounted Stop Lamp (3) - A standard equipment Center High Mounted Stop Lamp (CHMSL) is centered on the upper liftgate header above the liftgate glass opening at the rear of the vehicle.
- Front Fog Lamps (7) - Vehicles equipped with this option have a separate front fog lamp unit mounted near each outboard end of the front fascia, below each front lamp unit.
- Front Lamp Units (1) - A standard equipment front lamp unit with two, single-filament headlamp bulbs is located at each outboard side of the grille opening in the Front End Module (FEM).
- Front Position Lamps - A front position lamp is integral to each front lamp unit on vehicles manufactured for export markets where they are required.
- License Plate Lamps (4) - Two standard equipment rear license plate lamp units are integral to the liftgate handle assembly, just above the license plate tub formation on the outer liftgate panel.
- Rear Fog Lamps (5) - A rear fog lamp unit is mounted near each outboard end of the rear fascia, below each rear lamp unit on vehicles manufactured for export markets where they are required.
- Rear Lamp Units (2) - A standard equipment two-piece rear lamp unit is mounted on each side at the rear of the vehicle. One piece of the rear lamp is secured to the end of each quarter panel on either side of the liftgate opening and the second piece is secured to each side of the liftgate outer panel, adjacent to the first piece of the rear lamp when the liftgate is closed.
- Repeater Lamps (6) - A repeater lamp is mounted to each front fender just behind the front wheel opening on vehicles manufactured for export markets where they are required.
These exterior lighting lamp units and their controls are combined to provide the following exterior lighting features:
- Automatic Headlamps - Vehicles with the automatic headlamps option are equipped with a unique left (lighting) multi-function switch that includes an AUTO (Automatic) position and have an automatic headlamp sensor to sense ambient light levels. The automatic headlamp sensor is integral to the sun load sensor located on the top of the instrument panel. When the AUTO position of the headlamp switch is selected, the headlamps are turned ON and OFF automatically as ambient light levels dictate.
- Backup Lamps - The backup (or reverse) lamps include a clear bulb, reflector and clear lens that are integral to the liftgate portions of each rear lamp unit.
- Brake Lamps - The brake (or stop) lamps include a clear bulb, reflector and red lens that are integral to the quarter panel portions of each rear lamp unit, and the red lens and multiple Light-Emitting Diode (LED) units of the CHMSL.
- Daytime Running Lamps - Daytime Running Lamps (DRL) are standard equipment on vehicles manufactured for sale in Canada and optional on vehicles manufactured for the United States. Vehicles with the DRL feature enabled illuminate the high beam headlamp bulb in each front lamp unit at a reduced intensity to serve as the DRL.
- Exterior Lamp Fail-Safe Operation - The ElectroMechanical Instrument Cluster (EMIC) (also known as the Cab Compartment Node/CCN) and the Totally Integrated Power Module (TIPM) provide a failsafe feature which will automatically turn ON the low beam headlamps and all park lamps when the ignition switch is in the ON position and there is no detected communication from the Steering Control Module (SCM), or when the Local Interface Network (LIN) data bus or Controller Area Network (CAN) data bus are inoperative.
- Exterior Lamp Load Shedding - The TIPM provides a battery saver feature which will automatically turn OFF all exterior lamps (except the park/tail lamps in certain export markets) that remain ON with the ignition switch in the LOCK position after a timed interval of about eight minutes.
- Front Fog Lamps - The optional front fog lamps include the clear bulb, reflector and clear lens of each adjustable front fog lamp unit.
- Hazard Warning Lamps - The hazard warning lamps include the bulbs, reflectors and lenses of each lamp in the right and left, front and rear turn signal circuits.
- Headlamps - The headlamps include dual, single filament halogen bulbs, an adjustable reflector and a clear lens integral to each front lamp unit.
- Headlamp Leveling - Headlamp leveling is available only in certain markets where it is required equipment. A headlamp leveling actuator motor on each headlamp unit and a headlamp leveling switch integral to the switch pod in the instrument panel center stack allows the headlamp beam pattern to be adjusted by the vehicle operator from the interior of the vehicle to compensate for passenger or cargo loads.
- Headlamp Time Delay - On vehicles equipped with the automatic headlamps option, when this feature is enabled the low or high beam headlamps remain illuminated for a programmable delay interval of 0 (disabled), 30, 60 or 90 seconds after the ignition switch has been turned to the OFF position. If the vehicle is equipped with the optional Electronic Vehicle Information Center (EVIC), this feature is customer programmable through the EVIC.
- Headlamps With Wipers - Vehicles with the automatic headlamps option have an automatic headlampswith- wipers feature. When this feature is enabled and the AUTO position of the headlamp switch is selected, the headlamps are turned ON automatically whenever the windshield wipers are turned ON; and, if the headlamps were turned ON automatically when the wipers were turned ON, they will also turn OFF automatically when the wipers are turned OFF if the appropriate ambient light conditions exist. If the vehicle is equipped with the optional EVIC, this feature is customer programmable through the EVIC.
- Optical Horn - Also known as flash-to-pass, the beam selection function of the left (lighting) multifunction switch control stalk has a momentary intermediate position that allows the headlamp high beams to be flashed momentarily, without changing the headlamp beam selection.
- Park/Tail Lamps - The front park lamps include the amber bulbs, reflectors and clear lenses integral to each front lamp unit and, if the vehicle is so equipped, the clear position lamp bulb integral to each front lamp unit. The rear tail lamps include the clear bulbs, reflectors and red lenses integral to both the quarter panel and liftgate portions of each rear lamp unit as well as the bulbs and lenses of the license plate lamp units.
- Rear Fog Lamps - Rear fog lamps are available only in certain export markets where they are required equipment. The rear fog lamps include a clear bulb, a red lens and a reflector that are integral to each rear fog lamp unit.
- Turn Signal Lamps - The front turn signal lamps include an amber bulb, a reflector and a clear lens that are integral to each front lamp unit. In certain export markets where they are required, the clear bulbs and lenses of the repeater lamps on each front fender will also be included in the front turn signal circuits. The rear turn signal lamps include an amber bulb, a reflector and a clear lens that are integral to the quarter panel portion of each rear lamp unit.
Other components of the exterior lighting system for this vehicle include:
- Backup Lamp Switch - A plunger-type backup lamp switch is installed through the transmission housing of vehicles equipped with a manual transmission and is actuated by the shifter mechanism within the transmission when REVERSE gear is selected. On vehicles with an optional automatic transmission, a stand alone Transmission Range Sensor (TRS) performs the backup lamp switch function.
- Brake Lamp Switch - A plunger-type brake lamp switch is located on the brake pedal support bracket under the instrument panel and is actuated by the brake pedal arm when the brake pedal is depressed.
- Clockspring - The clockspring includes an integral turn signal cancel cam, which provides automatic turn signal cancellation as the steering wheel is rotated back to its centered position following a vehicle turning maneuver. The clockspring is located near the top of the steering column, directly beneath the steering wheel.
- Hazard Switch - A latching push button-actuated hazard switch is integral to the switch pod located just above the heater and air conditioner controls in the center stack area of the instrument panel.
- Headlamp Leveling Switch - A four mode push button-actuated headlamp leveling switch is integral to the switch pod located just above the heater and air conditioner controls in the center stack area of the instrument panel of vehicles manufactured for certain export markets where the headlamp leveling feature is required.
- Instrument Cluster - The ElectroMechanical Instrument Cluster (EMIC) is also known as the Cab Compartment Node (CCN) in this vehicle. The EMIC/CCN is located in the instrument panel above the steering column opening, directly in front of the driver.
- Instrument Panel Switch Pod - The instrument panel switch pod contains the hazard switch and, on vehicles so equipped, the headlamp leveling switch. The switch pod is located just above the heater and air conditioner controls in the center stack area of the instrument panel.
- Left Multi-Function Switch - The left (lighting) multi-function switch is located on the steering column, just below the steering wheel. A control stalk that extends from the left side of the switch is used to select the turn signal lamps (right or left) and to select the headlamp beam (low, high or optical horn). A control knob on the control stalk is used to select the park lamps, headlamps or fog lamps.
- Park Brake Switch - A park brake switch is located on the park brake mechanism. On vehicles with a manual transmission, a park brake hand lever mechanism is located on the side of the floor panel transmission tunnel between the two front seats. On vehicles with an automatic transmission, a park brake foot lever mechanism is located on the driver side cowl side inner panel below the instrument panel.
- Steering Control Module - The Steering Control Module (SCM) is located within the left multi-function switch housing on the top of the steering column, just below the steering wheel.
- Stop Lamp Inhibit Relay - A stop lamp inhibit relay (also known as a brake lamp relay, brake lamp activation relay or trailer tow damping relay) is located in a connector on the left rear quarter inner panel just forward of the shock tower within the passenger compartment.
- Totally Integrated Power Module - The Totally Integrated Power Module (TIPM) is located in the engine compartment, near the battery.
- Trailer Tow Wiring - Vehicles equipped with an optional Trailer Tow Prep package include a wire harness, four relays, a conventional 4-way light duty trailer tow connector and an installation instruction sheet shipped loose in the glove box from the factory for installation by the vehicle owner or the dealer.
Hard wired circuitry connects the exterior lighting system components to the electrical system of the vehicle.
These hard wired circuits are integral to several wire harnesses, which are routed throughout the vehicle and retained by many different methods. These circuits may be connected to each other, to the vehicle electrical system and to the exterior lighting components through the use of a combination of soldered splices, splice block connectors and many different types of wire harness terminal connectors and insulators. The wiring information includes wiring diagrams, proper wire and connector repair procedures, further details on wire harness routing and retention, as well as pin-out and location views for the various wire harness connectors, splices and grounds.

 Operation
Following are paragraphs that briefly describe the operation of each of the
major exterior lighting systems. The
lamps and the hard wired circuits between components related to the exterior
light ...
See also:
Description
Fig. 1: Muffler/Exhaust Pipe Assembly - Single Tail Pipe
- INSULATOR
- MUFFLER/EXHAUST PIPE ASSEMBLY
- BAND CLAMP
The exhaust system on the 2.4L and 2.7L engine models consists of a front ...
Removal
1. Release the parking brake.
2. Manually release the parking brake cable tension.
3. Raise and support the vehicle.
Fig. 206: TIRE AND WHEEL MOUNTING
4. Remove wheel mounting nuts (3), t ...
Installation
CLUTCH - FIXED DISPLACEMENT A/C COMPRESSOR
NOTE: Typical A/C compressor and clutch assembly shown in
illustrations.
Fig. 214: Clutch Coil & Snap Ring
1. Align the dowel pin on the bac ...
