Dodge Journey: Removal, Installation
REMOVAL
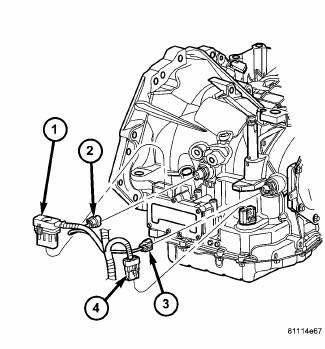
Fig. 298: Identifying Transmission Connectors
- - SOLENOID PACK CONNECTOR
- - INPUT SPEED SENSOR CONNECTOR
- - OUTPUT SPEED SENSOR CONNECTOR
- - TRANSMISSION RANGE SENSOR CONNECTOR
NOTE: If solenoid/pressure switch assembly is being replaced, the "Quick-Learn" procedure must be performed.
1. Disconnect battery negative cable.
2. Remove air cleaner assembly.
3. Disconnect solenoid/pressure switch assembly connector (1) .
4. Disconnect input speed sensor connector (2).

Fig. 299: Removing/Installing Input Speed Sensor
- - INPUT SPEED SENSOR
5. Remove input speed sensor (1) .
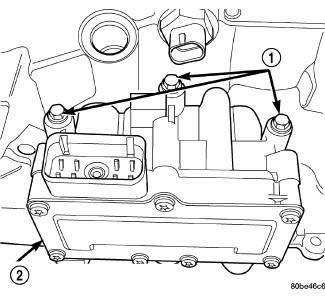
Fig. 300: Removing/Installing Solenoid/Pressure Switch Assembly-To-Transaxle
Case Bolts
- - BOLTS
- - SOLENOID AND PRESSURE SWITCH ASSEMBLY
6. Remove three solenoid/pressure switch assembly-to-transaxle case bolts (1) .

Fig. 301: Removing/Installing Solenoid/Pressure Switch Assembly & Gasket
- - SOLENOID/PRESSURE SWITCH ASSEMBLY
- - GASKET
7. Remove solenoid/pressure switch assembly (1) and gasket (2). Use care to prevent gasket material and foreign objects from become lodged in the transaxle case ports.
INSTALLATION
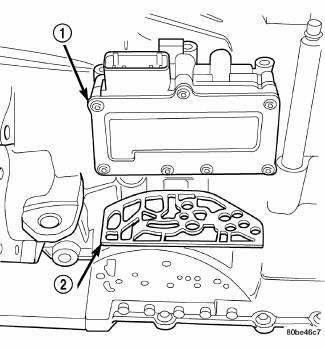
Fig. 302: Removing/Installing Solenoid/Pressure Switch Assembly & Gasket
- - SOLENOID/PRESSURE SWITCH ASSEMBLY
- - GASKET
NOTE: If solenoid/pressure switch assembly is being replaced, it is necessary to perform the "Quick-Learn" procedure.
1. Install solenoid/pressure switch assembly and new gasket to transaxle .

Fig. 303: Removing/Installing Solenoid/Pressure Switch Assembly-To-Transaxle
Case Bolts
- - BOLTS
- - SOLENOID AND PRESSURE SWITCH ASSEMBLY
2. Install and torque three bolts (1) to 12 N.m (105 in. lbs.).
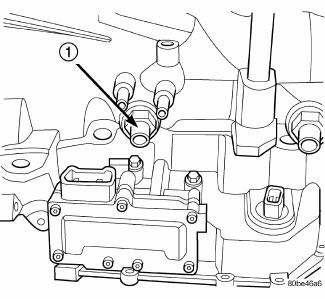
Fig. 304: Removing/Installing Input Speed Sensor
- - INPUT SPEED SENSOR
3. Install input speed sensor (1) and torque to 27 N.m (20 ft. lbs.).

Fig. 305: Identifying Transmission Connectors
- - SOLENOID PACK CONNECTOR
- - INPUT SPEED SENSOR CONNECTOR
- - OUTPUT SPEED SENSOR CONNECTOR
- - TRANSMISSION RANGE SENSOR CONNECTOR
4. Connect input speed sensor connector (2) .
5. Install solenoid/pressure switch 8-way connector and torque to 4 N.m (35 in. lbs.).
6. Install air cleaner assembly.
7. Connect battery negative cable.
8. If solenoid/pressure switch assembly was replaced, perform the "Quick-Learn" procedure.
 Description, Operation
DESCRIPTION
Fig. 297: Identifying Solenoid/Pressure Switch Assembly
- SOLENOID AND PRESSURE SWITCH ASSEMBLY
The Solenoid/Pressure Switch Assembly (1) is external to the transaxle and
mount ...
 Cable, shift
REMOVAL
Fig. 306: Identifying Knee Blocker
1. Remove the knee blocker (2).
Fig. 307: Identifying Shift Cable At Shifter
NOTE: Ensure the lock tab on the shift cable (2) is depressed before ...
See also:
Cap, radiator
Description
Fig. 58: Cooling System Pressure Cap
- OVERFLOW NIPPLE
- MAIN SPRING
- GASKET RETAINER
- STAINLESS-STEEL SWIVEL TOP
- RUBBER SEALS
- VENT VALVE
- COOLANT OUTLET CONNECTO ...
CHILL ZONE BEVERAGE COOLER STORAGE COMPARTMENT
The Chill Zone Beverage Cooler Storage Compartment
can keep chilled beverages cool depending on ambient
temperature and climate control setting. Chill Zone is
intended for nonperishable beverages o ...
Operation
Fig. 427: Identifying Torque Converter Fluid Pressure
Operation
- APPLY PRESSURE
- THE PISTON MOVES SLIGHTLY
FORWARD
- RELEASE PRESSURE
- THE PISTON MOVES SLIGHTLY
REARWARD
The co ...
