Dodge Journey: Cable, shift
REMOVAL
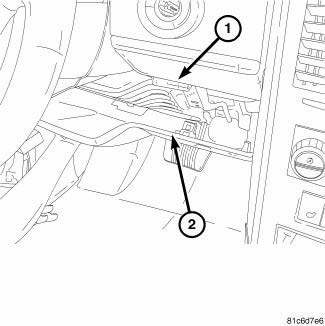
Fig. 306: Identifying Knee Blocker
1. Remove the knee blocker (2).

Fig. 307: Identifying Shift Cable At Shifter
NOTE: Ensure the lock tab on the shift cable (2) is depressed before pulling the cable from the shifter housing.
2. Remove the cable from the shifter (1, 2).
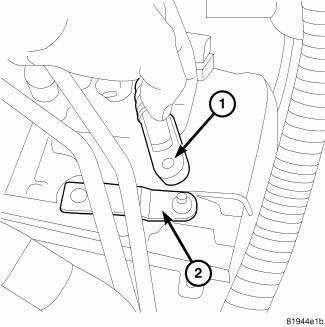
Fig. 308: Identifying Gearshift Cable & Transaxle Manual Valve Lever
3. Disconnect gearshift cable (1) from transaxle manual valve lever (2).
4. Disconnect gearshift cable from the bracket.

Fig. 309: Identifying Shift Cable At Bulkhead
5. Remove the grommet form the bulkhead 6. Pull the cable (2) through the bulkhead (1) into the passenger compartment.
INSTALLATION
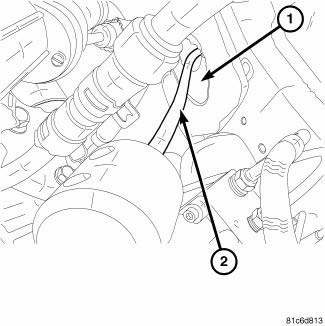
Fig. 310: Identifying Shift Cable At Bulkhead
NOTE: Ensure rubber grommet in the bulkhead is fully seated to prevent water leaking into the passenger compartment.
1. Install the shift cable (2) through the bulkhead (1) from the passenger compartment.
2. Seat rubber grommet in the bulkhead.

Fig. 311: Identifying Gearshift Cable & Transaxle Manual Valve Lever
3. Connect gearshift cable to the bracket.
4. Connect gearshift cable (1) to transaxle manual valve lever (2).
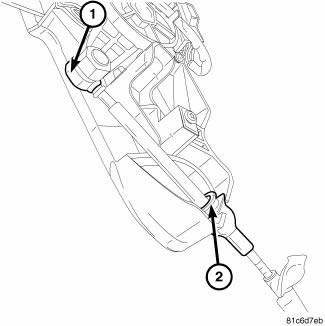
Fig. 312: Identifying Shift Cable At Shifter
NOTE: Ensure the lock tab on the shift cable (2) is seated after the cable in installed to the shifter housing.
5. Install the cable to the shifter (1, 2).
6. Install the knee blocker (2).
ADJUSTMENT
1. Park the vehicle on level ground and set the parking brake.
2. Place the gearshift lever in gated park (P) and remove ignition key.
3. Loosen the cable adjustment screw at the transaxle manual valve lever.
4. Pull the gearshift lever fully forward to the park detent position.
5. Release the park brake, then rock the vehicle to assure it is in park. Reset the park brake.
6. Tighten the cable adjustment screw to 8 N.m (70 in. lbs.). Gearshift cable should now be properly adjusted.
7. Verify adjustment by using the verification procedure.
VERIFICATION
1. Place gearshift lever in gated park (P).
2. Attempt to move vehicle by rocking back and forth on level ground. If vehicle does not move, attempt to start engine. If engine starts, the park position is correct.
3. Set parking brake.
4. Turn key to on/run and depress brake pedal. Place gearshift lever in neutral (N).
5. Attempt to start engine. If engine starts in both neutral (N) or park (P), gearshift cable is adjusted properly. No adjustment is required.
6. If engine does not start in either park (P) or neutral (N), perform adjustment procedure.
 Removal, Installation
REMOVAL
Fig. 298: Identifying Transmission Connectors
- SOLENOID PACK CONNECTOR
- INPUT SPEED SENSOR CONNECTOR
- OUTPUT SPEED SENSOR CONNECTOR
- TRANSMISSION RANGE SENSOR CONNECTOR
...
 Drive, final
...
See also:
Description, Operation
DESCRIPTION
Several combinations of radio receivers and speaker systems are offered. The
audio system uses an ignition
switched source of battery current so that the system will only operate when ...
Removal
1. Remove the engine cover.
2. Release fuel pressure.
3. Disconnect negative battery cable.
4. Drain cooling system.
5. Evacuate the A/C system using a suitable refrigerant recovery machi ...
Fuel system
FUEL SYSTEM
Fuel System Similar Conditions Window - An indicator that 'Absolute MAP
When Fuel Sys Fail' and
'RPM When Fuel Sys Failed' are all in the same range when the failure
occurred. ...
