Dodge Journey: Assembly
NOTE: If the coil spring has been removed from the spring compressor, proceed with the next step, otherwise, proceed with 3.
NOTE: To determine the flat coil end of the coil spring for the following step, attempt to stand the coil spring on-end on a flat, level surface. If the coil spring stands on end, the end on the flat surface is the flat coil end. If the coil spring falls over, the end on the flat surface is not the flat coil end. Stand the coil spring on the opposite end to verify.
1. Place the coil spring flat coil end upward (see above note) in the spring compressor following the manufacturer's instructions. Before compressing the spring, rotate the spring so the end of the bottom coil is at approximately the 9 o'clock position as viewed above (or to where the spring was when removed from the compressor). This action will allow the strut (damper) clevis bracket to be positioned outward, away from the compressor once installed.
2. Slowly compress the coil spring until enough room is available for strut assembly reassembly.
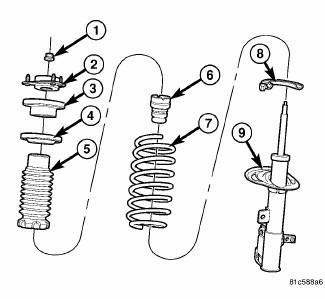
Fig. 92: Strut Assembly (Exploded)
3. Install the bearing and upper spring seat (3), and isolator (4) on top of the coil spring (7).
4. Install the upper mount (2) on top of the bearing and upper spring seat (3).
5. Install the lower spring isolator (8) on the spring seat on the strut (damper) (9).
6. Slide the jounce bumper (6) and dust shield (5) onto the strut rod.
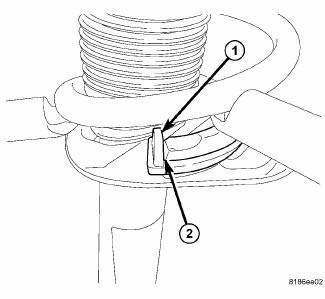
Fig. 93: Coil Spring Against Stop
7. Install the strut up through the bottom of the coil spring and upper spring seat, mount, and bearing until the lower spring seat contacts the lower end of the coil spring. Rotate the strut as necessary until the end of the bottom coil (2) comes in contact with the stop (1) built into the lower spring isolator.

Fig. 94: Strut Assembly (Exploded)
8. While holding the strut in position, install the nut (1) on the end of the strut rod.
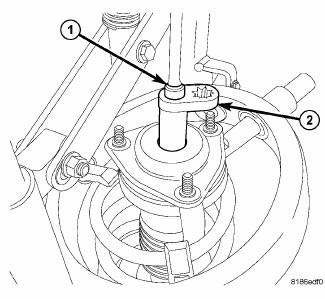
Fig. 95: Special Tools On Strut Rod Nut
CAUTION: Never use impact or high speed tools to remove the strut rod nut.
Damage to the strut internal bearings can occur.
9. Install Strut Nut Wrench (2) 9362, on the strut rod nut. Next, install a deep socket (1) on the end of the strut rod. While holding the strut rod from turning, tighten the strut rod nut to 60 N.m (44 ft. lbs.) using a torque wrench on the end of Strut Nut Wrench (2) 9362.
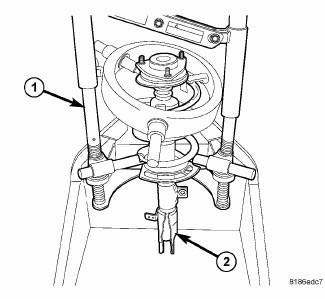
Fig. 96: Identifying Strut Assembly Positioned In Strut Coil Spring
Compressor
10. Slowly release the tension from the coil spring by backing off the compressor (1) drive completely. As the tension is relieved, make sure the upper mount and bearing align properly. Verify the upper mount does not bind when rotated.
11. Remove the strut assembly from the spring compressor.
12. Install the strut assembly on the vehicle.
 Disassembly
NOTE: The strut assembly must be removed from the vehicle for it to be
disassembled
and assembled.
For the disassembly and assembly of the strut assembly, use strut spring
compressor, tea ...
 Installation
Fig. 97: Strut Upper Mounting Nuts
1. Raise the strut assembly (2) into the strut tower, aligning the three
studs on the strut assembly upper
mount with the holes in strut tower. Install the thr ...
See also:
Uconnect™ Multimedia (SATELLITE RADIO) — IF EQUIPPED
(REN/REQ/RER/RES/REU/RBZ RADIOS ONLY)
Satellite radio uses direct satellite-to-receiver broadcasting
technology to provide clear digital sound, coast to
coast. The subscription service provider is Sirius Satellite
Radio. This service o ...
Removal, Installation
Removal
WARNING: Refer to the applicable warnings and cautions for this
system before
performing the following operation. Failure to follow the warnings and
cautions may result in po ...
Valve, oil pressure relief
Removal
Fig. 285: Oil Pressure Relief Valve
- RELIEF VALVE
- SPRING
- RETAINER CAP
1. Remove the oil pan.
2. Remove the pressure relief valve (1) by remove the threaded retaining cap ...
