Dodge Journey: Link, stabilizer bar
REMOVAL
1. Raise and support the vehicle.
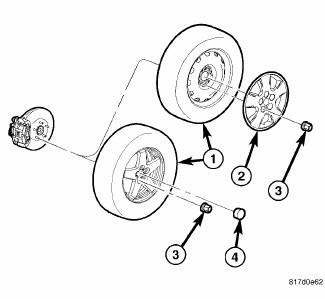
Fig. 60: TIRE AND WHEEL MOUNTING
2. Remove the wheel mounting nuts (3), then the tire and wheel assembly (1).

Fig. 61: Strut Mounting To Knuckle
3. While holding the stabilizer bar link (1) stud stationary, remove the nut (4) securing the link to the strut (3).

Fig. 62: Stabilizer Link Mounting To Bar
4. While holding the stabilizer bar link (1) lower stud stationary, remove the nut (3) securing the link to the stabilizer bar (2).
5. Remove the stabilizer bar link (1).
INSTALLATION
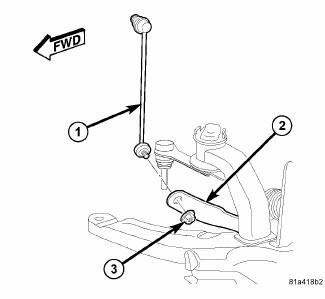
Fig. 63: Stabilizer Link Mounting To Bar
1. Attach the stabilizer bar link (1) to the stabilizer bar (2). Install and tighten the nut (3) while holding the stabilizer bar link lower stud stationary. Tighten the nut to 48 N.m (35 ft. lbs.).
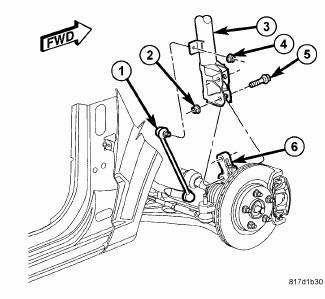
Fig. 64: Strut Mounting To Knuckle
2. Attach the stabilizer bar link (1) to the strut (3). Install and tighten the nut (4) while holding the stabilizer bar link stud stationary. Tighten the nut to 48 N.m (35 ft. lbs.).

Fig. 65: TIRE AND WHEEL MOUNTING
3. Install tire and wheel assembly (1). Install and tighten wheel mounting nuts (3) to 135 N.m (100 ft. lbs.).
4. Lower the vehicle.
 Installation
Fig. 51: Front Hub And Bearing Mounting
1. If required, install the hub and bearing (1) by sliding it into the
knuckle.
2. If installing hub and bearing, install the four bolts (2) fastening t ...

See also:
Installation
LEFT-HAND-DRIVE
Fig. 35: BOOSTER SEAL
NOTE: Before power brake booster (1) installation, be certain a NEW
dash seal (2) is
installed on the booster mounting studs.
Fig. 36: PEDAL AND ...
POWER INVERTER — IF EQUIPPED
Your vehicle may be equipped with a 115 Volt AC (150
Watt maximum) power outlet located on the back of the
center console. This outlet can power cellular phones,
electronics and other low power dev ...
Motor, headlamp leveling, export
DESCRIPTION
Fig. 37: Headlamp Leveling Motor
The headlamp leveling motor (1) is located on the rear surface of each front
lamp unit on vehicles equipped
with the headlamp leveling system, which ...
