Dodge Journey: Assembly
CAUTION: Be certain to adjust the refrigerant oil level when servicing the A/C refrigerant system. Failure to properly adjust the refrigerant oil level will prevent the A/C system from operating as designed and can cause serious A/C compressor damage.
NOTE: When replacing multiple A/C system components, refer to the REFRIGERANT OIL CAPACITIES to determine how much oil should be added to the refrigerant system. NOTE: If only the rear A/C evaporator is being replaced, add 30 milliliters (1 fluid ounce) of refrigerant oil to the refrigerant system. Use only refrigerant oil of the type recommended for the A/C compressor in the vehicle.
NOTE: Replacement of the refrigerant line O-ring seals is required anytime a refrigerant line or expansion valve is disconnected. Failure to replace the rubber O-ring seals could result in a refrigerant system leak.
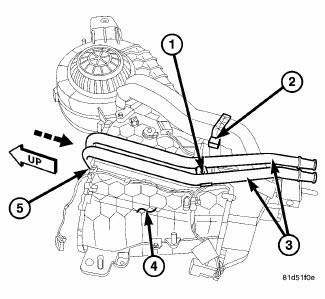
Fig. 176: Rear Heater Core Install
1. Install the rear heater core (5) into the rear heater-A/C housing (4). Make sure that the foam seals are properly installed.
2. Install the screw (1) that secures the rear heater core tubes (3) to the outboard side of the rear heater-A/C housing. Tighten the screw to 1.2 N.m (10 in. lbs.).
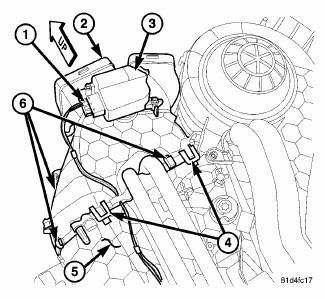
Fig. 177: Rear Distribution Housing Removal/Installation
3. If removed, install the rear mode door actuator (3) to the rear heater-A/C distribution housing (2).
4. Position the rear heater-A/C distribution housing to the rear heater-A/C housing (5) and engage the five plastic retaining tabs (4). Make sure the retaining tabs are fully engaged.
5. Install the three metal retaining clips (6) that secure the rear distribution housing to the rear heater-A/C housing.
6. Position the rear heater-A/C wire harness (1) to the rear heater-A/C distribution housing and connect it to the rear mode door actuator (3).
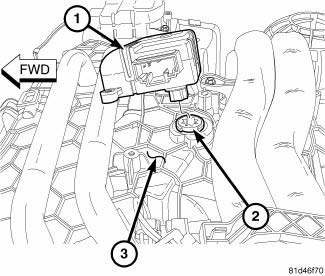
Fig. 178: Rear Blend Door Actuator Align
7. Position the rear blend door actuator (1) onto the rear heater-A/C housing (3). If necessary, rotate the actuator slightly to align the splines on the actuator output shaft with those on the rear blend-air door pivot shaft (2).
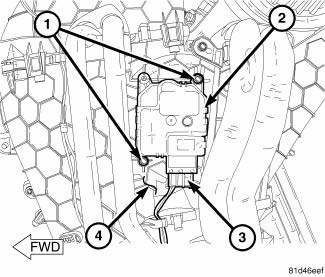
Fig. 179: Rear Blend Door Actuator Removal/Installation
8. Install the two screws (1) that secure the rear blend door actuator (2) to the rear heater-A/C housing (4).
Tighten the screws to 1.2 N.m (10 in. lbs.).
9. Connect the wire harness connector (3) to the rear blend door actuator.
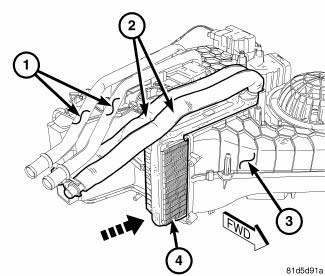
Fig. 180: Rear Evaporator Install
10. Install the rear A/C evaporator (4) into the rear heater-A/C housing (3). Guide the evaporator tubes (2) past the rear heater core tubes (1). Make sure that the foam seals are properly installed on the evaporator.
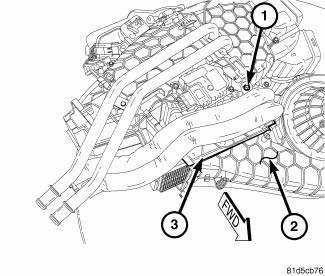
Fig. 181: Rear Evaporator Cover Removal/Installation
11. Install the evaporator cover (3) onto the outboard side of the rear heater-A/C housing (2) and install the retaining screw (1). Tighten the screw to 1.2 N.m (10 in. lbs.).
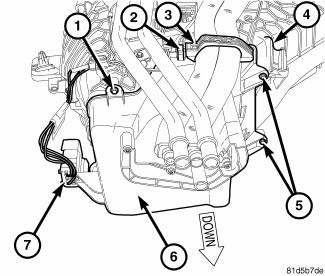
Fig. 182: Lower Rear Housing Removal/Installation
12. Install the lower rear heater-A/C housing (6) onto the rear heater-A/C housing (4). Rotate and tilt the lower housing as necessary for installation.
13. Install the five screws (1 and 5) that secure the lower housing to the rear heater-A/C housing. Tighten the screws to 1.2 N.m (10 in. lbs.).
14. Install the metal retaining clip (2) that secures the lower housing to the rear heater-A/C housing.
15. Close the evaporator tube retaining bracket (3). Make sure the bracket retainers are fully engaged.
16. Install the wire harness connector (7) onto the lower rear heater-A/C housing.
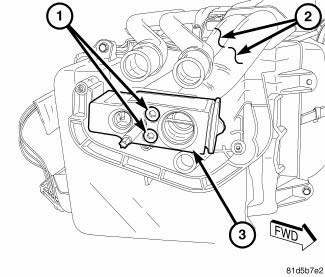
Fig. 183: Rear Expansion Valve Removal/Installation Bench
17. Remove the tape or plugs from the rear evaporator tubes and expansion valve ports.
18. Lubricate new rubber O-ring seals with clean refrigerant oil and install them onto the rear evaporator tube fittings. Use only the specified O-rings as they are made of a special material for the R-134a system. Use only refrigerant oil of the type recommended for the A/C compressor in the vehicle.
19. Install the rear A/C expansion valve (3) onto the tapping plate located on the end of the rear evaporator tubes (2) 20. Install two bolts (1) that secure the rear A/C expansion valve to the taping plate. Tighten the bolts to 11 N.m (97 in. lbs.).
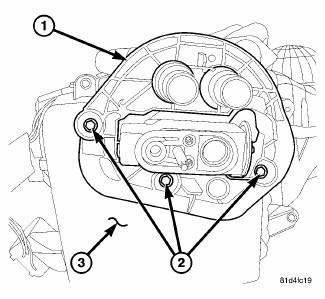
Fig. 184: Rear Housing Flange
21. Position the flange (1) to the bottom of the rear heater-A/C housing (3) and install the three retaining screws (2). Tighten the screws to 1.2 N.m (10 in. lbs.).
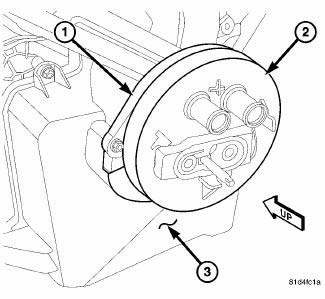
Fig. 185: Rear Housing Flange Seal
22. Install the foam seal (2) onto the flange (1) at the bottom of the rear heater-A/C housing (3). Make sure that the foam seal is properly installed.
23. Install the rear blower motor.
24. Install the rear blower motor resistor or power module (depending on application).
25. Install the rear heater-A/C housing.
26. Reconnect the negative battery cable.
27. If the rear heater core is being replaced, flush the cooling system.
28. If the rear A/C evaporator is being replaced, add 30 milliliters (1 fluid ounce) of refrigerant oil to the refrigerant system. When replacing multiple A/C system components, refer to the REFRIGERANT OIL CAPACITIES to determine how much oil should be added to the refrigerant system. Use only refrigerant oil of the type recommended for the A/C compressor in the vehicle.
 Disassembly
NOTE: The rear heater-A/C housing must be removed from the vehicle for
service of
the mode door actuator and blend door actuator and it must be disassembled
for service of the A/C evaporator ...
 Installation
Fig. 186: Rear Heater AC Housing Removal/Installation
NOTE: MTC rear heater-A/C system shown. ATC system similar.
1. Position the rear heater-A/C housing (1) into the vehicle and align the
...
See also:
Frame
SPECIFICATIONS
FRAME DIMENSIONS
Frame dimensions are listed in metric scale. All dimensions are from center
to center of Principal Locating
Point (PLP), or from center to center of PLP and fasten ...
FUEL REQUIREMENTS
2.4L Engine
All engines are designed to meet all emissions
regulations and provide excellent
fuel economy and performance when using
high-quality unleaded “regular” gasoline
having an octan ...
Installation
Fig. 40: Seal Protector
- HALFSHAFT
- SEAL PROTECTOR
1. Install halfshaft to hub/bearing assembly. Install hub nut and washer but
do not tighten at this time.
2. Using Seal Protector 9 ...
