Dodge Journey: Converter, catalytic
DESCRIPTION
WARNING: The normal operating temperature of the exhaust system is very high.
Therefore, never work around or attempt to service any part of the exhaust system until it is cooled. Special care should be taken when working near the catalytic converter. The temperature of the converter rises to a high level after a short period of engine operation time.
CAUTION: DO NOT remove spark plug wires from plugs or by any other means short out cylinders. Failure of the catalytic converter can occur due to a temperature increase caused by unburned fuel passing through the converter.
The stainless steel catalytic converter body is designed to last the life of the vehicle. Excessive heat can result in bulging or other distortion, but excessive heat will not be the fault of the converter. If unburned fuel enters the converter, overheating may occur. If a converter is heat-damaged, correct the cause of the damage at the same time the converter is replaced. Also, inspect all other components of the exhaust system for heat damage.
Unleaded gasoline must be used to avoid contaminating the catalyst core.
REMOVAL
2.4L
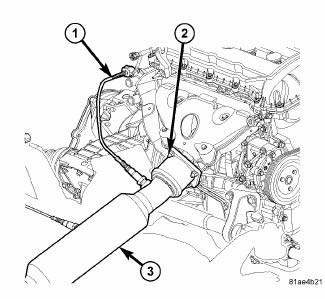
Fig. 6: Catalytic Converter - 2.4L
- - OXYGEN SENSOR ELECTRICAL CONNECTOR
- - FLANGE NUTS
- - CATALYTIC CONVERTER - 2.0/2.4L
WARNING: The normal operating temperature of the exhaust system is very high.
Therefore, never work around or attempt to service any part of the exhaust system until it is cooled. Special care should be taken when working near the catalytic converter. The temperature of the converter rises to a high level after a short period of engine operating time.
NOTE: When replacement is required on any component of the exhaust system, you must use original equipment parts (or their equivalent).
1. Raise and support vehicle.
2. Apply penetrating oil to band clamp nut and bolt.
3. Disconnect oxygen sensor connector (1).
4. Remove oxygen sensor.
5. Loosen resonator and muffler assembly to catalytic converter band clamp.
6. Pull muffler and resonator assembly rearward to remove from catalytic converter.
7. Remove flange nuts (2) at exhaust manifold.
8. Remove catalytic converter from vehicle (3).
9. Remove and discard gasket.
FRONT - 2.7L
For removal of the front catalytic converter.
REAR - 2.7L
For removal of the rear catalytic converter.
3.5L
For removal of the catalytic converter.
INSPECTION
WARNING: The normal operating temperature of the exhaust system is very high.
Therefore, never attempt to service any part of the exhaust system until it is cooled. Special care should be taken when working near the catalytic converter. The temperature of the converter rises to a high level after a short period of engine operation time.
Check catalytic converter for a flow restriction. Visually inspect the catalytic converter element by using a borescope or equivalent. Remove oxygen sensor(s) and insert borescope. If borescope is not available, remove converter and inspect element using a flashlight.
Inspect element for cracked or melted substrate.
NOTE: Before replacing a catalytic converter, determine the root cause of failure. Most catalytic converter failures are caused by air, fuel or ignition problems. (Refer to appropriate Diagnostic Service Information) for test procedures.
INSTALLATION
2.4L

Fig. 7: Catalytic Converter - 2.4L
- - OXYGEN SENSOR ELECTRICAL CONNECTOR
- - FLANGE NUTS
- - CATALYTIC CONVERTER - 2.0/2.4L
NOTE: Always work from the front to rear of exhaust system when aligning and tightening exhaust system components.
1. Clean manifold to converter sealing surfaces.
2. Using a new gasket, position catalytic converter to exhaust manifold.
3. Install catalytic converter mounting bolts (2). Tighten to 28 N.m (250 in. lbs.).
4. Position a new band clamp onto the resonator and muffler assembly.
5. Install resonator and muffler assembly onto catalytic converter.
6. Align exhaust system to maintain position and proper clearance with underbody parts. All support isolators should have equal load on them.
7. Tighten resonator and muffler assembly band clamp to 54 N.m (40 ft. lbs.).
8. Lower vehicle.
9. Start the engine and inspect for exhaust leaks. Repair exhaust leaks as necessary.
10. Check the exhaust system for contact with the body panels. Make the necessary adjustments, if needed.
FRONT - 2.7L
For installation of the front catalytic converter.
REAR - 2.7L
For installation of the rear catalytic converter.
3.5L
For installation of the catalytic converter.
 Inspection, adjustments
INSPECTION
Inspect the exhaust pipes, catalytic converters, muffler, and resonators for
cracked joints, broken welds and
corrosion damage that would result in a leaking exhaust system. Inspect the ...

See also:
POWER SUNROOF — IF EQUIPPED
The power sunroof switch is located between the sun
visors on the overhead console.
Power sunroof Switch
WARNING:
• Never leave children in a vehicle with the key in
the ignition switch. Occu ...
Insulator, engine mount, right
Removal
Fig. 243: Belly Pan
1. Remove the belly pan (2).
Fig. 244: Right Engine Mount
2. Lower vehicle. Remove the load on the engine motor mounts by carefully
supporting the engine assembly ...
Belt, serpentine, power steering
Removal
2.7L ENGINE
Fig. 28: STRETCH TO FIT POWER STEERING BELT REMOVAL
- POWER STEERING PULLEY
- STRETCH TO FIT POWER STEERING BELT
1. Raise and support the vehicle.
2. Remove RH whee ...
