Dodge Journey: Insulator, engine mount, right
Removal

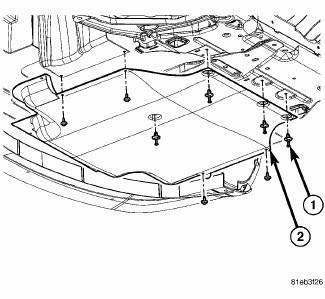
Fig. 243: Belly Pan
1. Remove the belly pan (2).

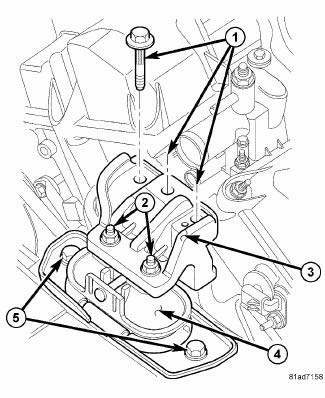
Fig. 244: Right Engine Mount
2. Lower vehicle. Remove the load on the engine motor mounts by carefully supporting the engine assembly from below.
3. Remove coolant recovery container.
4. Disconnect the ground strap.
5. Remove the right engine support bracket vertical fasteners (1) and (2) and remove support bracket (3).
6. Remove the bolts (5) attaching the right isolator (4) to the frame rail.
7. Remove right isolator (4).
Installation

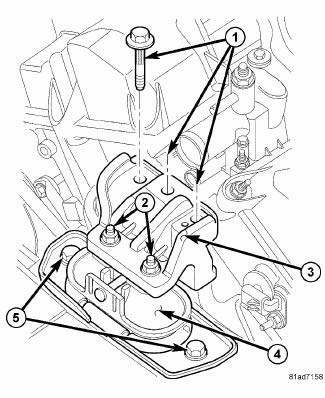
Fig. 245: Right Engine Mount
1. Position right isolator (4) and install the isolator to frame rail bolts (5). Tighten bolts to 55 N.m (40 ft.lbs.).
2. Install the engine support bracket (3) and bolts (1). Tighten bolts to 50 N.m (37 ft. lbs).
3. Install the support bracket to isolator nuts (2) and tighten to 30 N.m (22 ft. lbs).
4. Reconnect the ground strap.

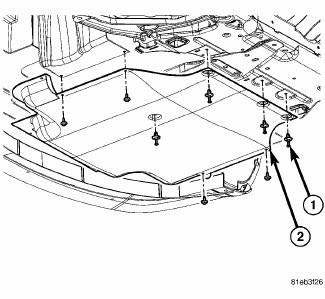
Fig. 246: Belly Pan
5. Raise vehicle on a hoist.
6. Install the belly pan (2).
7. Install coolant recovery container.
 Insulator, engine mount, rear
Removal
Fig. 234: Belly Pan
1. Remove throttle body air inlet hose and air cleaner housing assembly.
2. Raise the vehicle.
3. Remove the belly pan (2).
Fig. 235: Identifying Rear Mount B ...
 Lubrication
...
See also:
OVERHEAD CONSOLE
The overhead console contains courtesy/reading lights,
storage for sunglasses, an interior observation mirror and
an optional power sunroof switch.
Overhead Console
Courtesy/Reading Lights
Refe ...
Tube, air pump, inlet
Description
The air pump inlet tube is located on the left side of the engine
compartment. The tube attaches to the air
injection pump using a quick connect style fitting. The other end of the tub ...
Fan, cooling
Description
Fig. 67: COOLING SYSTEM - OVERVIEW
- WINDSHIELD WASHER RESERVOIR
- UPPER SUPPORT
- FAN SHROUD
- FAN MOTOR
- LOWER RADIATOR HOSE
The radiator fan module includes a support ...
