Dodge Journey: Insulator, engine mount, left
Removal

Fig. 228: Belly Pan
1. Disconnect and isolate the negative battery cable.
2. Remove throttle body air inlet hose and air cleaner housing assembly.
3. Remove the belly pan (2).
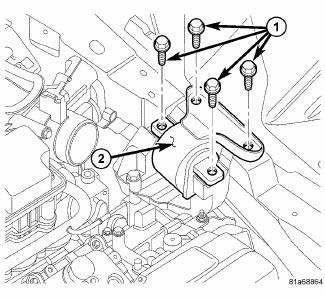
Fig. 229: Left Mount Vertical Bolts
4. Support transmission with floor jack and wooden block.
5. Remove the vertical bolts (1) from the left mount (2) to transmission bracket.
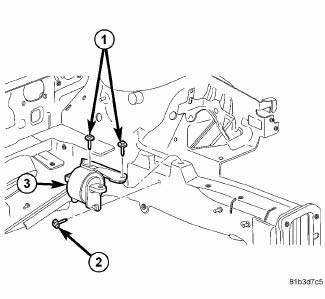
Fig. 230: Mount Isolator Bolts
6. Slightly lower transmission with floor jack to gain access to mount to frame rail fastener (2).
7. Remove mount isolator (3).
Installation

Fig. 231: Mount Isolator Bolts
1. Position mount isolator (3) in place, install bolts (1, 2) and tighten to 50 N.m (37 ft. lbs.).

Fig. 232: Identifying Left Engine Mount
2. Raise transaxle into position, install bolts (2) and tighten to 98 N.m (72 ft. lbs.).
3. Remove floor jack and wooden block.
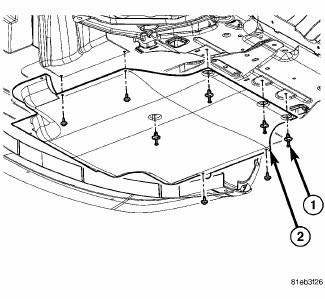
Fig. 233: Belly Pan
4. Install belly pan (2).
5. Install throttle body air inlet hose and air cleaner housing assembly.
6. Connect negative battery cable.
 Insulator, engine mount, front
Removal
1. Raise vehicle.
Fig. 222: Belly Pan
- belly pan fasteners
- belly pan
2. Remove the belly pan (2).
Fig. 223: Front Engine Mount Through Bolt
3. Remove front mount to bracket ...
 Insulator, engine mount, rear
Removal
Fig. 234: Belly Pan
1. Remove throttle body air inlet hose and air cleaner housing assembly.
2. Raise the vehicle.
3. Remove the belly pan (2).
Fig. 235: Identifying Rear Mount B ...
See also:
Installation
Fig. 67: Seal Protector
- HALFSHAFT
- SEAL PROTECTOR
1. Install driveline module to transmission jack. Secure module to jack.
2. Using Seal Protector 9099 (2), load halfshafts to differe ...
Camshaft, engine
DESCRIPTION
Fig. 108: Camshaft & Valvetrain Components
- CAMSHAFT BEARING CAP - INTAKE
- CAMSHAFT BEARING CAP - EXHAUST
- CAMSHAFT - EXHAUST
- ROCKER ARM
- HYDRAULIC LIFTER
- CYLI ...
FUEL REQUIREMENTS
2.4L Engine
All engines are designed to meet all emissions
regulations and provide excellent
fuel economy and performance when using
high-quality unleaded “regular” gasoline
having an octan ...
